
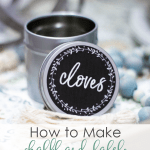
How to Make Amazing Chalkboard Labels Using Your Computer
Making adorable chalkboard font labels is easy and fun! Add your own style to spice jars, canisters, baskets, and pantry items by using this tutorial on how to make chalkboard labels using your computer!
Now that you have learned how to make chalkboard font labels using the transfer method, I thought you might like to learn another way that is easy and versatile, too!
Creating chalkboard labels brings a special touch to your home-organizing that is lovely and practical.
And, there’s a BONUS!
Not only will this tutorial show you how to make amazing chalkboard labels with your computer, but it will be easy to translate into creating any type of label for your storage solutions, whether they are boxes, baskets, plastic bins, bottles, jars… or even magnetic spice tin storage for small homes!
HOW TO MAKE CHALKBOARD LABELS USING YOUR COMPUTER
if you just really don’t want to mess with using chalk and a paint pen, then the digital method may be just right for you!
Using a software application, Avery labels, a computer and printer, AND this tutorial, you can create any kind of label you would like!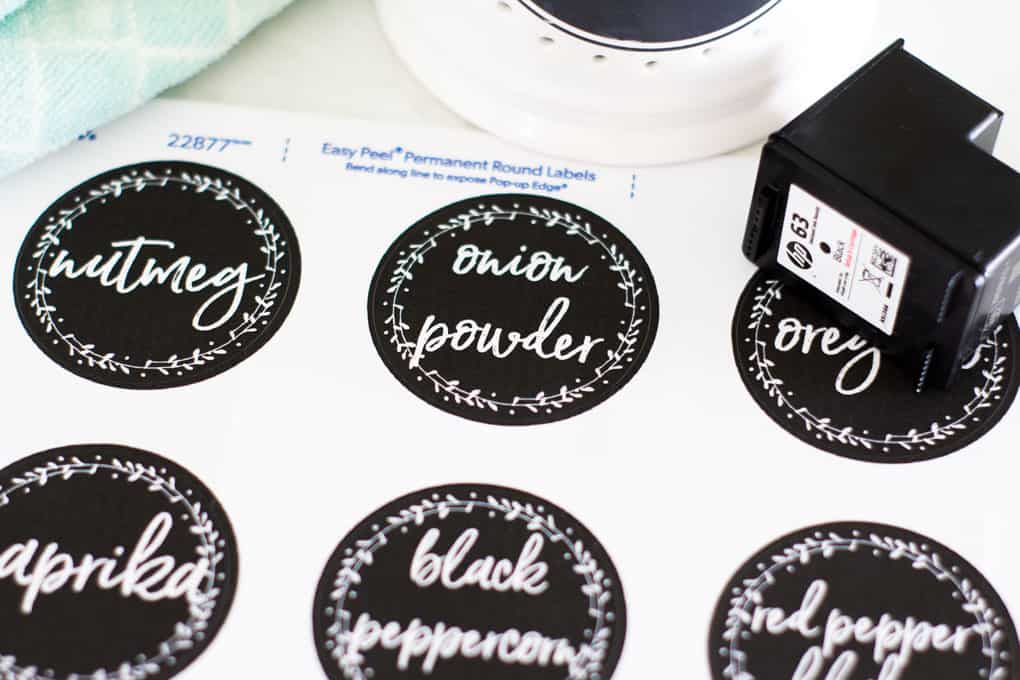
This post may contain affiliate links, at no additional cost to you.
For more information, see my complete disclosure HERE.
What You’ll Need
- Editing/design software application: Photoshop, Picmonkey.com, or Canva.com (Picmonkey is my app of choice because it is affordable, user-friendly, and can be used for SO many home projects! Canva is free, but I’m not familiar with using it, but LOTS of my friends use it!)
- Avery Labels #22877 (though a little pricey, you get a lot, they are super versatile, and they print great, which makes them affordable in the long-run!)
- Home Printer
- Adobe Reader (for this tutorial, you must have this FREE application)
- Patience. The tutorial is a bit long, with lots of step-by-step photos, but my hope is they are helpful to you!
And of course, you will need a printer! If you are looking for the best option, take a look at Best Printer for Stickers : 14 Options!
DIY Chalkboard Labels Using the Computer/Printer Method
For this tutorial, we’ll be using Windows, Picmonkey, and 2-inch labels. This will be a general tutorial, without all (some, but not all) the ins-and-outs of using the software.
- Use the Edit option to import THIS TEMPLATE into your design software. Scroll down to “more printables” to access. (By subscribing to My Wee Abode, you will get instant access to the template and all the printables and extras for VIP members of the MWA community! See more at the bottom of this post!)

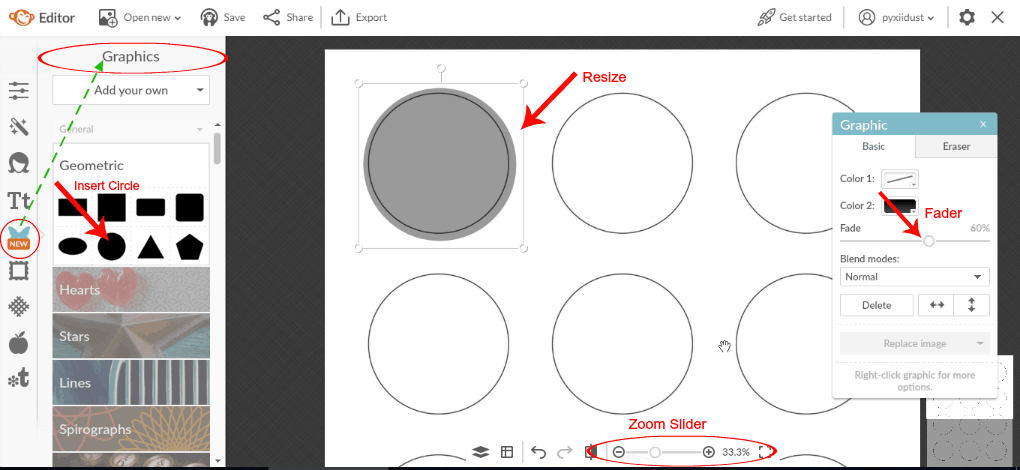
- Enlarge your template using the slider at the bottom (you can raise and lower the page using the mouse and hand tool).
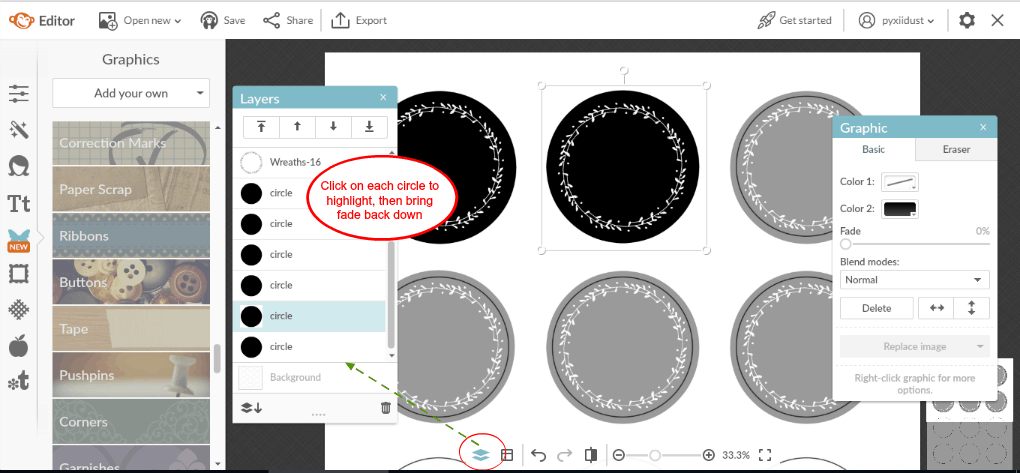
- Using the graphics option, insert the round black graphic to your template, fade out the circle, and resize to just over the edges of each circle in the template. Repeat for each circle (you can Cntrl C on your first black circle, and then Cntrl V to create the same size circle for each additional label.)
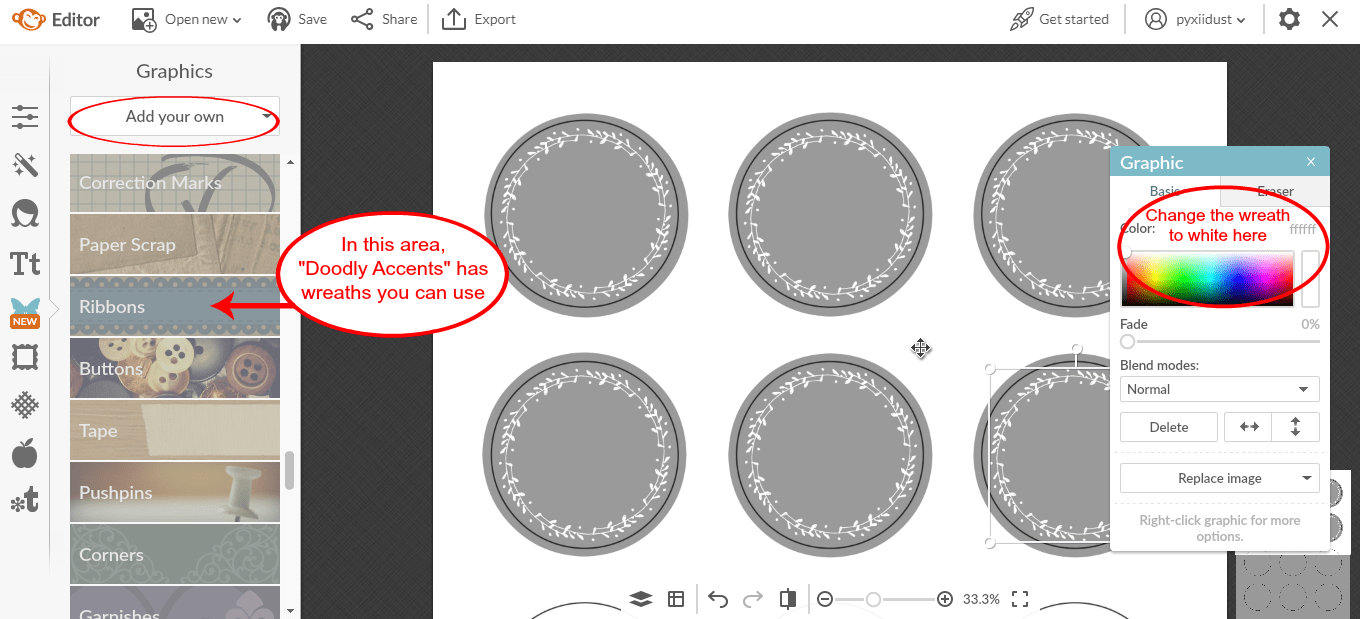
Steps 2 and 3 - Using the graphics option again, select a wreath or decoration you would like on your label and insert (you can use your own clipart on your computer, or Picmonkey’s options). Change the color to white. Again, resize for your circle, and repeat as explained above.
- At this point, go back to each black circle and darken to full black.
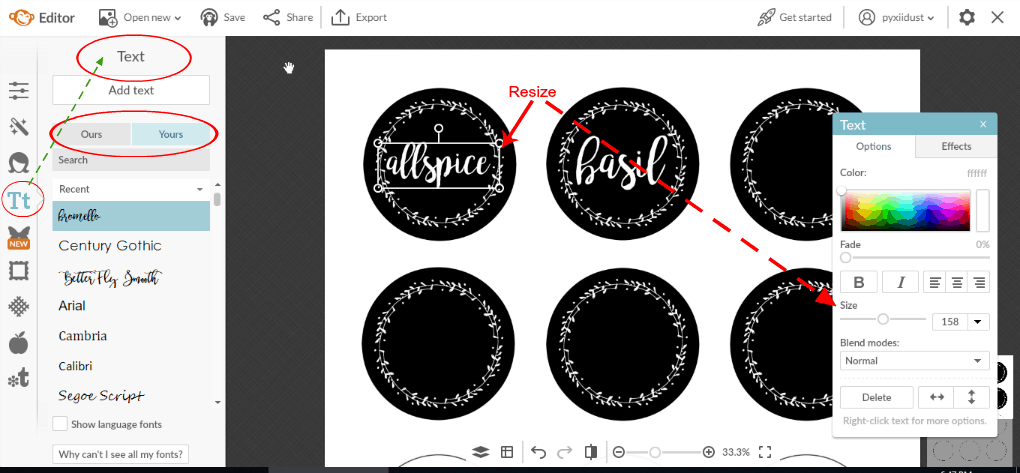
- Go to the text option and select your favorite font. Change the color to white. Type in your spice name, resize and center on circle. Repeat this for each label. (Again, you can Cntrl C on your first font square, and then Cntrl V to create the same size font for each additional label. You’ll just need to resize as needed.)
- Save the whole project to your Hub (in Picmonkey… don’t know what it’s called in Canva). This will enable you to export for printing, but come back and change the spice names for additional labels without creating the whole project again.

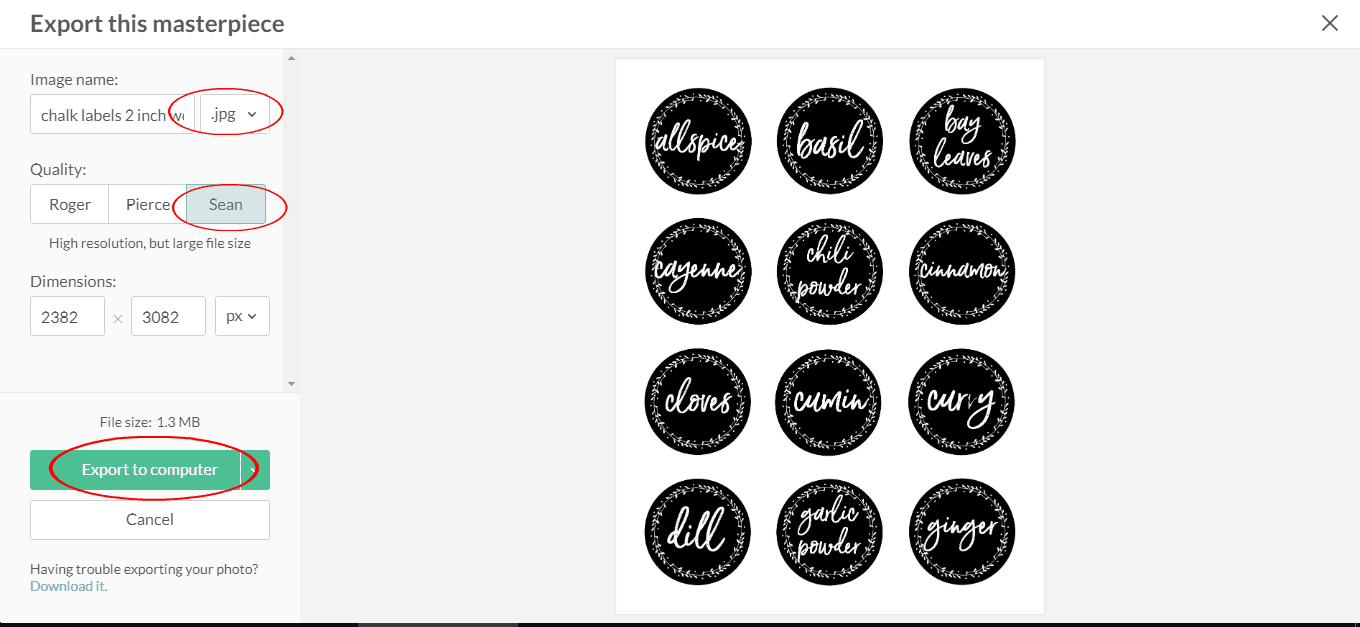
- Export the project as a high-resolution jpg (png won’t work for this project), and save to your computer.
Printing Your Chalkboard Font Labels
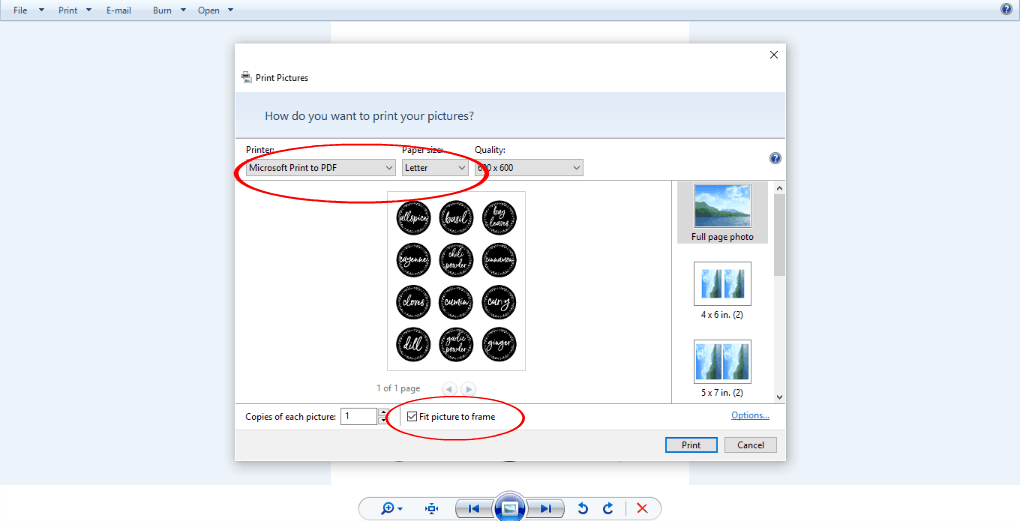
- Open the .jpg and click on “Print”. Use the drop-down box and select “Microsoft Print to Pdf”, this will save the jpg as a pdf file.
- Open the pdf in ACROBAT READER (AR) and place a plain sheet of paper in your printer.
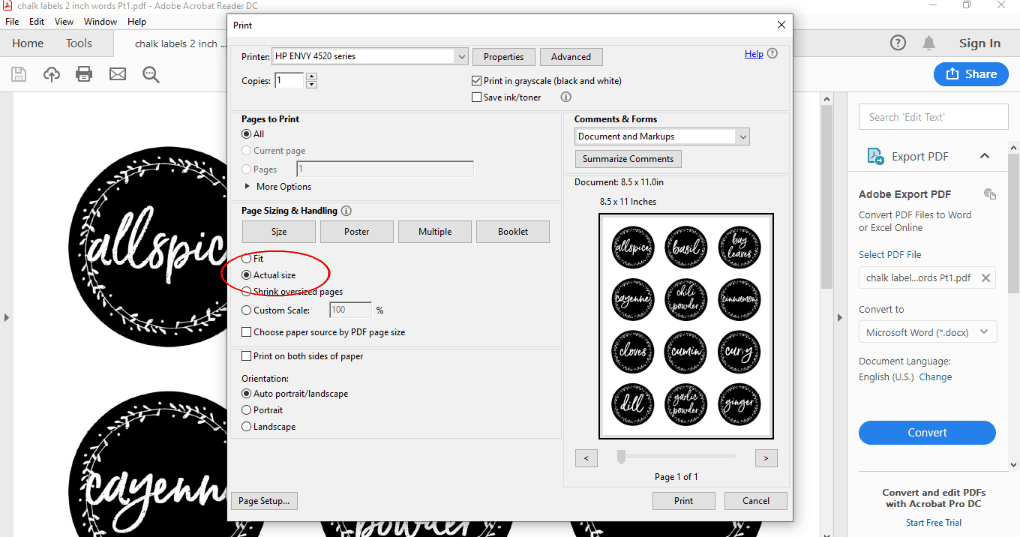
- In AR select File/Print. When the Print Dialog box opens, click on the “Properties” button, and then select Print Quality = Draft, and then OK.

- THIS IS IMPORTANT: In the Print Box that you are now in, select “Actual Size”. This will create a perfectly aligned label. Now click “Print”.
- Place the printed paper on a blank label sheet and make sure it aligns properly. I have tested this on two printers, and it has worked… it should for you, too!
- Now place a label sheet in your printer, according to the directions on the label box.
- In AR select File/Print. When the Print Dialog box opens, click on the “Properties” button, and then select Paper Type = Other Matte Paper, Print Quality = Best, and then OK. THIS IS IMPORTANT… AGAIN: In the Print Box that you are now in, select “Actual Size”. This will create a perfectly aligned label. Now click “Print”.

- Now you should have a perfectly printed chalkboard label. 🙂
Finished Product
Now here are a few more photos of the finished product!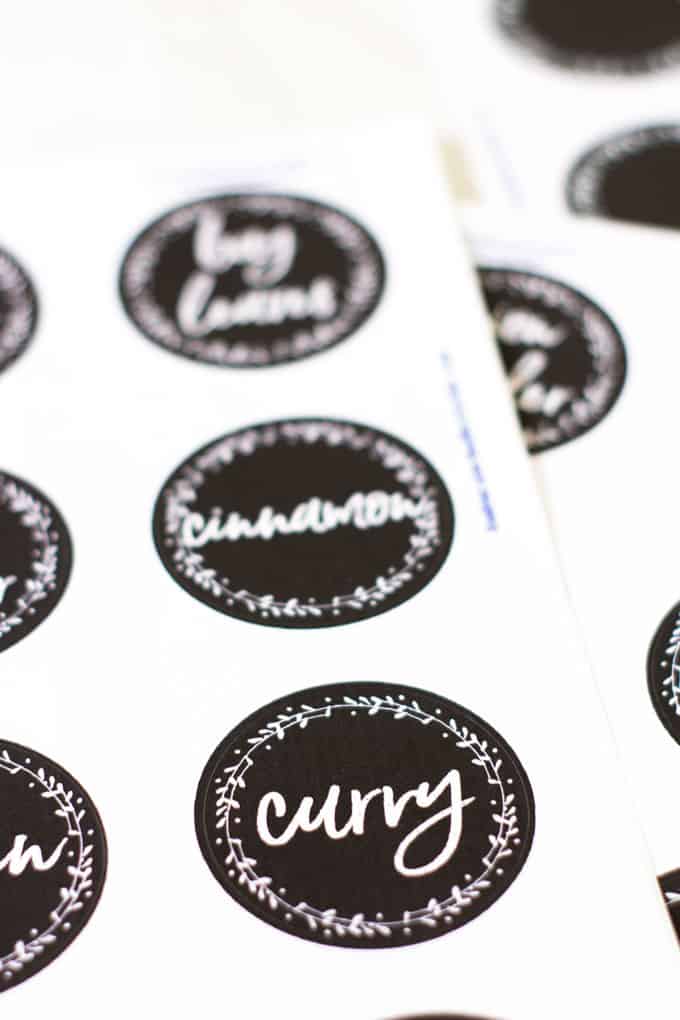
You can even make the labels without the writing, print them, and use hand-lettering or the transfer method!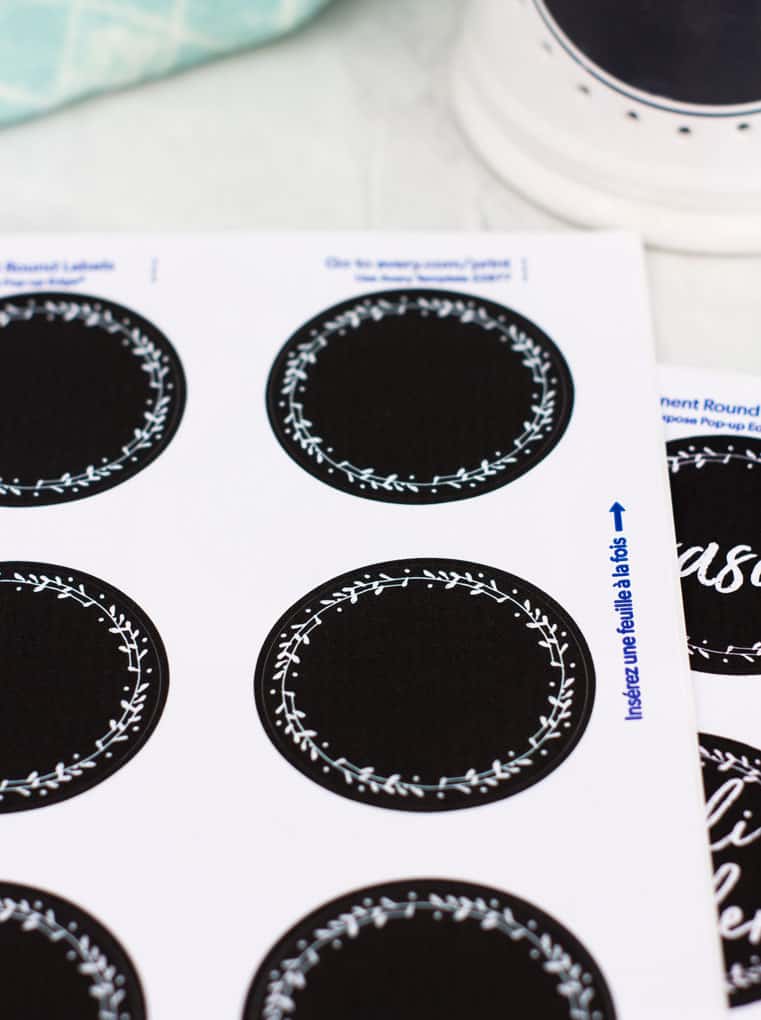
And, you can change up the font, the colors, or even use different labels shapes to create your own style of labels.
Pro Tip: Did you know that you can get free fonts and graphics every week? When you subscribe to just about any digital graphics site, you get freebies sent straight to your email! Start out with Creative Market and Design Bundles!
Pro Tip 2: There are lots of ways to get creative with making labels. If you use Procreate, here are 18 free color palettes for Procreate!
And one last look, using the label on a magnetic spice tin (including a sneak peek at what’s coming Tuesday!)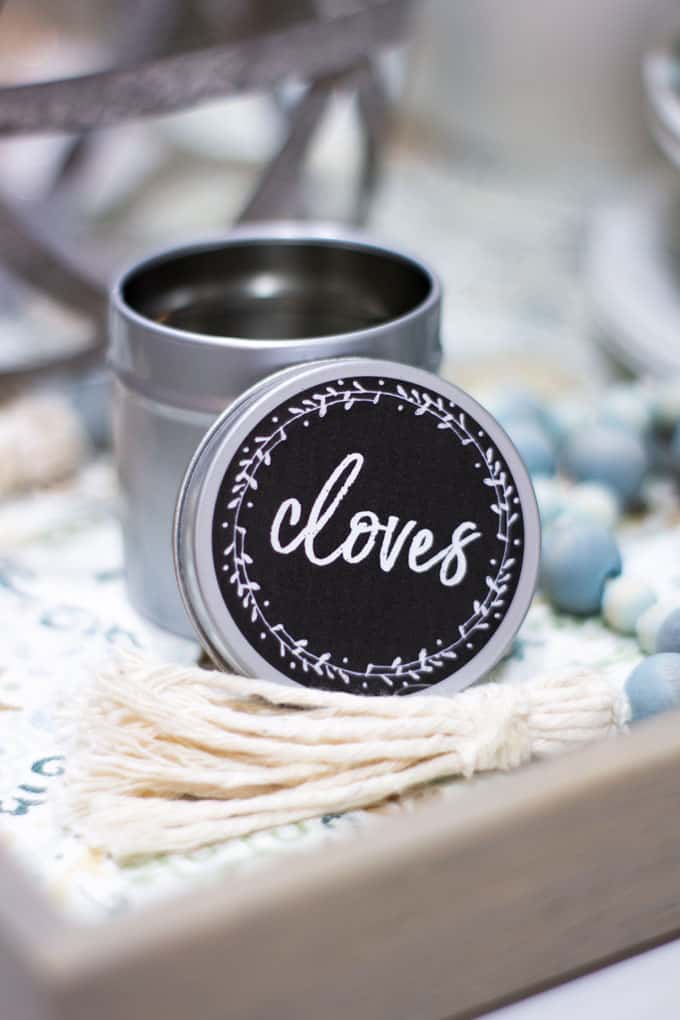
Special Bonus! Printables Library
If you just don’t want to make your own storage labels, whether it’s the transfer method or the computer method, well, I have a gift for you!
For My Wee Abode VIP community members only, we are offering 23 Basic Spice Labels already created for you! All you need are the Avery Labels #22877 labels, a printer, and the print instructions above (starting with step #2)! Oh, and of course the password to the Printables Resource Library located at the bottom of your newsletter!
Just click on the “Free Printables” tab at the top of this page.
Oh, and if you haven’t yet subscribed to My Wee Abode, what’s holding you back? To get instant access to the 23 Basic Spice Labels, simply click on the button below and fill out the form. You will immediately receive an email containing the password to download the chalkboard font labels, along with ALL the MWA printables! You’ll also receive new post notifications, newsletters, and tips and tricks for living small sent right to your inbox! To see all that’s available in the exclusive My Wee Abode library, click the button.
Now It’s Your Turn!
So, how would YOU use these DIY chalkboard font labels? Remember, you can use any font (either on your computer or use some new ones in the Picmonkey app)! So easy! Did you have fun learning how to make amazing chalkboard labels using your computer?


Very cute idea, adds a nice touch to plain top.
Cindy
Thanks, Cindy! They were a ‘bear’ to figure out, but I’m glad they are done!
Have you tried using the Avery free app?
I have… The last time I used it, I found it to be clunky and not very intuitive. I’ll have to look again!
I love these, but alas, even with your wonderful directions I fear I am not up to it.. but I love to imagine you using them!! Hae a blkessed upcoming weekend!
Oh, I bet you could do it! 😉 But, I’m not gonna lie… it was a bit daunting for me, too! Thanks for your sweet words, Schotzy!
Oh, I just love these… so clean and would go great in my farmhouse style kitchen, too! 🙂
Carrie
curlycraftymom.com
Thanks, Carrie! I’m glad to project is done, but even happier to be able to share it with everyone so they don’t have to go through the obstacles! 😉
JULIE, These are GORGEOUS! I’m going to switch out my tiny ball jars for these pretty tins with “handwritten” labels. You work so hard at your business and art and I am so so proud of you, my friend!
Thank you, Yvonne… your encouragement and support is a gift from God, my friend… Truly!
Great tutorial I may try it for Christmas ornaments. Pinning
Ohhh, that a great idea, Leanna! <3 Thanks for the kind words!
These look great, Julie! The tutorial is excellent, too!
Thanks for hosting the party, Bev!
Julie,
These are so cute! Love the wreath and font. Thanks for sharing your excellent tutorial.
Judith
Thanks, Judith! It was a fun project… difficult to figure out, but fun!
These are SO pretty, Julie! When my printer is speaking to me again, I may try it! I have a love/hate relationship with my printer!
Oh, I totally get you, Janet. This printer I have now gave me a run for my money in the beginning. It’s behaving quite well as of late (though the ink ran out during this project, and postponed it for two days!) 😉
I love these Julie!! Thank you for sharing at #ThursdayFavoriteThings. Pinned and shared. Have a lovely week. I hope to see you at next week’s party too!
Thank you… You are always kind, Marilyn!
Julie, you are GREAT at writing tutorials! I’ve wondered if I could master using labels in my printer. . . I’m really dumb about that kind of thing. . . but you make it look totally doable. Your labels look wonderful!
Thanks so much for joining the Grace at Home party at Imparting Grace. I’m featuring you this week!
Thank you so much, Richella. You feature made my day! Looking forward to seeing you blog more. 😉
Thank you for sharing at #ThursdayFavoriteThings. Pinned and shared. Have a lovely week. I hope to see you at next week’s party too!
Thank YOU, Marilyn!