How To Make a Patriotic Wood Bead Garland With Stars
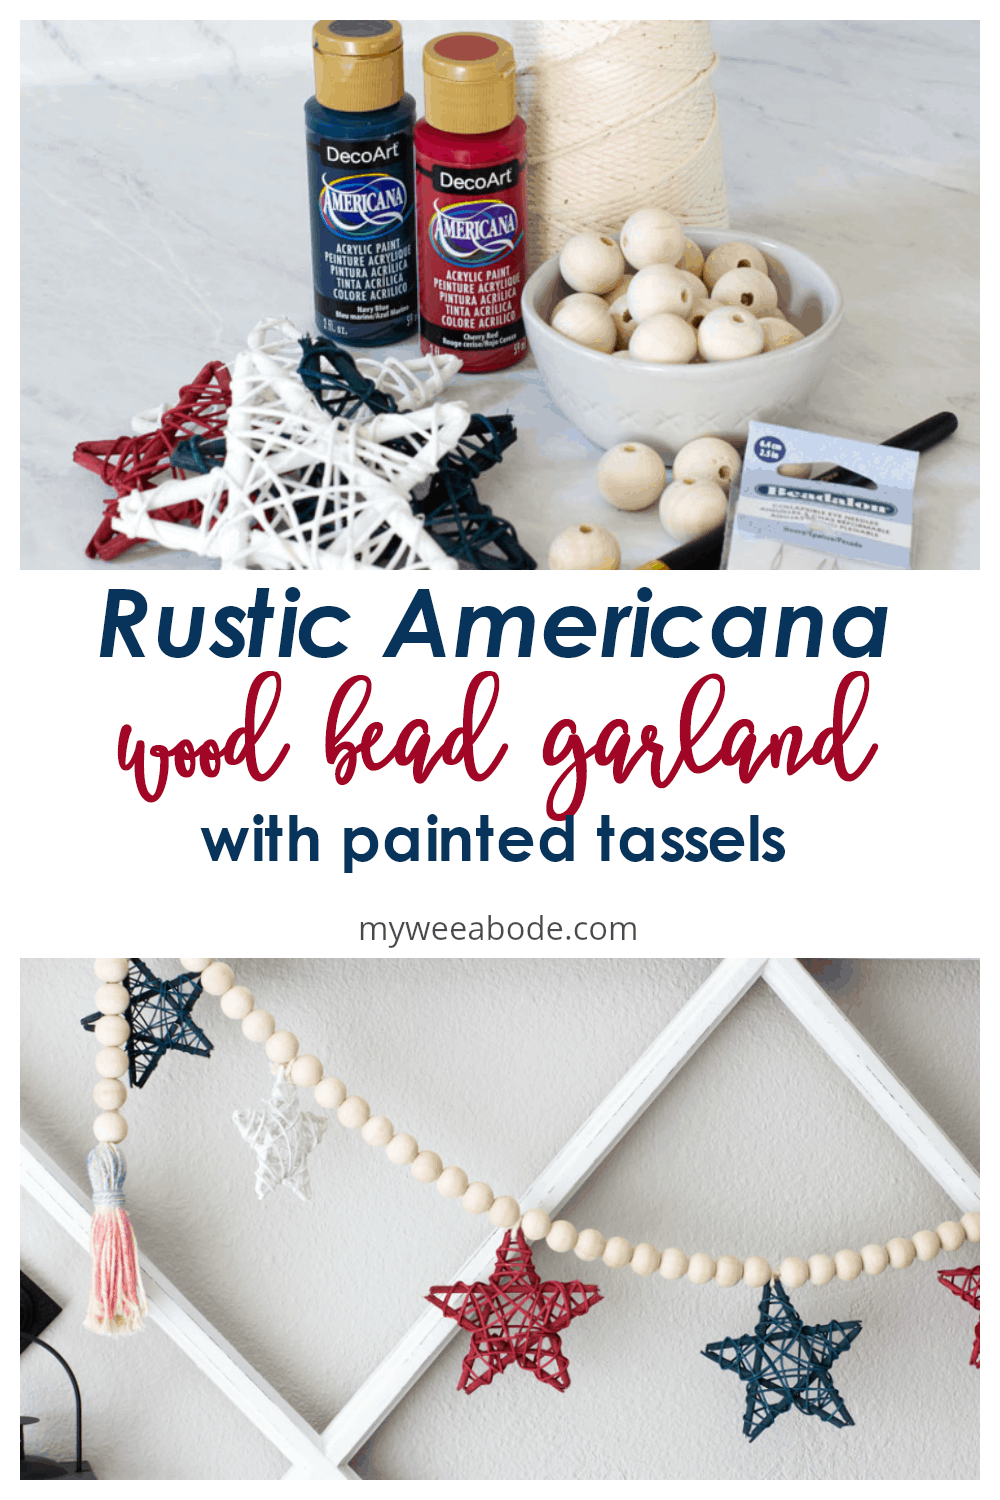
Summer is on its way, along with plenty of patriotic holidays! Today let’s learn how to create a DIY wood bead garland with stars.
DIY WOOD BEAD GARLAND WITH STARS
Yesterday, I was called ‘un-American’.
Yep… UN-American.
Take a wild guess why.
Go on, just take a guess.
Well, before I tell you why, let me ask you a question.
Do you like decorating with red, white, and blue?
I don’t mean red and white… or white and blue. I mean the combination of red, white, and blue.
You do? Well then, YOU may just call me “un-American”, too! 😉
(Don’t worry, my sweet friend was joking with me. But, I knew it was coming!)

Why Some May Think I am Un-American
I don’t know what it is, but I have NEVER decorated in the ‘colors of our country’. Red-white-and-blue, as a palette trio, just do nothing for me. And, I have never decorated my home for the 4th of July. Not the inside, nor the outside.
Until this past weekend.
This past weekend, I had to prepare for an upcoming Pinterest-challenge blog hop (if you don’t know what that is, come back on Tuesday morning and find out 😉 ). And guess what the challenge involved?
You got it! The grand old colors of the USA. (I knew you would guess right!)
So this American girl decided the best way to beat them was to join them… in an understated way. And, since my first coastal wood bead garland seemed to go over so well (according to Pinterest), I figured another string of wooden beads with a little Independence-Day-color-scheme might just be the ticket!
You can see how I have used red in this Tiny Kitchen Tour.
How To Make a Wooden Bead Garland with Grapevine Stars
Fair warning… I’m being quite detailed in the steps here, so you get a good picture (actually, you get over 20 pictures!) of what to do. I hope you appreciate detailed tutorials as much as I do. (Tell me, do you?)
So hang tight, and stick through to the end, because it really does only take about thirty minutes to make this 4th of July chunky garland. (Oh, and since this is Memorial Day Weekend, what a fun project this would be to make today, right?)
But wait… there’s more! We’re also going to see how to easily make tassels in red, white, and blue! Are you ready? Great! Me, too!
This post may contain affiliate links, at no additional cost to you.
For more information, see my complete disclosure HERE.
What You Will Need
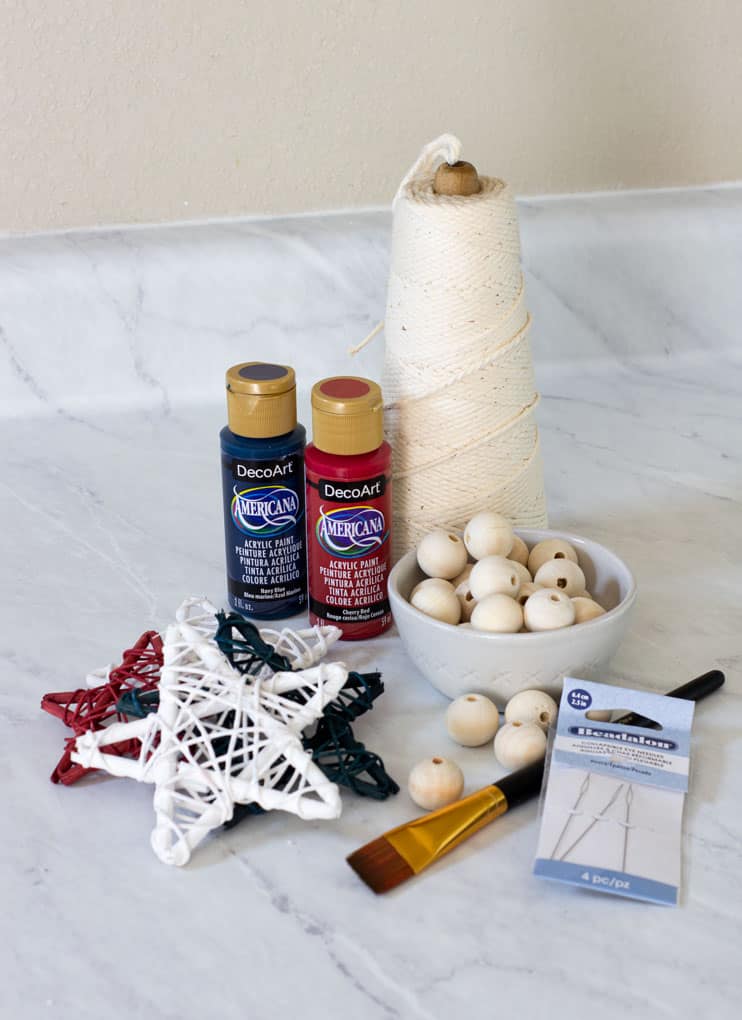
Here’s a small and affordable list of what you will need:
- Wooden Beads These are 20mm, my favorite bead size so far!
- Cotton Twine You’ll want to use cotton to get the effect on the RWB tassels.
- Beadalon Needles Seriously, these needles are worth the $4.50.! The large eye of the needle makes it easy to thread and the needle goes through just about any size of bead hole.
- Grapevine Stars (Hobby Lobby calls these ‘rattan’ stars. Remember to use the 40% off coupon!) If you can’t find them at HL, you can purchase them HERE and spray paint them.
- Red and Blue craft paint (I love DecorArt’s Americana Line. Buy them at your local craft stores. Amazon is too expensive!)
- Paint Brush(es) I’m a paintbrush snob, and these are actually amazing and cheap… seriously.
- Scissors
Prep
Actually, there is no prep! We’re just going to dig right in.
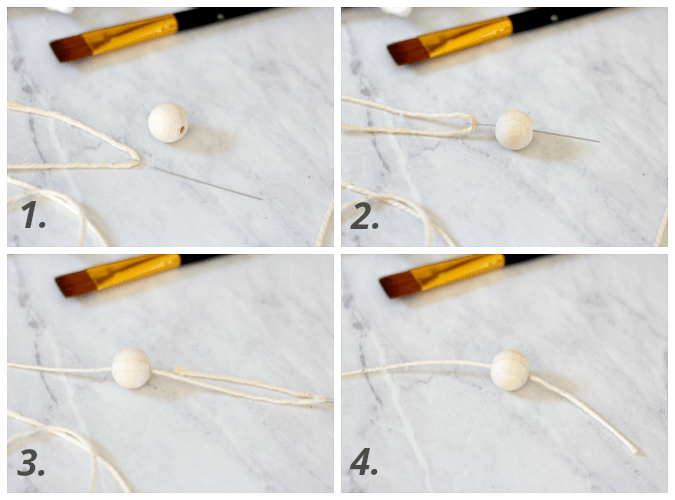
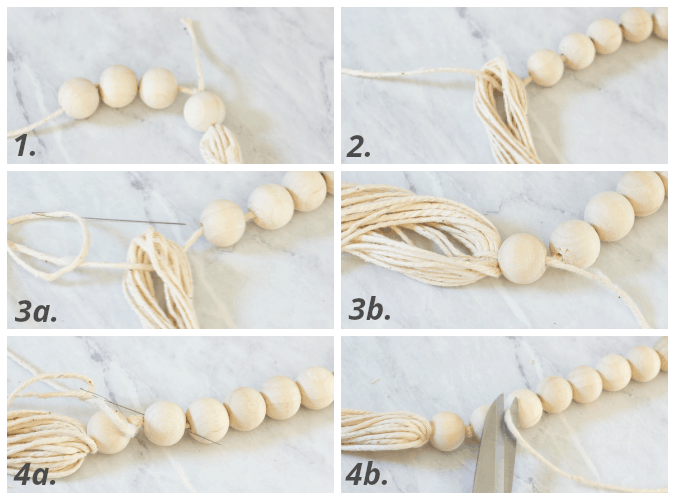
- Cut a strand of cotton twine about 12 inches longer than the full length desired for your finished wooden bead garland. So, if you want a 3-foot string of wooden beads, cut the twine to 48″. Thread your Beadolon needle by flattening out the end of your cotton twine (wetting it helps).
TipWARNING: Don’t hold the eye of the needle in your mouth. Your tongue juth MAY get caught in it. Yeth, yeth it happenth! - Thread the twine through your one bead, and
- Pull the bead all the way to the end of the twine.
- Leave about two inches of twine at the end (sorry… in the photo, I flipped the end over… the needle is to the left now.) Now set this part aside for a minute or two.
Creating a Tassel for Your DIY Wooden Bead Garland
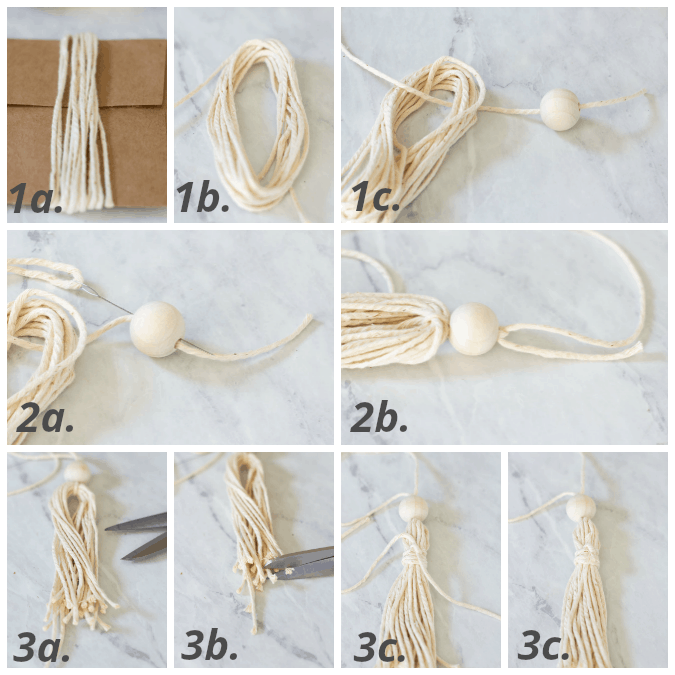
- (a) Take your ball of twine and wrap it around a 4 to 5-inch envelope. I wrapped mine 20 times. (b) Slip the twine off the envelope and (c) slide it onto the long side of the twine.
- (a) Take the needle and go back up through the bead, pull tight and (b) tie a knot at the top of the bead.
- (a) Take scissors and cut through the twine (opposite end from the bead) and (b) trim some of the uneven ends (you can do this again after you bind the tassel). (c) From your ball of twine, cut a 3 to 4-inch length and wrap it around the twine near the bead (I left about an inch between the bead and the binding.) Tie in a double knot and trim off the excess. (You can trim the bottom of the tassel again if needed.)
Stringing Your DIY Wooden Bead Garland and Tassel Number Two
- Now you can start stringing all your beads. String as many as you like, leaving about 6 inches of twine at the end to add the last tassel.
- Create another twine bundle for a tassel and slide it on to the twine, close to the last bead you added.
- (a) With the needle, thread the twine up through the last bead and (b) pull tight and add a knot by creating a loop around the twine between the two beads and then going back through the loop (that may be confusing… not sure how to explain it better. Sorry, I don’t have a pic.)
- (a) Take the twine up through the second bead, knot again, and clip off the remaining twine.
- Finish off your tassel as you did the first one above.
Finishing Touches for Your DIY Wood Bead Garland with Stars and Painted Tassels
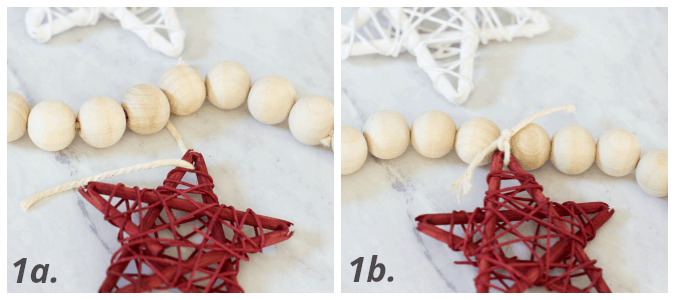
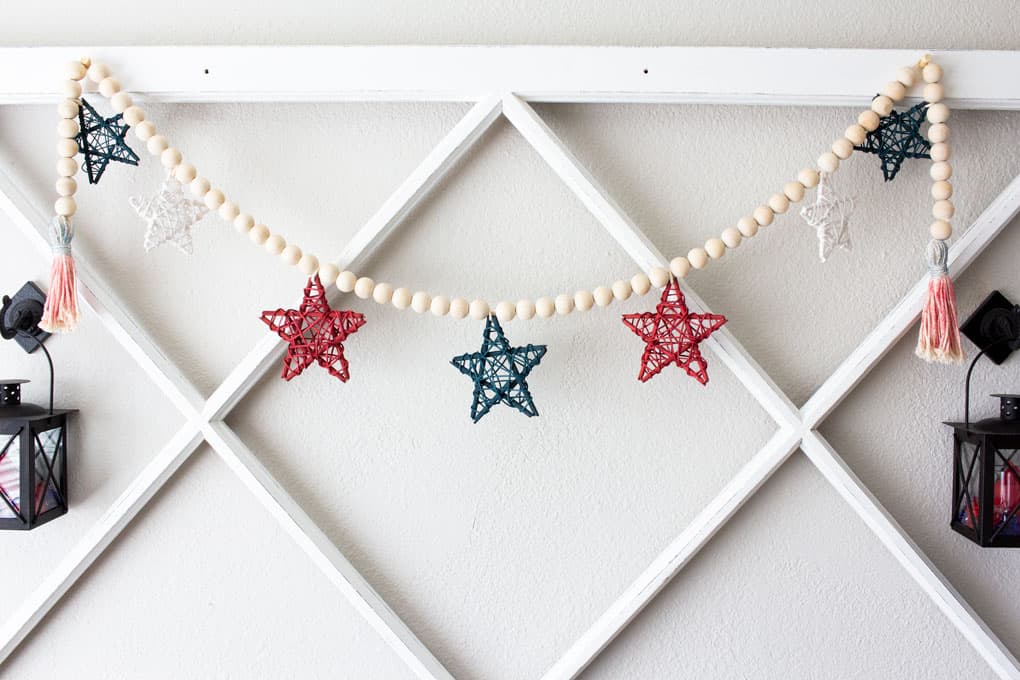
- Take your stars and thread a few inches of twine through each one and tie onto your garland between beads. Sticking with the rules of decorating, I added an odd number of stars to the string of beads. I started with one in the middle and then added them evenly across the rest of the garland. (You can see in the finished product photos at the end.)
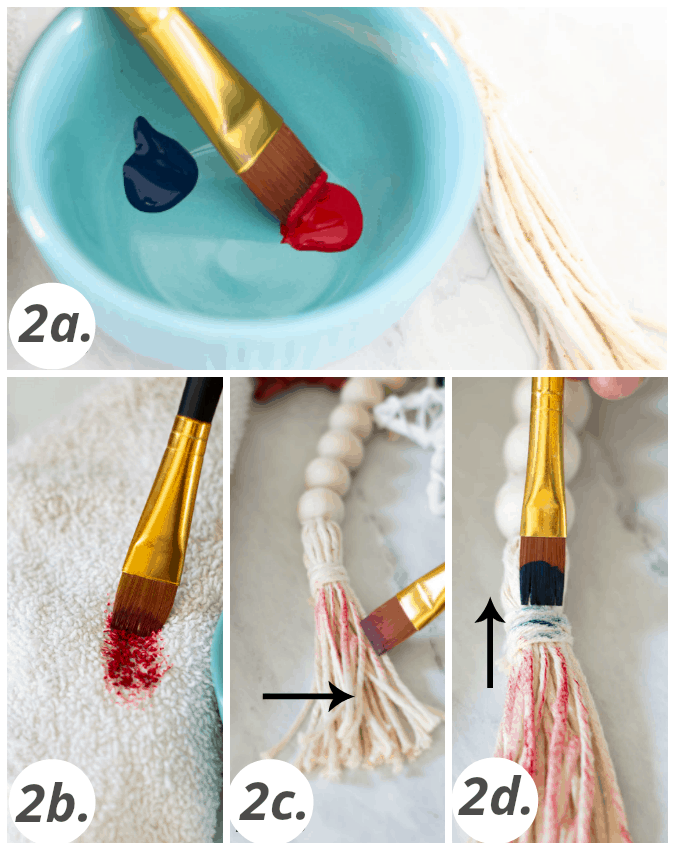
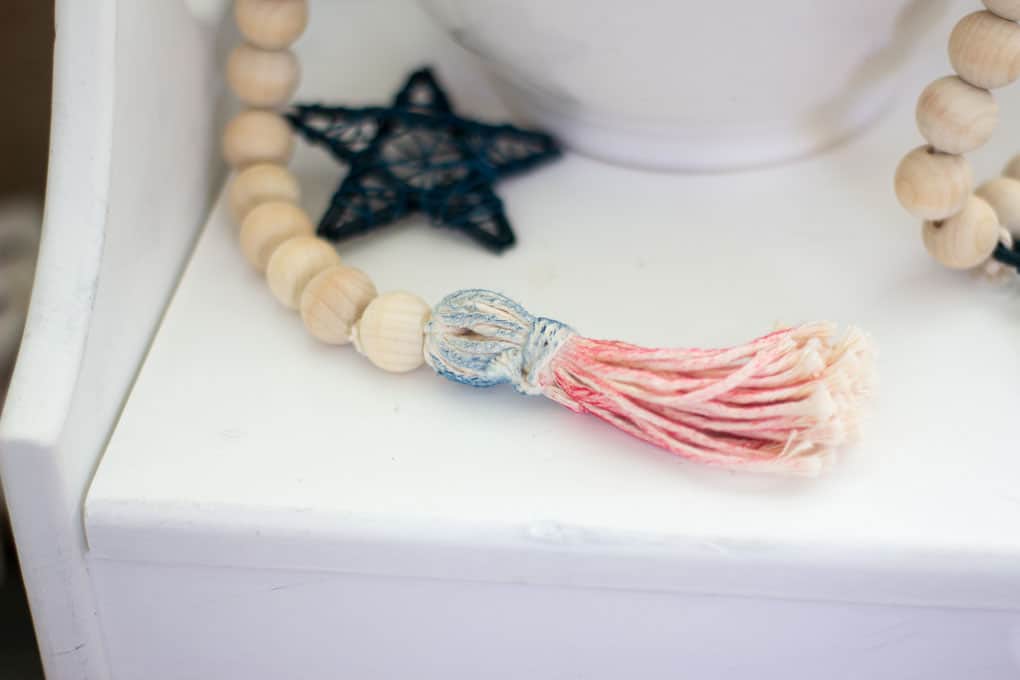
- To get the red, white, and blue effect on the tassel, simply use the dry brush technique. (a) Dip your brush in your paint (you don’t need much for this project). (b) Wipe most of the paint on your brush on a paper towel or craft cloth. (c) Brush the remaining paint onto the twine, being careful to go across the twine, not down the twine (go against the ‘grain’). (d) Be sure to go against the grain on the blue band, too (paint the direction of the arrows).
Last step? Let’s style this thing!
Your Finished DIY Wood Bead Garland with Stars
Because the red-white-and-blue accents are so understated on this chunky wooden string of beads, it’s a very versatile piece to use in your home decor. Today, let’s take a look at two ways it was used in My Wee Abode. (Guess what? A third way to style it is going to be posted on Tuesday morning!)
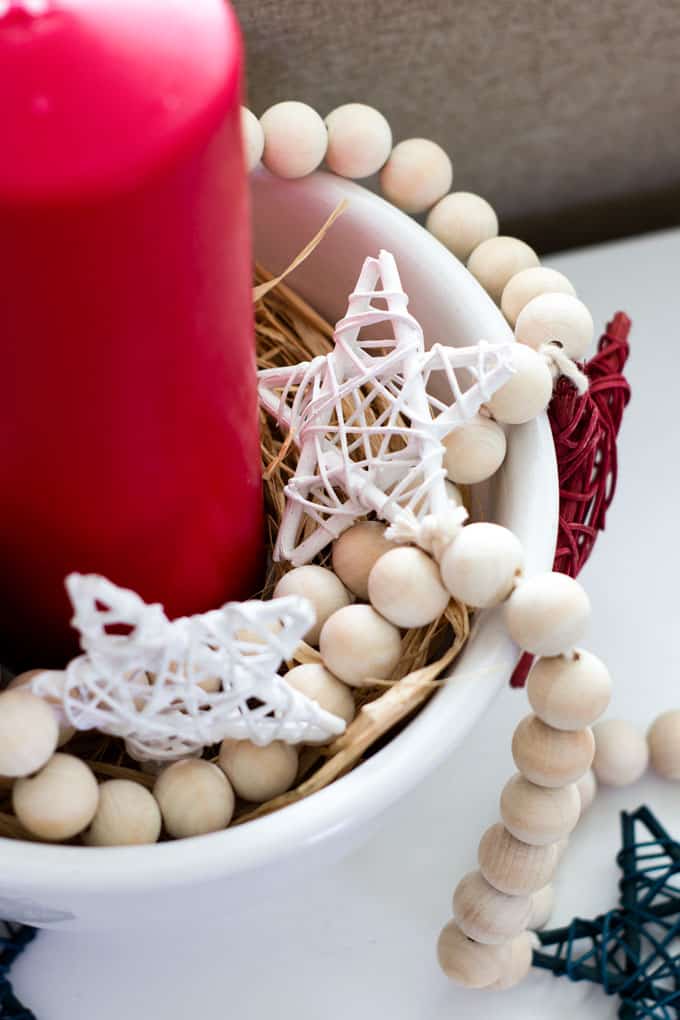
How ’bout using your bead garland in a bowl to accent a candle?
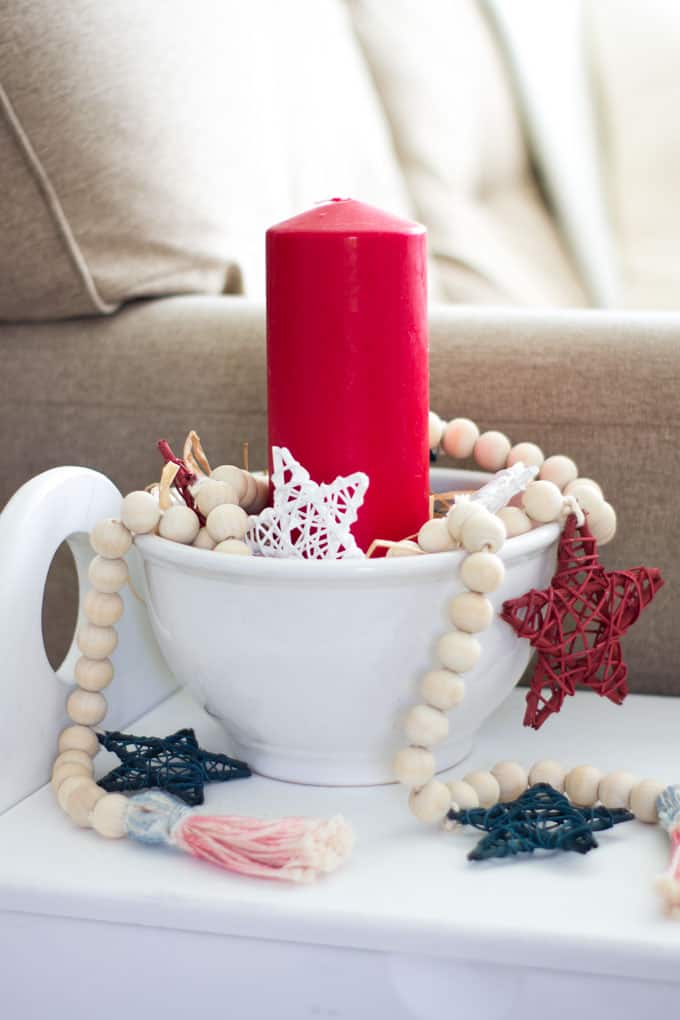
Don’t you love these sweet little rattan stars?!
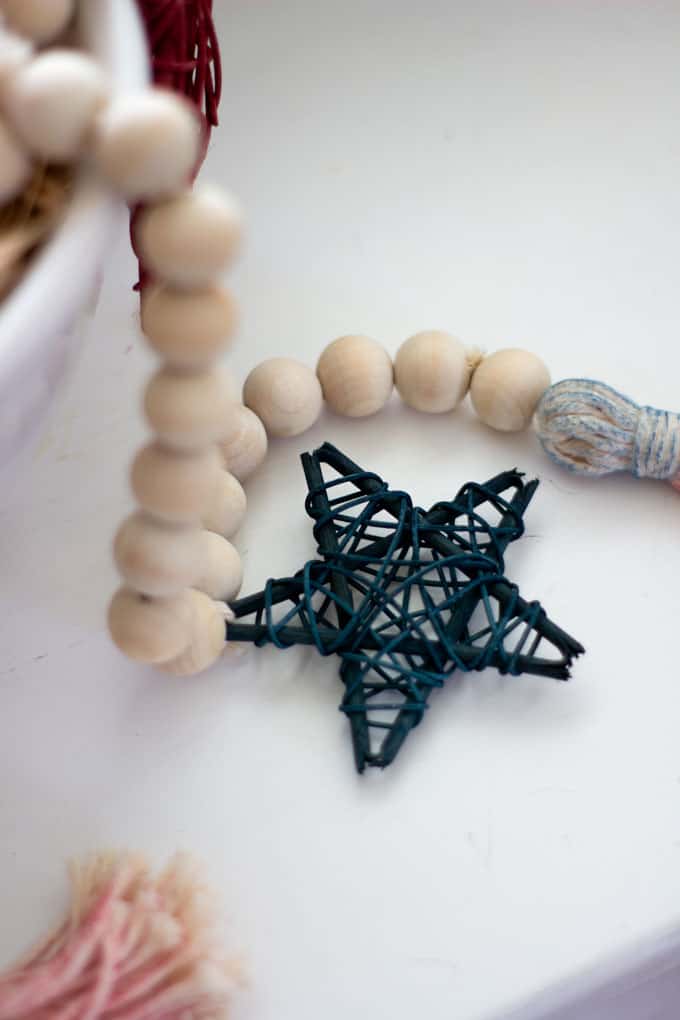
They nestle so nicely in this ironstone bowl.
And here’s that fun little tassel… you can add as much paint as you like to achieve the color depth you want! And you can use different colors for different decor palettes!
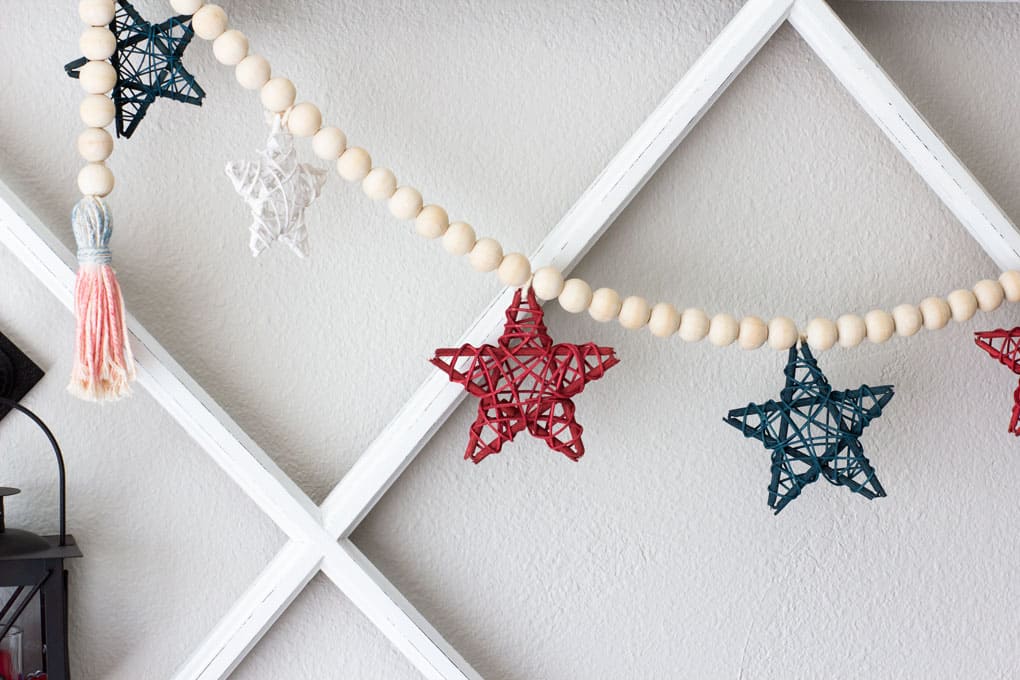
Now, here’s how most decorators like to use these trending decor accents. Stringing them across a mantle or window pane.
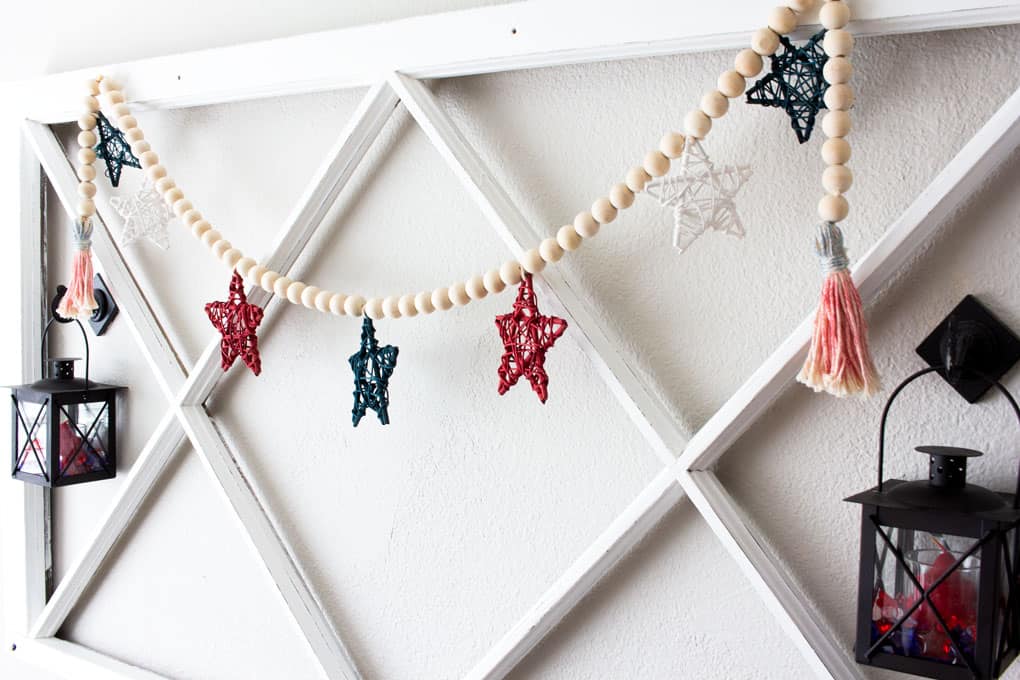
Using the colors of our flag in this ‘quiet’ way actually looks pretty nice for the summer! The natural beads lend a nice contrast to the white window pane and greige wall.
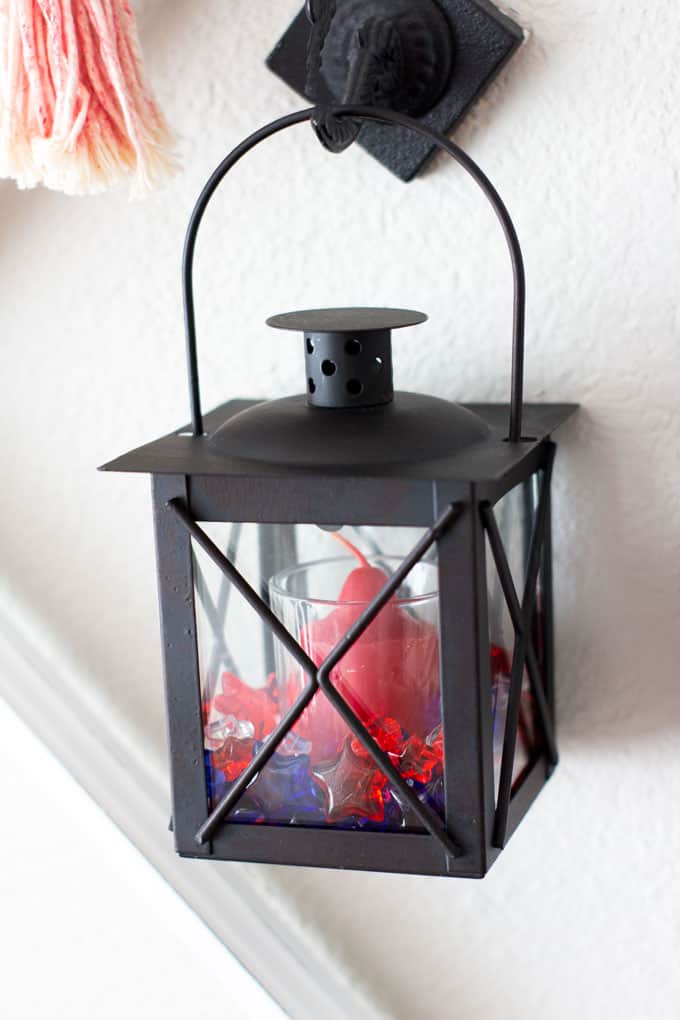
I love my little black lanterns. Did you know that using a touch of black to your home decor can ‘ground’ an area that may be a bit too light and airy (yeah… I didn’t think it was possible for a home to be too light and airy, but it’s true!)
I picked up those little plastic star beads at Hobby Lobby, as well.
And here’s a straight-on view. Difficult to get a good perspective in a 10′ x 10′ room. 😉
Now It’s Your Turn!
What about YOU?! Have you added any of these popular wood bead garlands to your home? Do you like the stars added? Are you as “un-American” as I am, and prefer to skip the July 4th decor, or maybe just do it in a more subtle way? And even more important… Do you like these detailed tutorials, or would you prefer a more summarized way of presenting the steps?
Here are more DIY wood bead garlands from some of my fellow bloggers:
- Salt Dough Christmas Garland from Hearth and Vine
- How to Make a Wood Bead Garland from Little House of Four
- DIY Oversized Wood Bead Garland from Inspired by Charm
Remember to come back early Tuesday! Not only am I sharing a third way to use this starry wood bead garland, but I have over 15 more friends sharing some patriotic decor, too!
Plus!!! Tuesday Turn About returns at 3pm PST!






I guess I’m like you, Julie! Although I’ve made a few crafts in red, white, and blue for theme challenges, I’ve never decorated in these colors for any of the patriotic holidays. Ever! It’s just not my style and has nothing to do with being patriotic or American. Btw, I think your garland looks really cute and I prefer detailed tutorials, especially if the project is unique and creative and you’ll offering new ideas on how to create.
I totally get it, Gail. AND, my friend was so joking with me. I thought it was really funny! Glad you like the tutorial, my friend!
Wow! I love, love, love this tutorial, my friend!! Your beaded garland looks so charming and celebrates the holiday in a subtle but sophisticated way. I’m with you…I don’t generally decorate for the 4th unless I’m throwing a party. I could see you customizing this in so many ways. Lovely!
Thank you for the sweet words, Crissy! I’m glad I have a comrade in my lack of July 4th decor. Hugs!
Very cute! Love your garland!
Thanks so much, Lauren! 😉 It was super fun to make!
I don’t decorate with red, white and blue for holidays, although, I’m pretty sure we had flags on the 4th of July when my daughters were young. 🙂
Love your garland – I really need to buy beads and make one.
Sheila
Thanks, Sheila! My parents hung an American flag in later years of their lives, but my mom never decorated for any holiday or season except Christmas. 😉 Let me know if/when you make your garland!
Julie, I do decorate in the red, white and blue…guess it is because I love the colors for a patriotic holiday…I only use all three colors for Flag Day, Memorial Day, 4th of July and Labor Day….plus we actually fly the flag all year long and use a spot light to high light it in the evenings. I love your beads and easy tutorial. Yay! Have a great week end!!!
If you asked me if you decorated for the patriotic holidays, I would have TOTALLY said, “Of course!” 😉 I can see a tablescape in your home in RWB! 😉 You have a wonderful holiday weekend, too, Kari!
Love the Garland and beads. I really like red, white and blue, but we don’t have much either. Great ideas for the patriot in us all!
Thanks, Melan… It’s a fun and quick project that can be tweaked for other decor, too! 😉
Julie, such a detailed tutorial you offer! The garland is adorable and I especially like it on the window with the black lanterns! I used to decorate for the patriotic holidays, but it seems the older I get the less I decorate for holidays other than fall and Christmas. Agh! I am getting to be an old lady!!😁
Well, at least you decorated for the patriotic holidays when you were young. It’s a gap in my kids’ childhood memories! 😉
I love it Julie and your tutorial is so good. I used to decorate for Memorial Day and 4th of July but then stopped for a while. I now have a banner and an outdoor flag and that’s it.
Thanks for stopping in, Sonya. Yeah, I think a little decor in RWB can go a long way. 😉 Hope you had a great holiday weekend! We need to talk!
One guest bedroom at our lake house is decorated with an Americanna theme. Other than that room, I just add patriotic vignettes to my home to celebrate Memorial Day and July 4.
I live the wood bead garland that you made. It is perfect for using for decor in many ways. Looking forward to seeing what you did for the Pinterest challenge on Tuesday!
Thanks for stopping in to see this project, Paula! Just getting to my comments as it has been a busy weekend and early week! 😉 I need to go check your patriotic room on your blog!
That looks great!
Thanks, Peg! 😉 It wasn’t easy! LOL!
Such a great project and tutorial! I do add patriotic decor and would love to give this project a try! Pinned!
Oh, I hope you do try it! I think you have done a wood bead garland before, haven’t you?
Thank you for sharing at #ThursdayFavoriteThings. Pinned and shared.
Thank you, friend! Have a good weekend!
So so cute! Thanks for sharing at TFT!
Of course, Amber! Thank you for hosting!
Love the patriotic look! This will be one of my features this Saturday at the Snickerdoodle link party!
Oh, thank you so much, Roseann! I’ll be visiting for sure! Have a great weekend!
Julie, Wow, you hit this one out of the ballpark! What a darling bead garland! I would really like to make one and add it to my decor. Yes, I do love the Red, White and Blue, patriotic theme! Thank you for the tutorial!
Hugs!
Tiffany @ Teediddlydee
Thanks, Tiffany! Very kind of you. 😉 My sister really liked this, too, so I may be gifting it to her! 😉
Julie,
I didn’t get a chance to decorate for Memorial Day but maybe a little for the 4th of July. I just need to find to decorations. lol!
Congrats, you are being featured at Thursday Favorite Things.
https://eclecticredbarn.blogspot.com/2019/06/thursday-favorite-things_12.html
Hugs,
Bev
Thanks for the feature, dear Bev! This is the first time I’ve ever decorated with RWB, so I get it! Hugs!
Julie,
I am so sorry to hear that you are not feeling well. Get better soon. Your link was broken, thanks for letting me know. You are so welcome for the feature.
Take care.
Hugs,
Bev
Very cute garland and beads. Found you at Imparting Grace Grace at Home 342
Thanks, Sylvia! We’d love to have you link up at Tuesday Turn About! 😉 Have a wonderful week!
Thank you for sharing at #ThursdayFavoriteThings. Pinned and shared.
Thank you, friend!
Love the tutorial Julie! And a great idea for the holiday – beautiful! ❤️
Oh, thanks, Barbara! You made my day!
You had me at the stars, Julie. Such a cute and timeless garland. Fingers crossed, Hobby Lobby carries them again this year, ours isn’t open yet, but they’ll be on my list when it does,
Oh, I hope they carry them again, too… lots of times they do bring prior year’s items back. Woot!
Your needle warning is hilarious! At least your mishap didn’t prevent you from making a wonderful garland. Pinned. Btw, I like the very detailed tutorials.
Oh, I’m so glad you found that funny… I still get a big grin from that. Hehe! Thanks for the kinds words, too, Allyson!
This is gorgeous. And I disagree that you are “un-American”. Hopefully, you have redeemed yourself with this garland. It’s amazing. Thank you so much for sharing.
Hehee…. thanks, Amy. I think I’ve warmed up a bit to the colors, as long as I can use them in an understated way. 😉
Althougth I don’t decorate a lot in RW&B, I have always done some. 25 years at the VA gave me a much stronger sense of patriotism! I have made several paper and twine, ribbon and twine garlands to sell. I like detailed tutorials. If it is too easy for me, I read over it quickly. Newbies (people with little to no craft experience need the info). Sometimes I just print a picture of the finished project or 2 important pix! Haven’t made a Pinterest board–yet!
Well, I hope this was inspiring, Kathy! That’s a lot of years with the VA! Thank you!
Very cute garland, Julie! And great tutorial for it, too. I’m like you – I don’t generally decorate with red/white/blue either!
Thanks, Janet. Since I’ve been ‘required’ to decorate a bit more with RWB (blog hops and such), I appreciate it a bit more, but always go understated (new post coming soon!) LOL!
Your garland turned out so cute.
Thank you so much, Janet… It’s a fave of mine, for sure!
I love to make wood bead garlands! The addition of the stars is super cute! Just enough red, white, and blue, without being overpowering! Happy Day, Donna
I agree, Donna… of course! Hehe!
I love this garland, Julie! It’s the perfect amount of chic and rustic without being too ‘loud’. The stars are super cute.
Thanks, Rachel! It’s so easy to make, too!
I love the way you explained it, its perfect and I love the garland, thanks so much!! I do decorate for all holidays, do not have a lit of RWB but I do use it
Thanks again, I love it!!
Oh, I’m glad you liked the tutorial, Debbie! Thanks so much for commenting and enjoy the 4th! It’s just around the corner! Woot!
I love to decorate in red white and blue! the mountain town I live in really goes all out with patriotic decor. I just bought buntings for my front rail and a patriotic wreath. I also love to paint flags and buntings in my watercolor paintings. I find any excuse I can to knit and crochet items in red white and blue, as well as in quilts that I make. When it comes to red white and blue there is no understating for me. Thanks for the post, I love reading them.
I can totally see that in BB… the RWB is probably really done in a big way! I would love to see pics of your home with all the RWB! 😉 Hugs, dear friend!
Thanks for sharing with us I’m featuring you this week when the next To Grandma’s house we go Wednesday link party starts!
Thank you so much for the feature, Tarah! Always appreciate it!
Hi Julie – I love this little DIY. It’s so simple and festive. I also love that it can be used year after year. Thanks for the great tutorial and for sharing this post on the Home Imagined Link Party.
Of course, Anna. Thanks for letting us party with you!
Thanks for sharing with us, I’m featuring you this week when the next To Grandma’s house we go Wednesday link party starts!
Oh, thank you so much, Tarah!
Hi Julie – We loved this post so much, that it is being featured tomorrow in our Home Imagined Link Party. Thank you for linking up!