
How to Make Flags from Fabric Scraps
Creating patriotic decor in understated colors is quite easy. You can add patriotic spirit to your home with DIY mini flags in all kinds of colors. Today, let’s learn how to make flags from fabric scraps.

HOW TO MAKE FLAGS FROM FABRIC SCRAPS
If you’ve been around My Wee Abode for a while, you may already know that I’m not so big on the traditional Old Glory colors for the patriotic holidays.
I believe it may stem from an over-abundance of the colors in my life for many months during 5th grade… 1976? You know, the bicentennial of our country? Yeah. LOTS of the old RWB during school THAT year!
However, being a blogger, sometimes you gotta just do it… add decor that isn’t your fave.
But wait! The solution to an ‘aversion’ to traditional patriotic colors is creating patriotic decor in understated tones! And that’s just what I did this week! And now it’s kinda my fave!
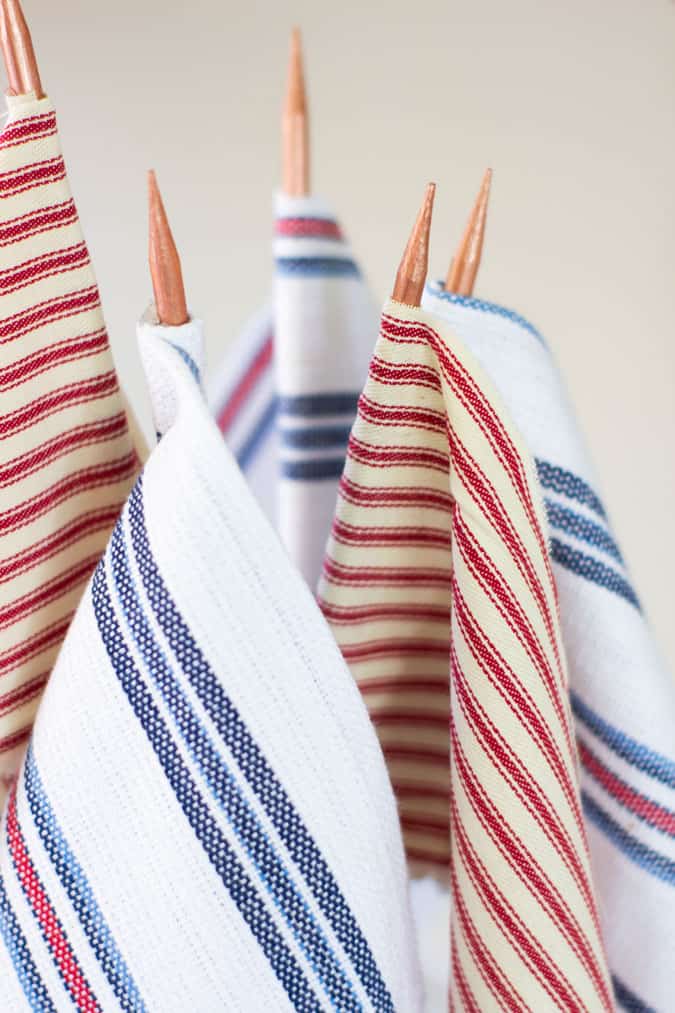
DIY Mini Flags in Understated Red White and Blue
When I started creating my Americana tray with toned-down colors, I remember my friend, Roxanne from The Honeycomb Home had created some little ‘wavers’ that I fell in love with.
So of course, I had to make some with my own little twist!
Let me show you how to make these DIY mini flags in just a few minutes.
And you can simply use scraps of material you might have leftover from a project… or maybe a cute little dishtowel you find at Hobby Lobby!
This post may contain affiliate links, at no additional cost to you. For more information, see my complete disclosure HERE.
What You’ll Need:
Even though we’re learning how to make flags from fabric scraps, you can totally create these miniature flags with dishtowels, too!
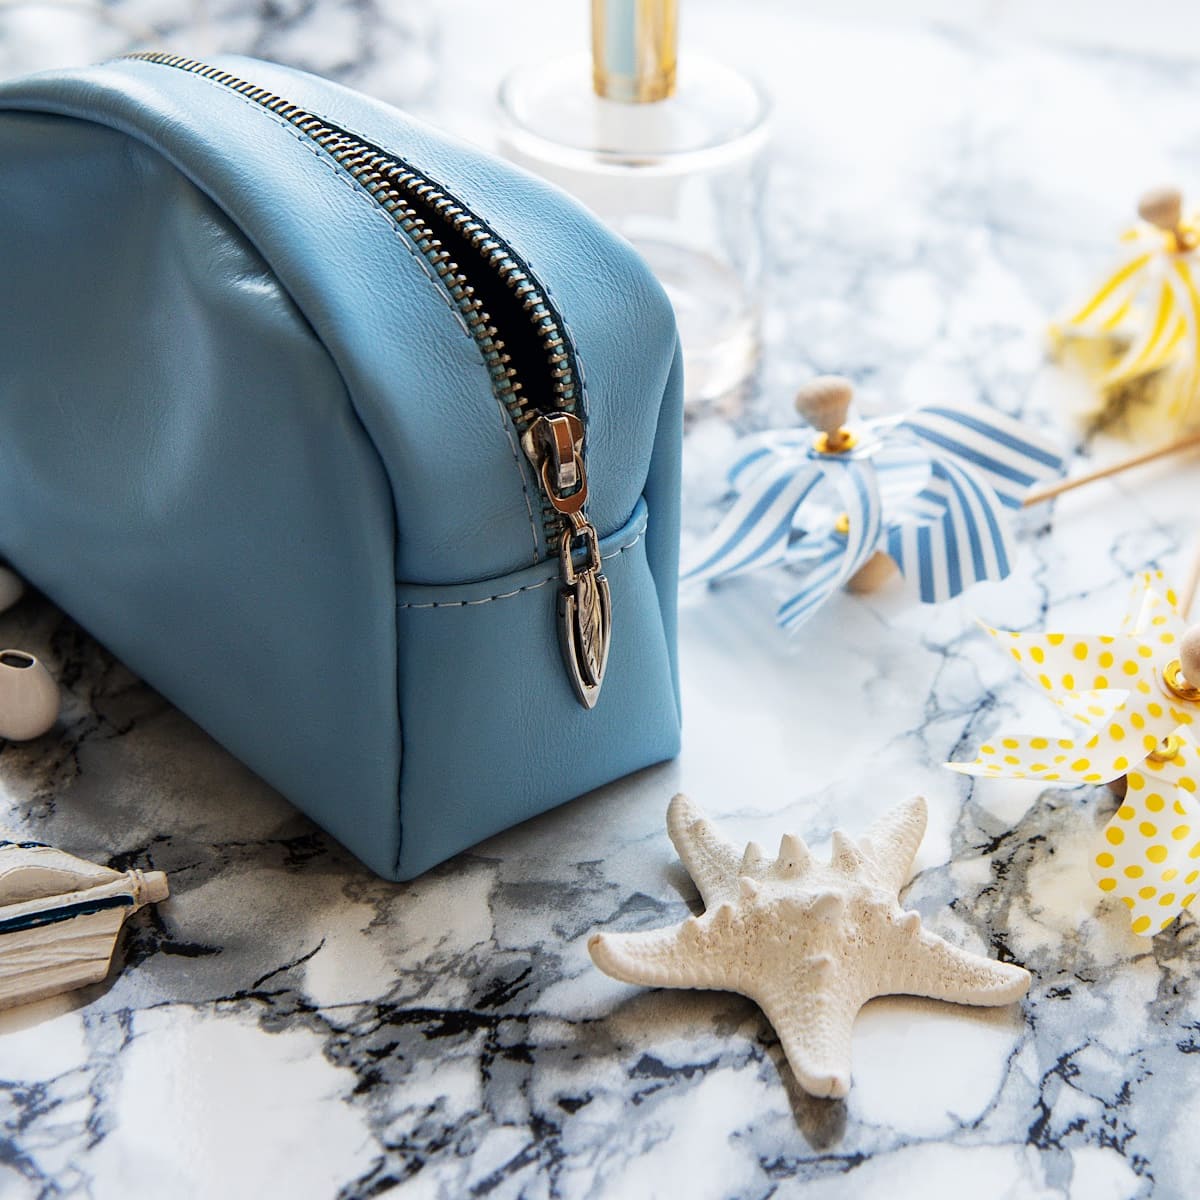
- 6 x 8″ rectangle in your choice of non-traditional patriotic fabric/scraps (think bright pink/blue/white, or pale pink/blue/cream, or muted red/blue/cream/white (like I did) or…
- OR pretty dishtowels with embellished edges, (Hobby Lobby has some fun ones)
- Roasting Skewers (Hobby Lobby, again ;-))
- Saw (I like my Japanese pull saw, it’s easy to use and very precise)
- Metallic acrylic paint of your choice (I like the rose gold color)
- Hot glue gun and glue sticks (Love me some Gorilla Glue products!)
Steps for Creating DIY Mini Flags
Here’s a quick tutorial on how to make your own little waving flags with scraps of material.
- Mark and cut your fabric in 6 x 8″ rectangles. Don’t worry about being perfect… these look great with frayed edges and imperfect lines! (Remember to try to leave a salvaged or hemmed edge as part of the flag, if you can.)
- Uhhh, just a cute pic of a fringed rectangle! LOL!
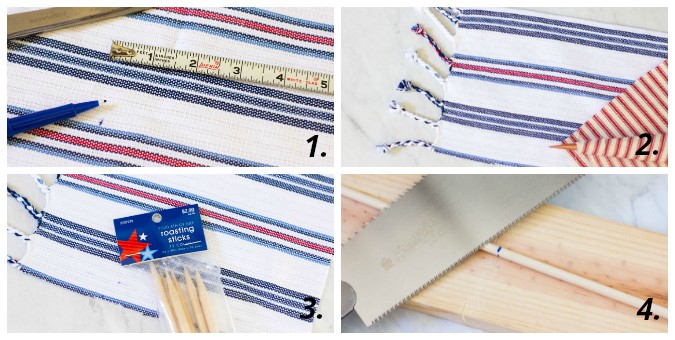
- Break out your roasting skewers and measure them the length that works for you. If you are putting them in a container, you may want to vary the size of each skewer just a bit.
- Mark your skewer and cut off the end… be sure to leave the sharp part of the skewer for the top of the flag.
- Paint the sharp end of the skewer… this will be our finial!
- Lay the skewer along the edge of your fabric and add hot glue along the skewer, then roll the fabric around it.
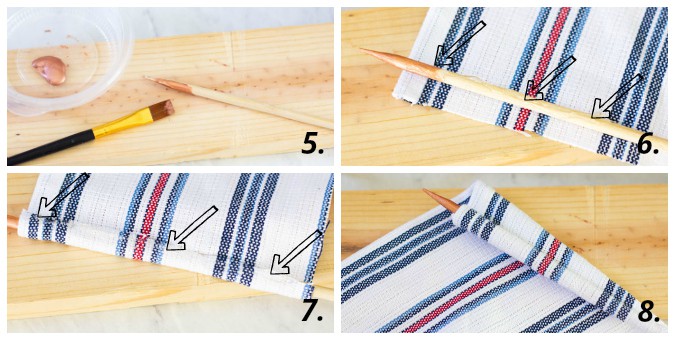
- Add more glue to the fabric, and roll one more time.
- And, that’s it! So stinkin’ easy, right?
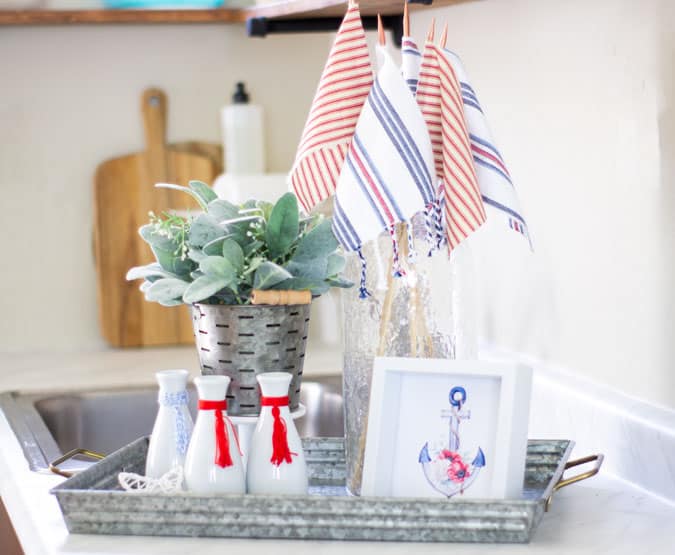
Add Your Miniature Flags to Your Decor
These are so easy to make, you can create some with your children or grandchildren to carry around and wave for the holidays!
Or you can add them to a vignette!

Don’t you love the easy way we made the “finials”?
It you want more ideas on how to make these fun little ‘wavers’, take a look at these patriotic cuties for the 4th!
Now It’s Your Turn
How ’bout it? Are these easy enough to create and add to your home decor? Oh!!! We can even use them in our garden containers, or along our walkways! What colors would you use for non-traditional Americana decor?


These are adorable!! Using a skewer is a great idea and painting the pointed end makes the perfect finial. This would be a great use for all of the fabric scraps that i have saved.
1976 was something. My mom sewed a red and white long colonial style dress for me that had a blue ribbon tie. It also had one of those hats with elastic that the colonial woman wore. I remember dancing the maypole dance in it and wearing it for a parade and then for church celebrations.
Yes, 1976 was indeed a wonderful year. My mom made my sister and me skirts and vests in red stars and blue stars… it was quite the sight! 🙂 Then I had to wear RWB to that celebration I was in. Whew! The celebration was indeed fun, and a wonderful memory, but I hated the white blouse and long read skirt in polyester!
Stickin cute for sure! I’ll be in Oceanside Sunday through Tuesday nite. Are you in San Diego?
Sorry to hear your trip was cancelled! Maybe we can connect at the end of summer! Hugs!
I loved this idea when I first saw it. I figured this was the way to make the flags, but it’s great to see the step~by~step process. So cute. Definitely saving.
Yeah, I figured lots of my friends would know how to make them, but then some don’t! 😉 That’s what we’re here for, right?!
Love this project! Perfect timing for the Fourth!
Happy birthday America!
karianne
Thanks, KariAnne! Was fun seeing on live today! I had to pop in and out because of work… I need to go watch it now! 😉
Great project! Here in Maine, we have companies that do wood turnings–so, of course, I have flag finials somewhere. I think t bought them to be used as dollhouse table legs! I love that rose gold color; my late mother loved rose gold. Picked up a great roll of flag looking burlap at Joanne;s this week for 70% off–that’s about my speed! Not sure if they are flags or banners for a garland yet!
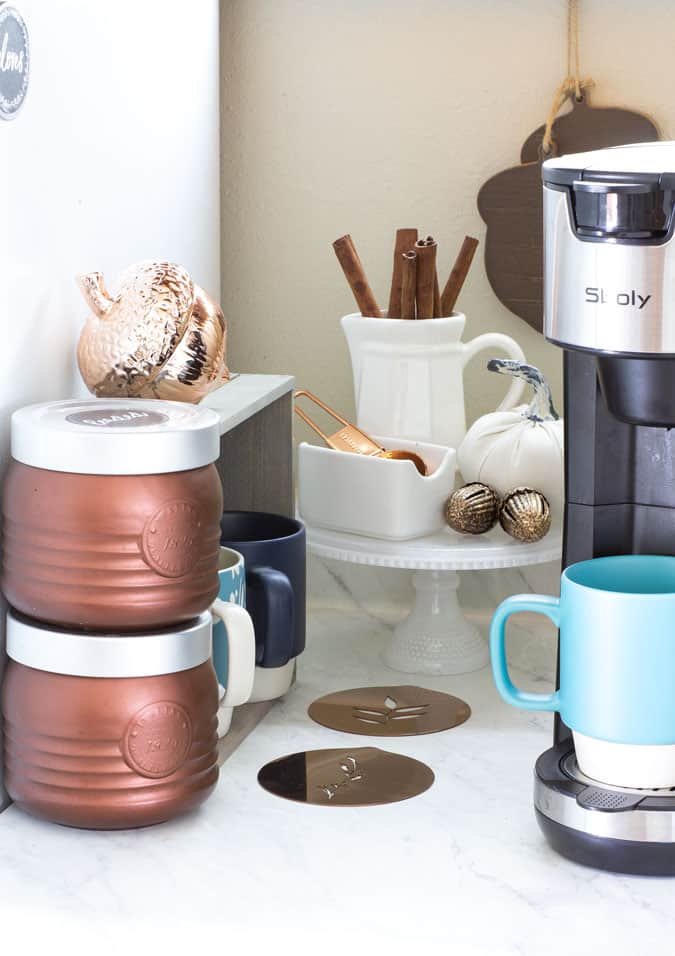
Oooo, that burlap sounds perfect for some vintage look decor! Rose gold is a fave for me, too! I’m slowly converting my coffee station to a rose-gold (copper?) collection. 😉
Oh my gosh! These are just adorable! What a great idea! I am doing a bit more decorating for the 4th this year. With everything going on in the country and the world right now, it just feels right. I will be adding these to my decor today! Thanks so much!
Oh, I hope I get to see them on your blog! 😉 Be sure to link-up at Tuesday Turn About tomorrow, Denise!
What a great way to use scrap material and have a cute display. Love the fringe one.
The fringe one is my fave, too, Terrie! Hugs!
Thanks, Terrie! You are so sweet! Hope to hop with you next month!
I am going to try so hard to not flake out and make these for next year! What a great idea Julie!
LOL! I SO get that, Kim! Hehe! And thanks!
So cute! Im forwarding this to my daughter. I think her kids would have fun doing this project plus she has material and I don’t
Thanks, Linda! Hope the kids enjoy!
What a great little diy and I love that you can use left over fabric. Perfect for summer and July 4th
Thanks, Sonya… they are SO easy, and so fun! I’m putting one in a planter on my patio!
These are adorable, Julie! My kids would have a blast with them. Pinned!
Thanks, Crissy… Uhhh, would the boys use them as swords?! 😉 Ryker def would… eventually!
Adorable flags and of course I love the ticking stripes! Pinning!
Thank you, sweet friend!
I love this idea!!! I’m not a big bright blue & red gal either so this is perfect for me. I actually talk about it a bit on a post tomorrow. = ). Have a great 4th of July!
XO- MaryJo
Oh, thanks for the encouragement, MaryJo! I’ll be sure to take a look at your post tomorrow! Hugs and hearts!
Your flags are soooo cute and sooo easy to make! What a cute little project! Have a great week!
Hugs,
Tee
Thanks, Tee! They were fun to make!
These are so cute!! I even have some red ticking! 1976 my birth year!!
Oh MAN, I feel old! LOL! 😉
This is so fun! Love the idea of using up scrap pieces of fabric to create these. Would be fun in any print too.
Exactly, Alex… I’m thinking of doing some ‘summery’ ones!
So cute!!! Just got off the phone with my sister and she is so bummed that all of their activities in NC are canceled. I’m going to forward this to her so she can make these with her littles! I think that will cheer them up and keep them out of trouble! LOL! I might make some for after the 4th to replace my flags because they look so summery!
Yes… I think I may make some for summer, as well! 😉 Thanks for sharing with your fam!
Those are so cute, Julie! What a fun idea and simple, too. Hugs!
Thank you so much, Pam… I think I may make some for other seasons/holidays. Who says flags are just for patriotic days?
These are adorable, Julie! So perfect for this time of year!
I think I may make some ‘summery’ ones! 😉
These are fabulous, Julie! I love that you didn’t use actual American flags but the flags are still patriotic because of the red white and blue. Using skewers to mimic finials was so clever. Pinned!
Thanks, Rebecca! You are always so kind!
These flags are adorable, Julie!! I LOVE how they are not ‘so’ red, white, and blue, making them better fit in with other decor. Super great project!!
Thanks, Rachel! They are super easy to make. I just ‘found’ them in my unpacking, so they’ll make an appearance next year! 😉
These are so cute and I love how simple they are! I’m pinning it for future reference! I have some kitchen towels that I could use to make these! Thanks for the inspiration!! Donna
Thanks for pinning, Donna! They are super easy. I want to try it with other season fabric/towels.
I love these flags and you chose such cute fabrics. Great idea to use the dish towel with fringe! I may have to steal your idea 🙂
Hugs,
Karin
You go right ahead! That’s why we post, right?! 😉
These are so nice. What a fun use of fabric scraps!
Thanks, Donna… and it’s so easy!
These are just so stinkin’ cute, Julie. I’m going to feature your flags and share them with my readers this weekend for my week in rewind recap.
Thank you again, Jen! So blessed by your generosity!
Love these darling little flags, Julie! I must have been two years ahead of you in school; I well remember being in 7th grade in the 75-76 school year, where everything was centered around the Bicentennial!
Thanks so much for joining the Grace at Home party at Imparting Grace. I’m featuring you this week!
Thank you so much, Richella! Yes, the Bicentennial was fun to be involved in and live through!
Julie,
These are adorable and I love the fabrics.
I’ll share a link on Sunday!
Thank you again, so much, Rachel!
these are so cute and perfect for what we fondly refer to around here as the red, white , and blue holidays (or the hot dog holidays LOL)
Thanks, Janet… that’s a sweet name to call the summer holidays! 😉
Julie these are adorable! Such a great idea my friend! I
Thanks, Nicolle. I think I will break-them-out this year for a Pinterest Challenge next month! 😉
These are ADORABLE, Julie!
We will be featuring you starting Wednesday at the Creative Crafts Linky Party! Pinned and shared!
Creatively, Beth
Oh, thank you so much, Beth!
Julie, these are so cute! I cannot wait to make my own.
Have fun! Glad you like them! Hugs!
Still love these little cuties. I plan to make some – really! Thank you for sharing them with us on Farmhouse Friday. Featuring them tomorrow. pinned 🙂
Oh… thank you for the feature! Yeah, why don’t you get those added to your freakishly busy schedule? What’s taking you so long?!
Julie,
I love these flags, especially the one with fringe. Congratulations, You are being featured on TFT. I hope you stop by. https://eclecticredbarn.blogspot.com/2025/06/summer-diy-projects-on-tft.html
Hugs,
Bev
Thanks so much, Bev!
This ism the first time I have seen these Julie…don’t know how I missed them, oh ait…that was when I was so sick. Anyway, great DIY and who doesn’t love a flag? Have a great Easter. hugs