
Easy DIY Velvet Mushrooms Three Ways
If you love the look of velvet in the fall season, you are going to love these easy DIY velvet mushrooms done three different ways!
EASY DIY VELVET MUSHROOMS THREE WAYS
Hey friends and fam! Welcome to a brand new DIY at My Wee Abode!
If you love velvet during the cozy seasons of fall and winter, you are gonna want to create these easy DIY velvet mushrooms!
And we aren’t learning just one version. I actually have THREE ways to show you how to DIY your own velvet ‘shroom patch! (Maybe even 3 1/2 ways!)
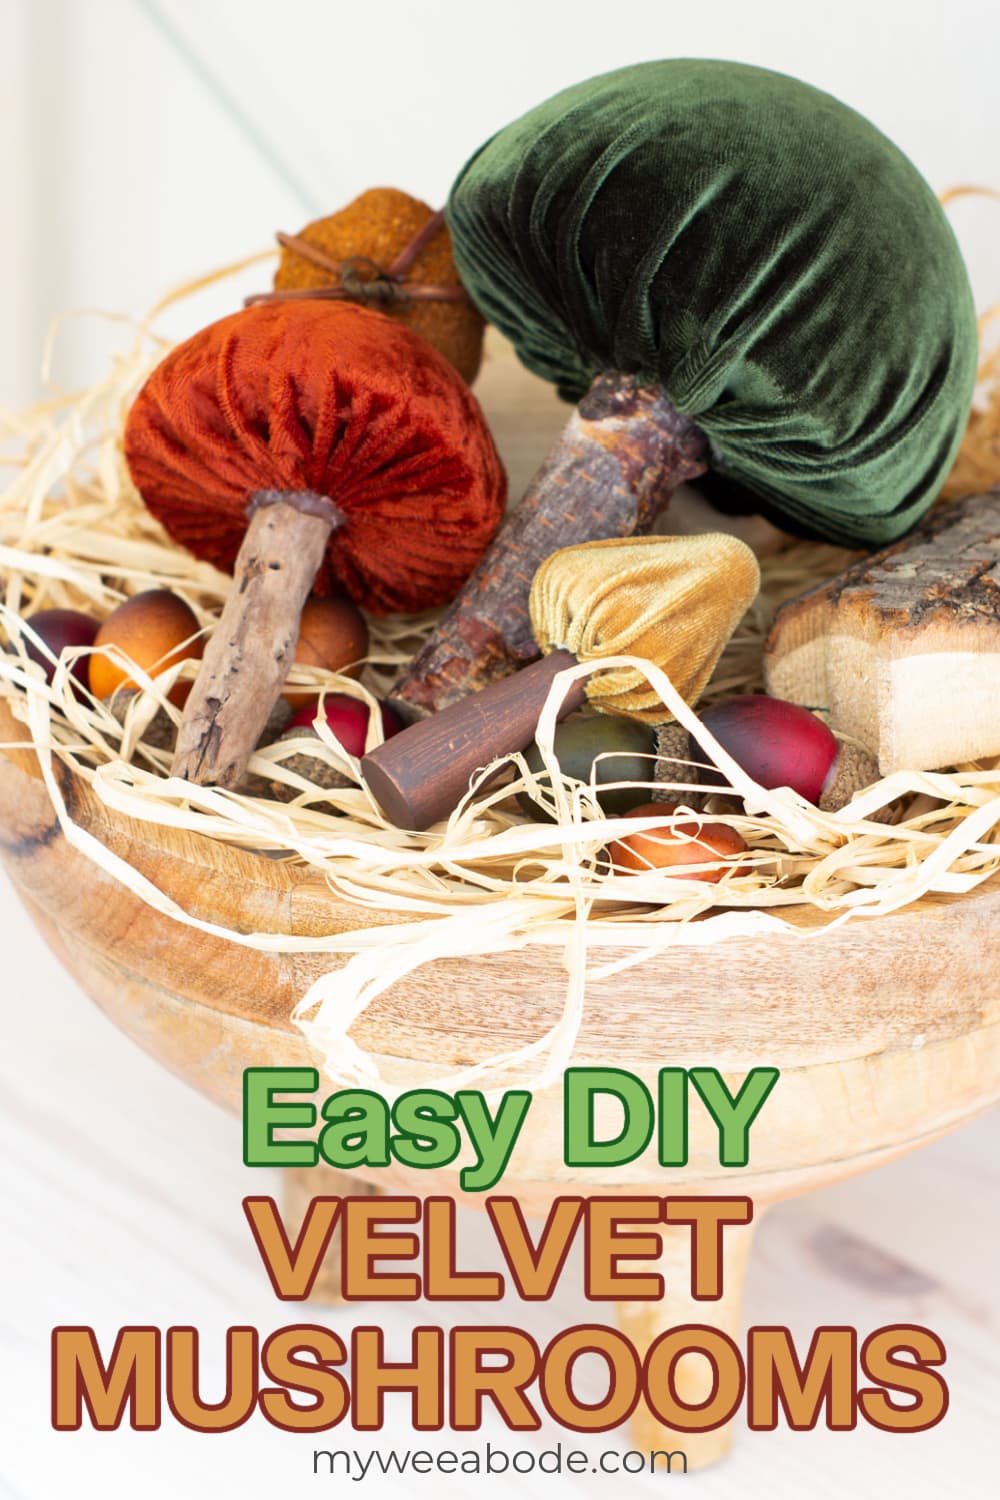
These luxurious, rustic velvet fungi (such an ugly word 😉 ) are all the rage these days, and I figured out a way to make them look just as lovely as my DIY velvet pumpkins!
These look JUST like the pros version, too! At a fraction of the cost!
So let’s get to it!
This post may contain affiliate links, at no additional cost to you. For more information, see my complete disclosure HERE.
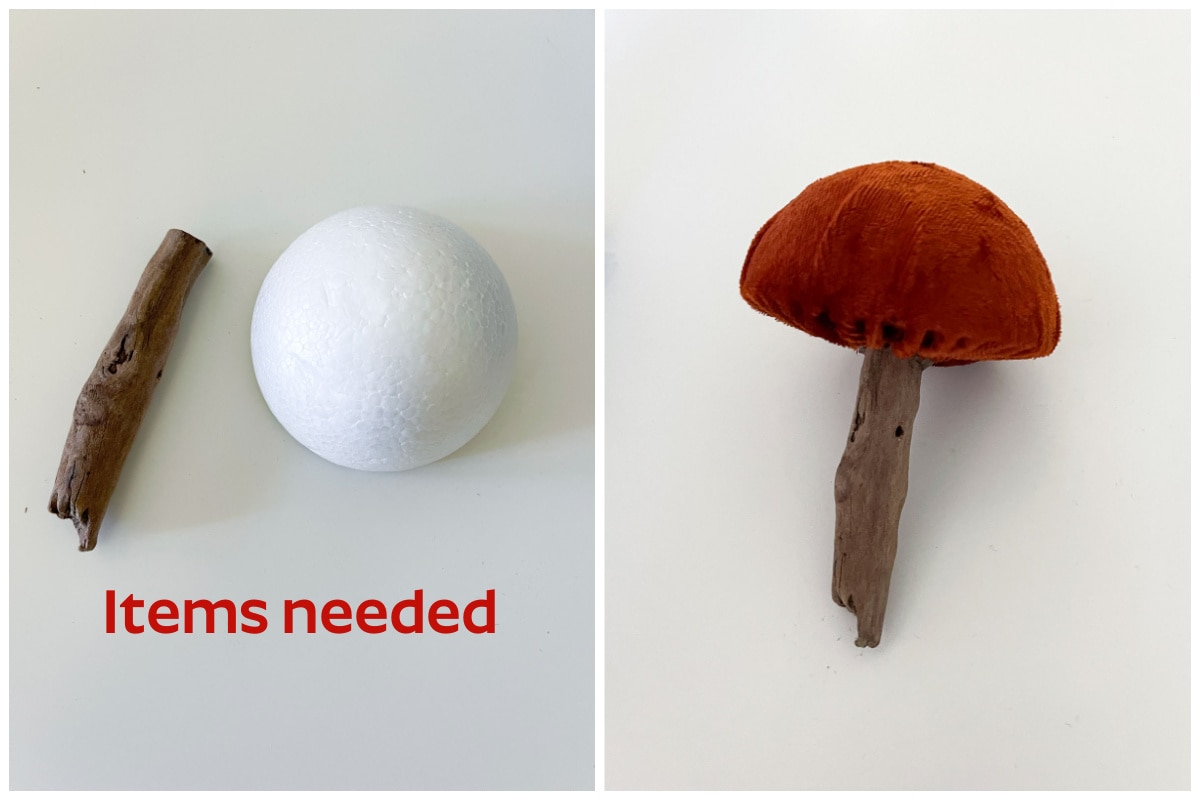
Easy DIY Velvet Mushrooms – Birchwood Stem
The first version of this DIY soft velvet mushroom is using a mini birch wood log as a stem.
What You Will Need for a DIY Velvet Mushroom with a Birch Wood Stem
Here are the items you will need for this first ‘shroom, as well as a few of these items for the next two.
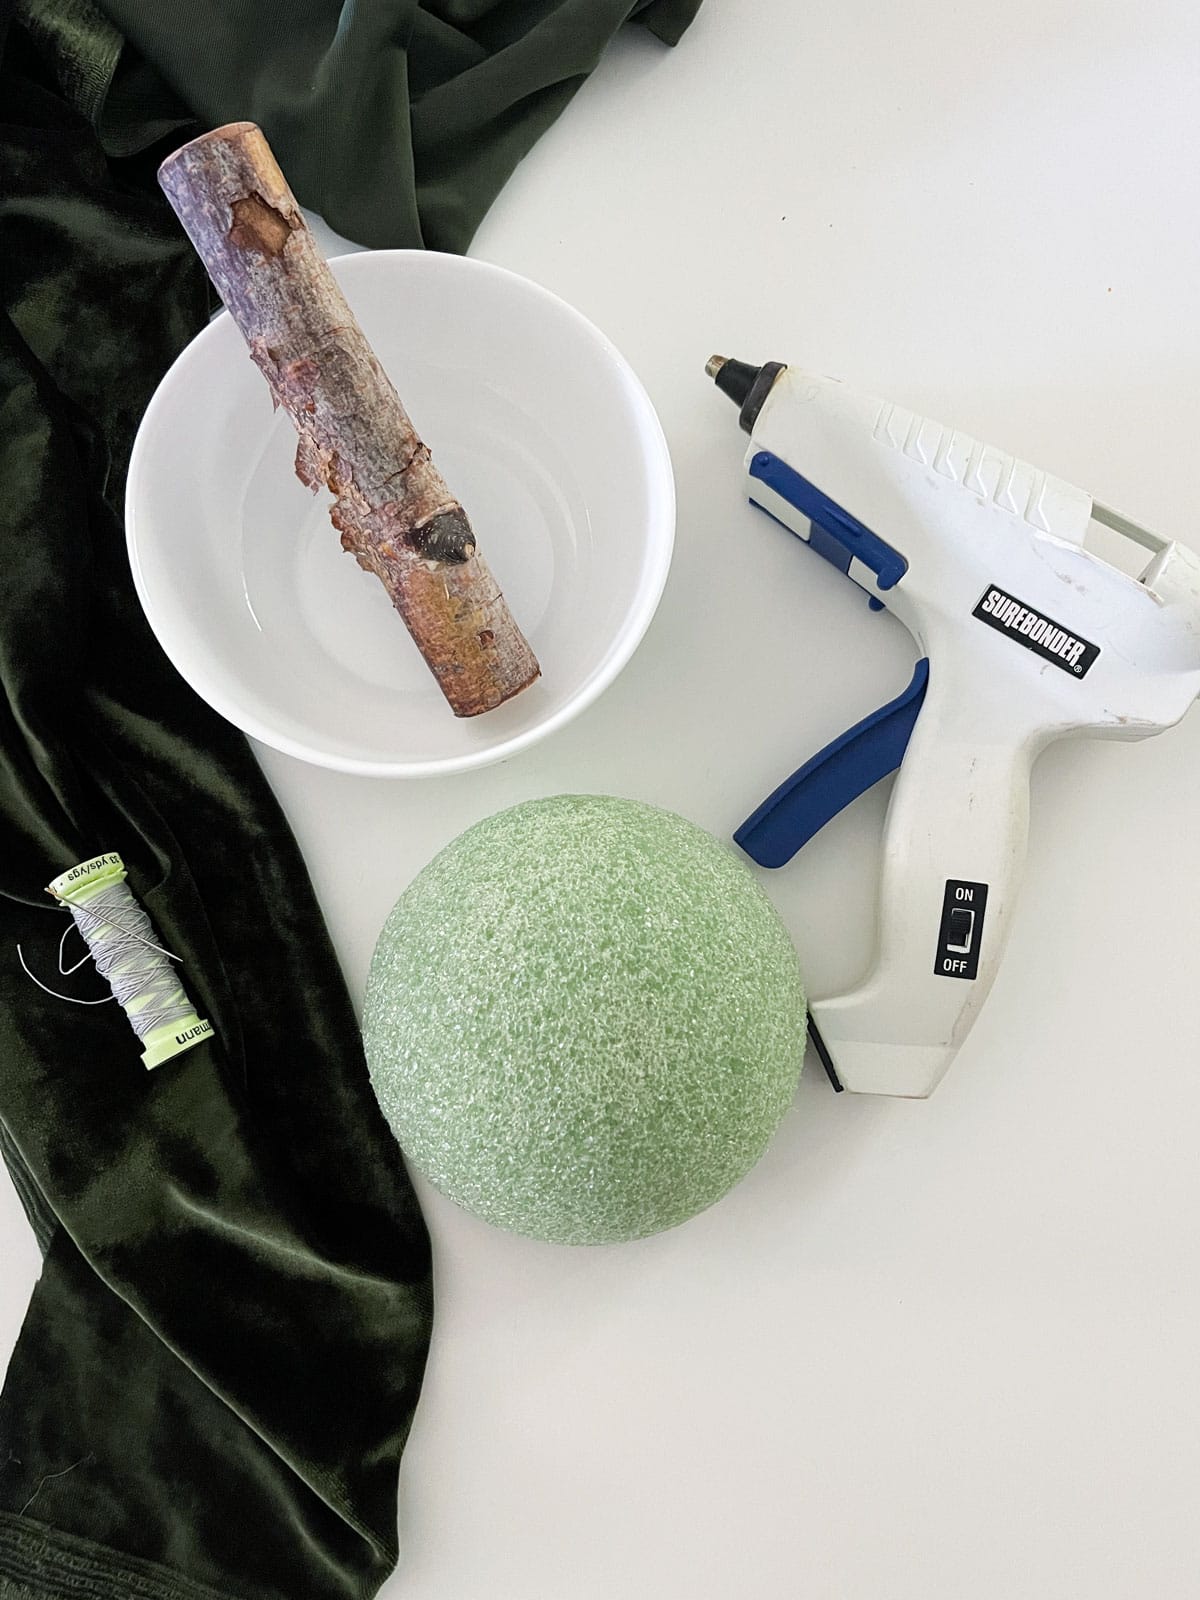
- Stretch velvet fabric; you can get this are your local fabric store, but there is a lot more colors to choose from on Amazon (seller 1 and seller 2) and Etsy.
- Foam mushroom ‘caps’. You can use either FloraFom (3.8″) or SmoothFom (4.5″) (I used both types, and prefer the SmoothFom) You can also pick these up at Hobby Lobby!
- Real mini birch ‘logs’ and Hobby Lobby has them, too!
- Extra Strong Upholstery Thread
- Large sewing needed with large eye
- Glue gun and glue sticks (I’ve found these to be the best)
- Rhinestones (optional)
- Jewel Picker
- Tacky Glue Fast Grab
How to Make a Large Velvet Mushroom with Birch Wood Stem
These velvety mushrooms are super easy to make… don’t let all the photos make you nervous. A thorough tutorial is always best, don’t you think?

- Turn your velvet face down and trace your stencil. For the large mushroom, I used a 10″ dinner plate (Fig 1a). Pro tip: Using a felt tip pen is easy, and shows up on the darkest of fabrics (Fig 1b).
- Take a needle with a large eye and your upholstery thread, and slip stitch around the circle about 1/4″ away from the edge (Fig 2).
- Slightly pull the thread to begin forming the cover for your foam half ball (Fig 3). Pro tip: Be sure to leave your needle threaded to tie off your fabric at the end.
Prep the “Cap”
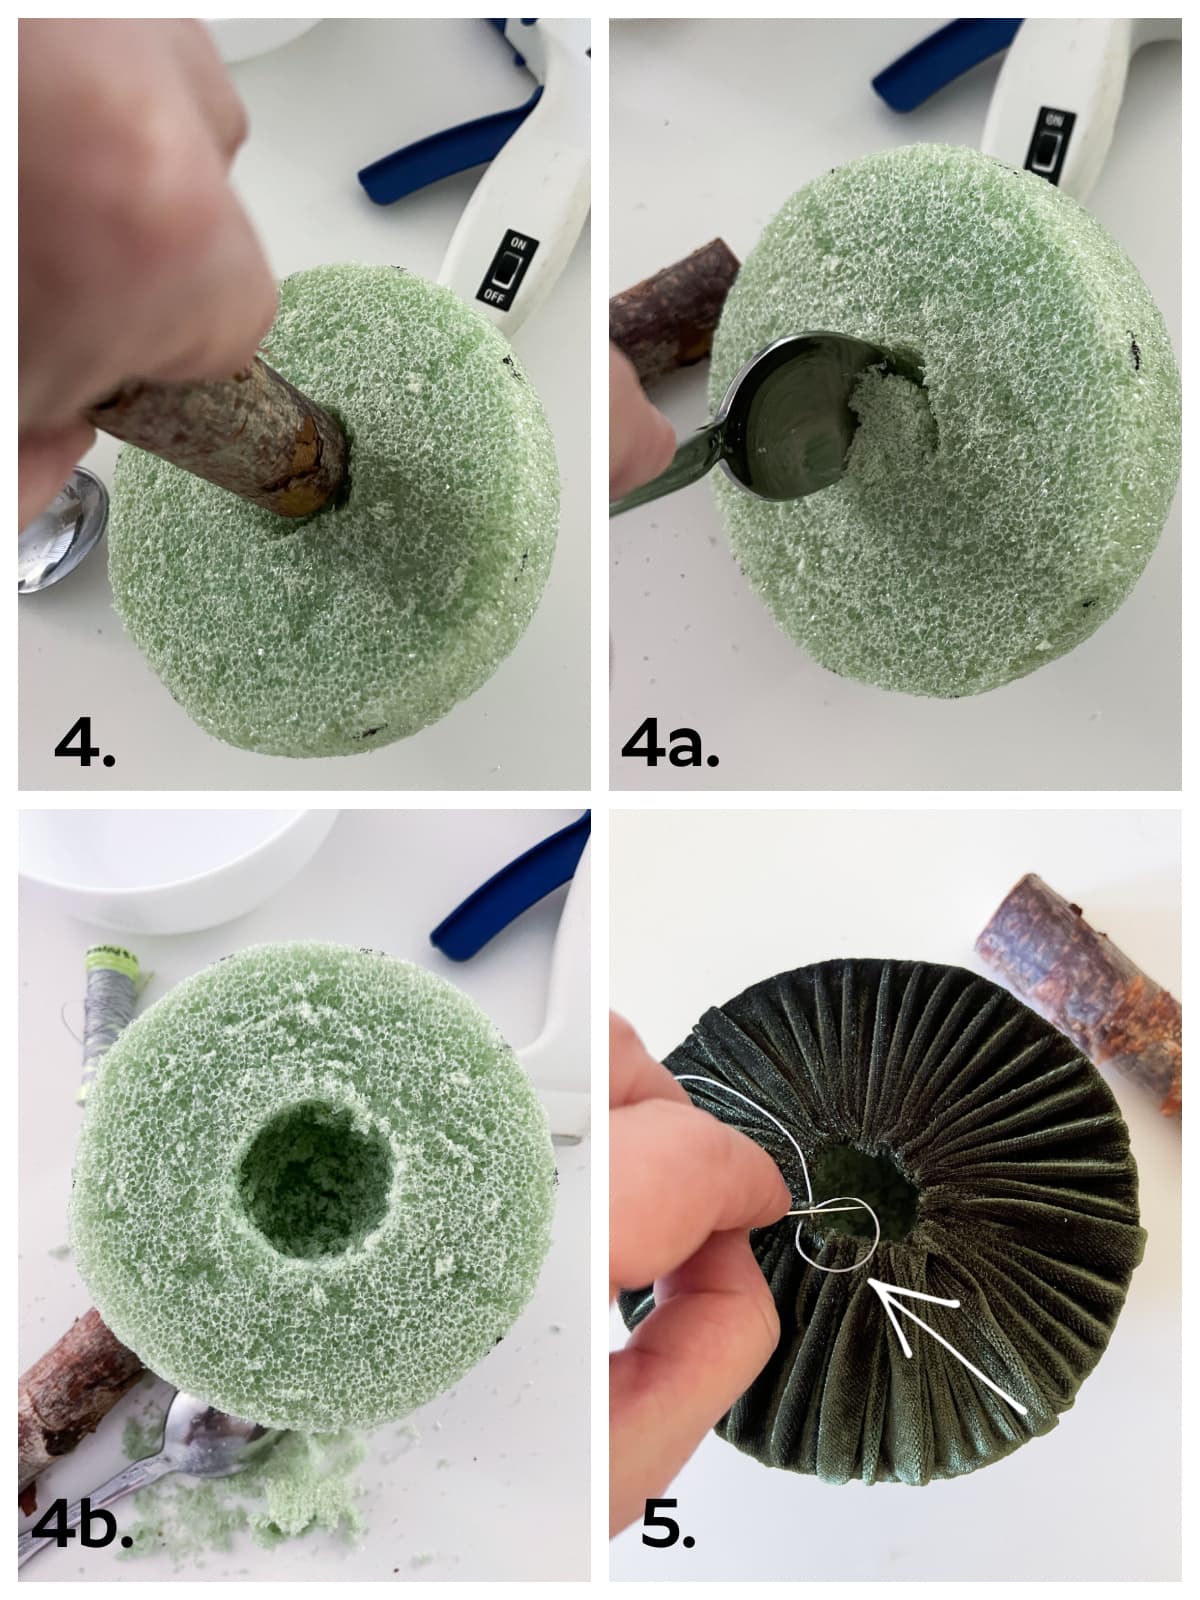
- Take your mini birch wood log and gently press it into your foam (Fig 4). Take a spoon and scoop out a ‘tunnel’ (Fig 4a and 4b)
- Cover your foam ‘cap’ with your velvet and pull the string in tightly. Arrange and rearrange to get the velvet centered. Then, tie-off the thread (Fig 5).
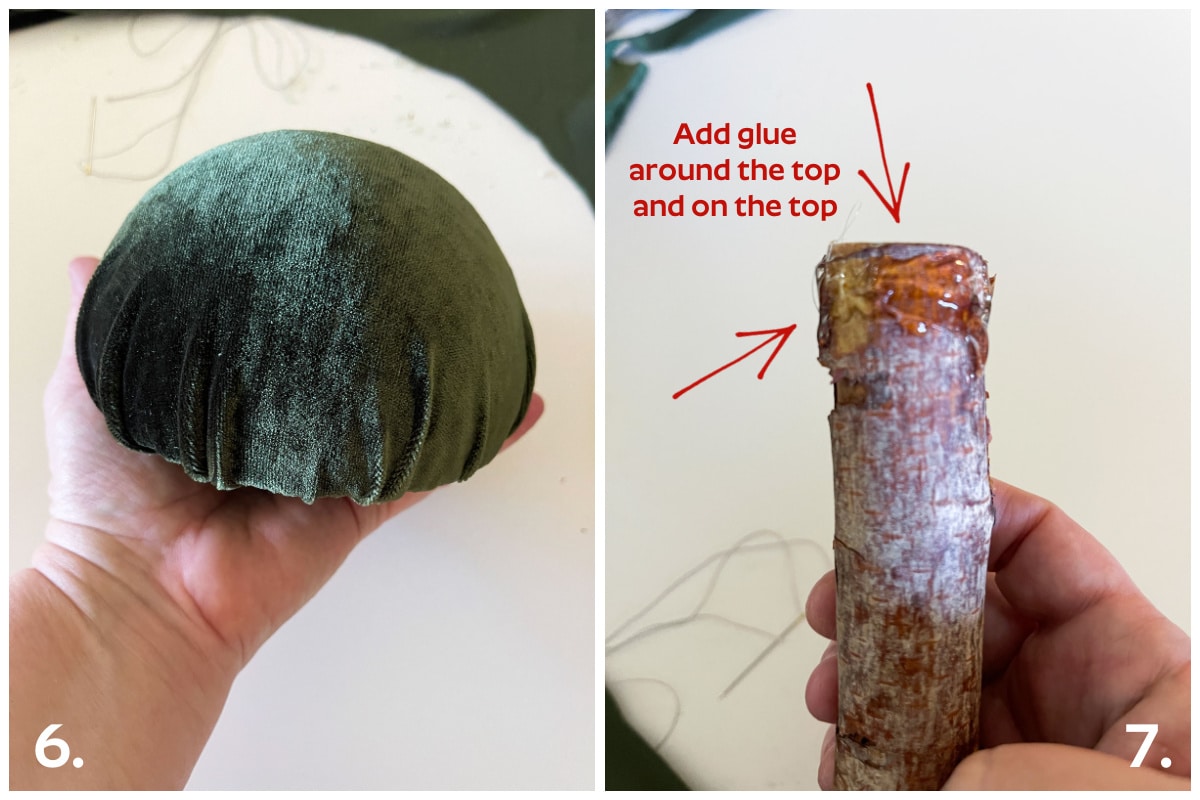
- Pinch and arrange the fabric on the foam half ball until you have the look you want (Fig 6).
- Add hot glue on the top of a mini birch wood log and around the top edge and push into the hole of the cap (Fig 7).
And that is IT!
The ‘bark’ flaking off the stem just reminds me of a rustic mushroom. It makes me so happy!
But, what makes me even more happy? Adding some sparkle!
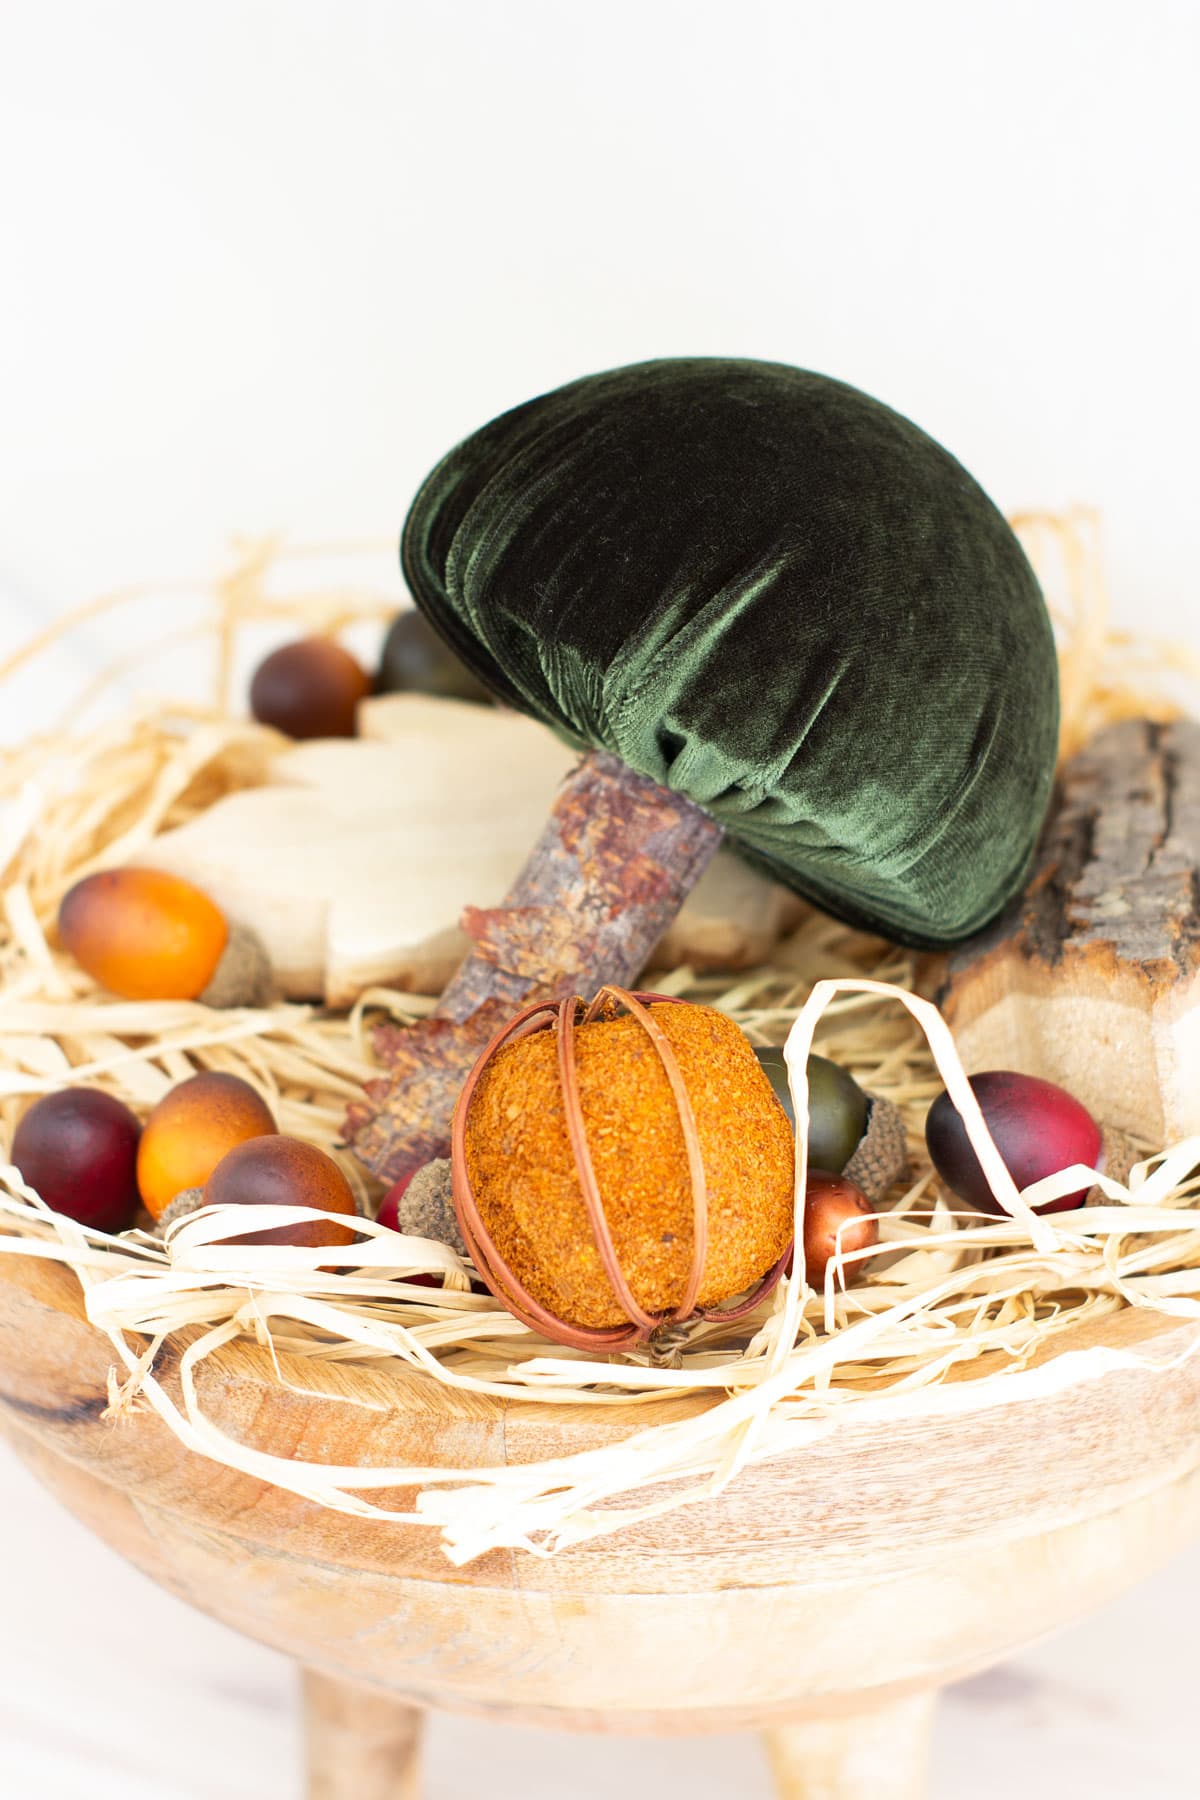
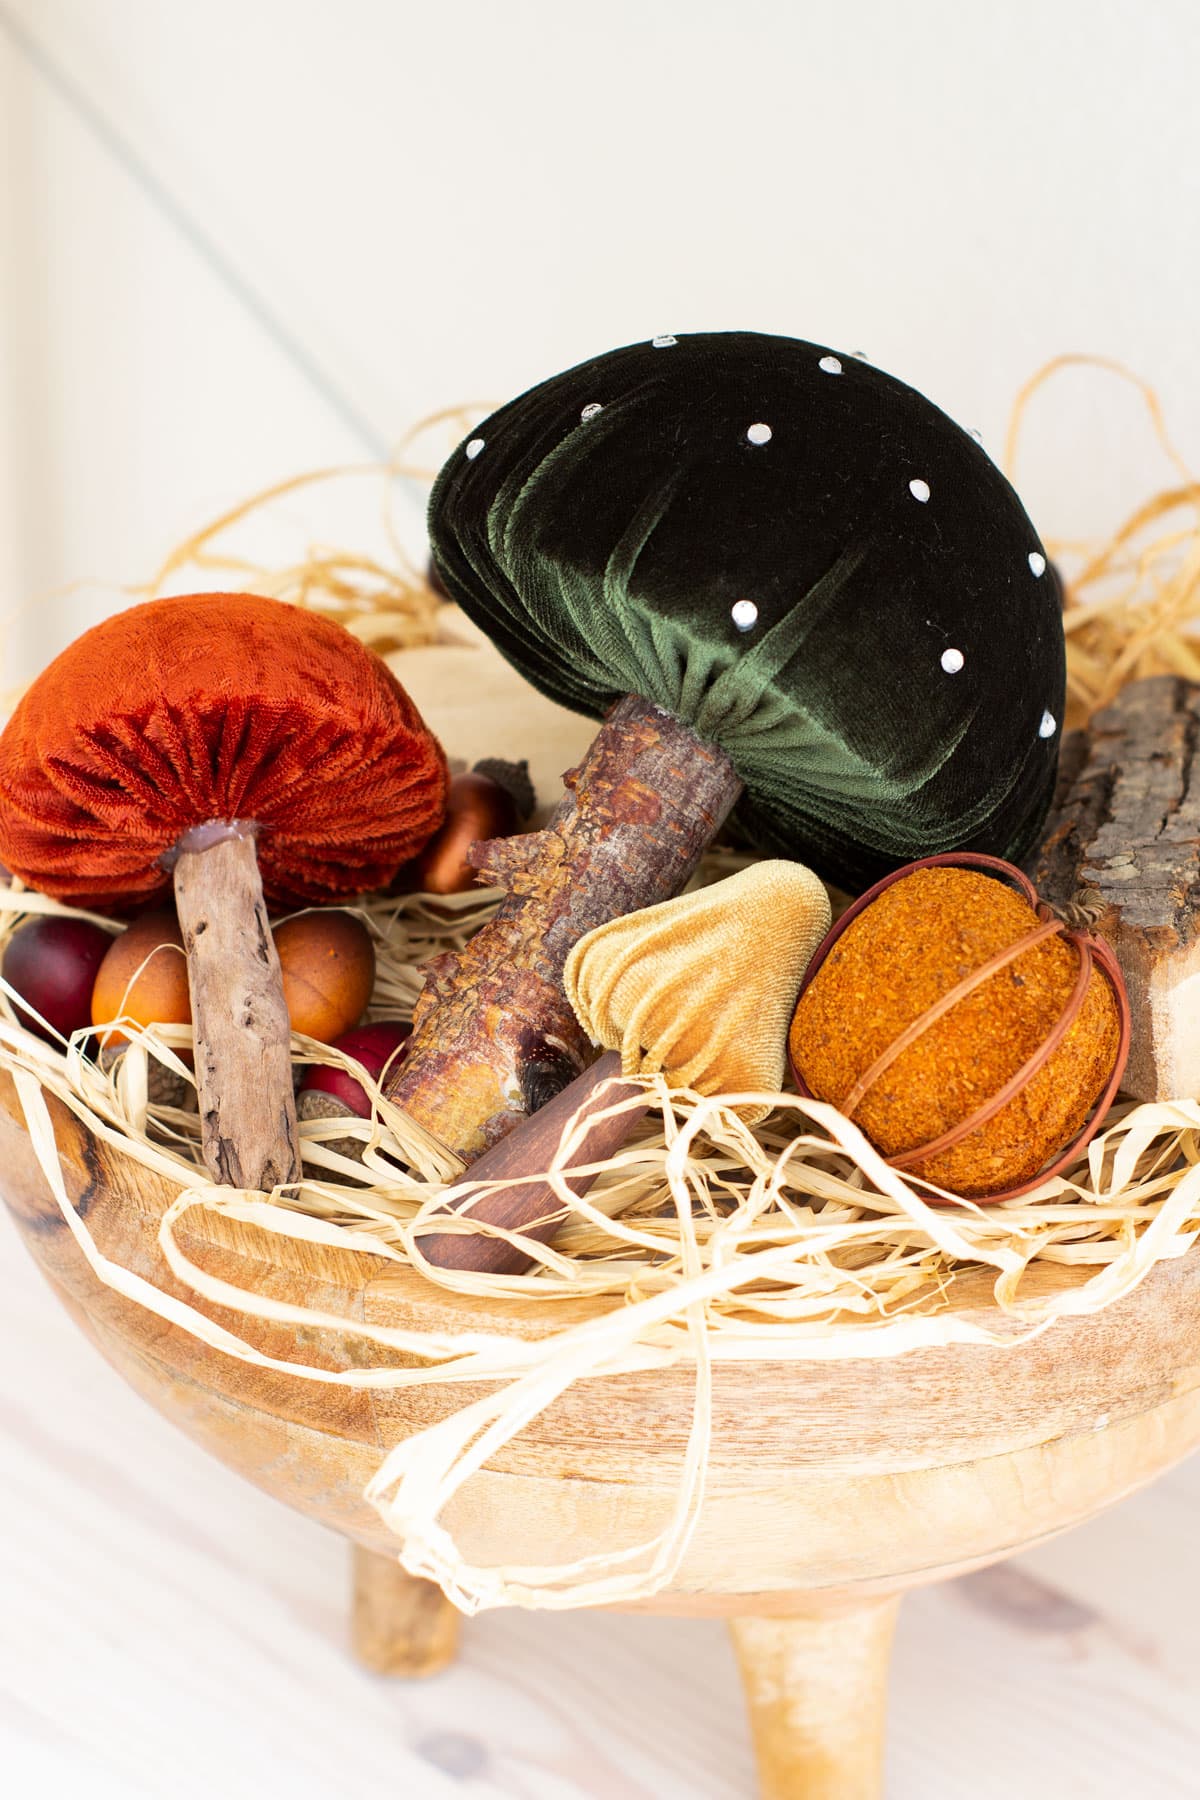
Adding Rhinestones to DIY Velvet Mushrooms
Again, this is really easy to do… seriously easy, and really satisfying!
And you can actually see the rhinestones in these photos!
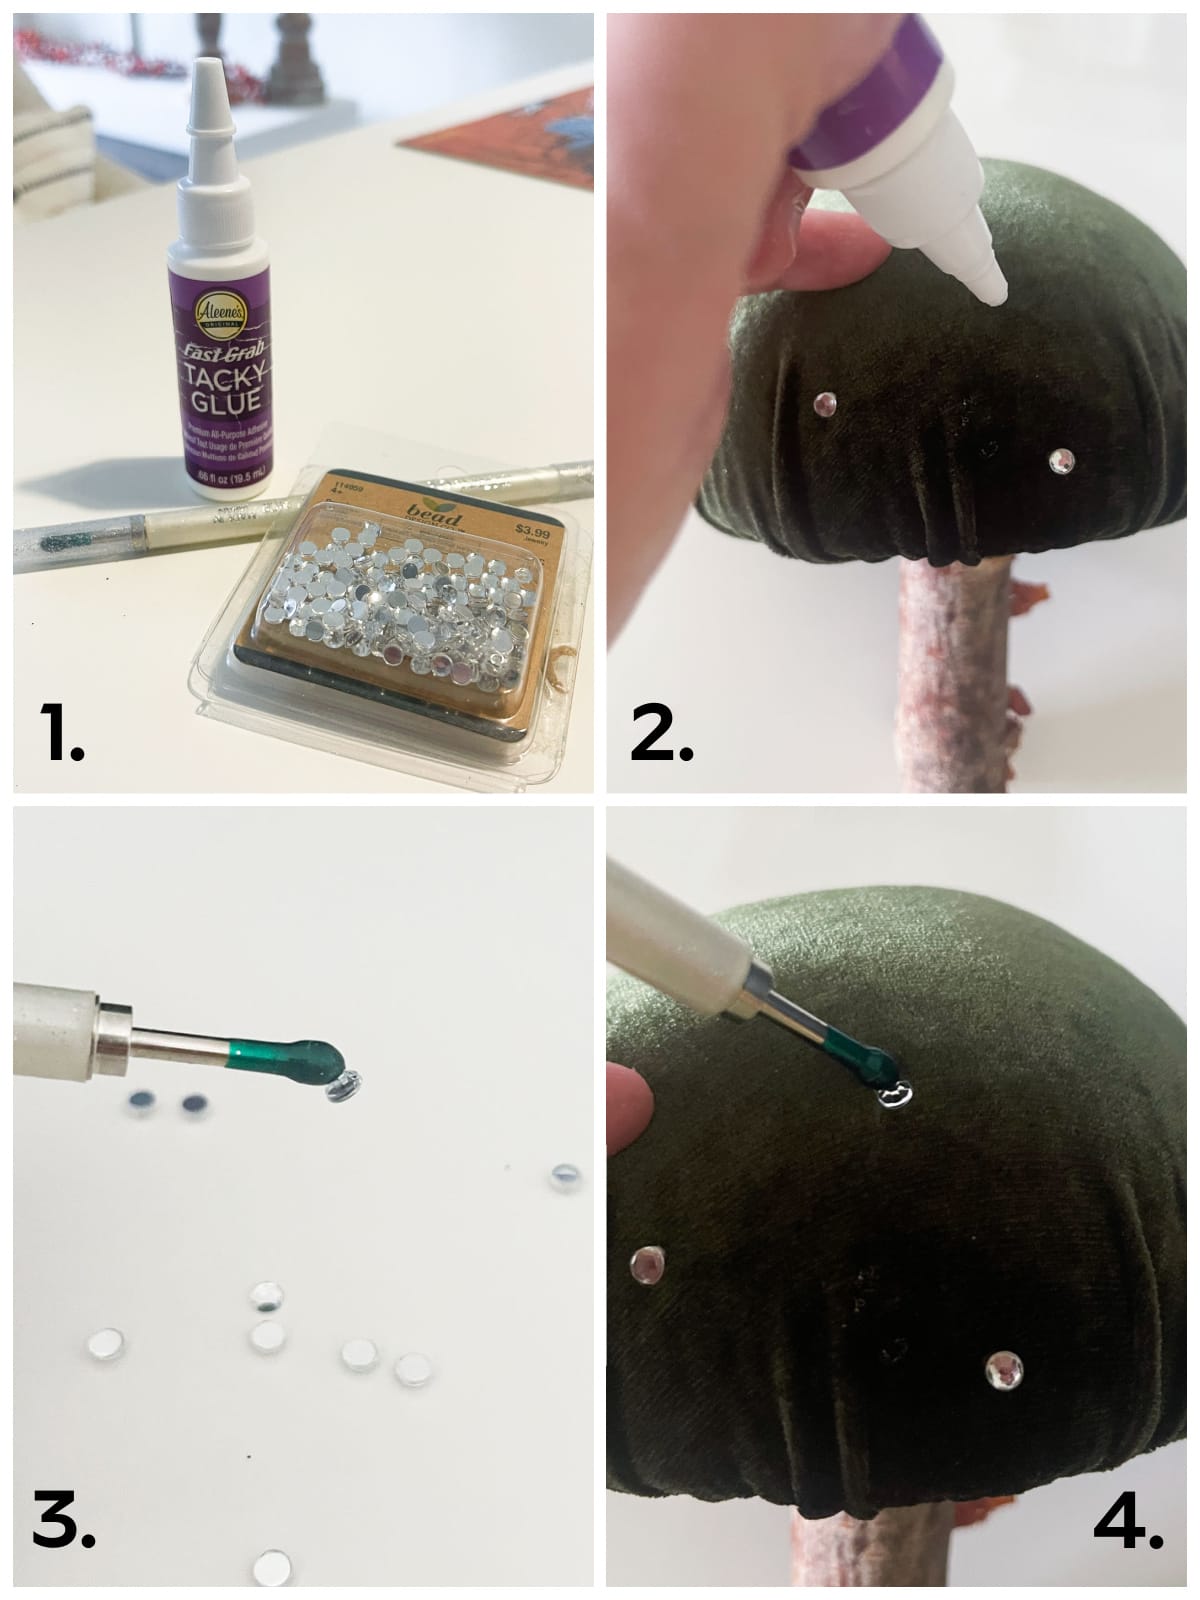
- If you want to add some rhinestones (or any other beading, for that matter) simply purchase Tacky Glue Fast Grab, faux jewels, and a jewel picker (Fig 1).
- Dot the glue around the cap, but don’t do more than three or four dots at a time (it will dry too fast) (Fig 2).
- Pick up a bead with your jewel picker (this is a MUST for adding jewels to anything) (Fig 3).
- Place your jewel on the glue and hold for a second or two. Then roll your jewel picker off the bead (Fig 4).
Now, let’s take a look at the second velvet mushroom style.
DIY Velvet Mushroom with Driftwood Stem and Panne Velvet
There’s not much difference with this velvet mushroom, except the type of stem, choice of fabric, and I DID use the 3-inch SmoothFom for this mushroom.
- Repeat the steps for the velvet mushroom with the birch wood stem, however, you may want to use a knife to hollow out the smaller foam half ball.
- Also, panne velvet is not stretchy, so you may need to work with pinching and prodding the fabric a bit more.
- Pro-tip: You can always cut the ‘stems’ to the length you want using a razor saw (I use mine ALL the time!)
Stand back and admire your velvet mushroom collection growing. Because you and I BOTH know how mushrooms MULTIPLY!
Easy DIY Velvet Mushrooms – Mini Wooden Mushrooms
These wooden mushrooms are so cute. You can choose to simply paint them, or make them little DIY velvet mushrooms!
What You’ll Need
Here are the additional items you will need to make these super simple velvet mushrooms.
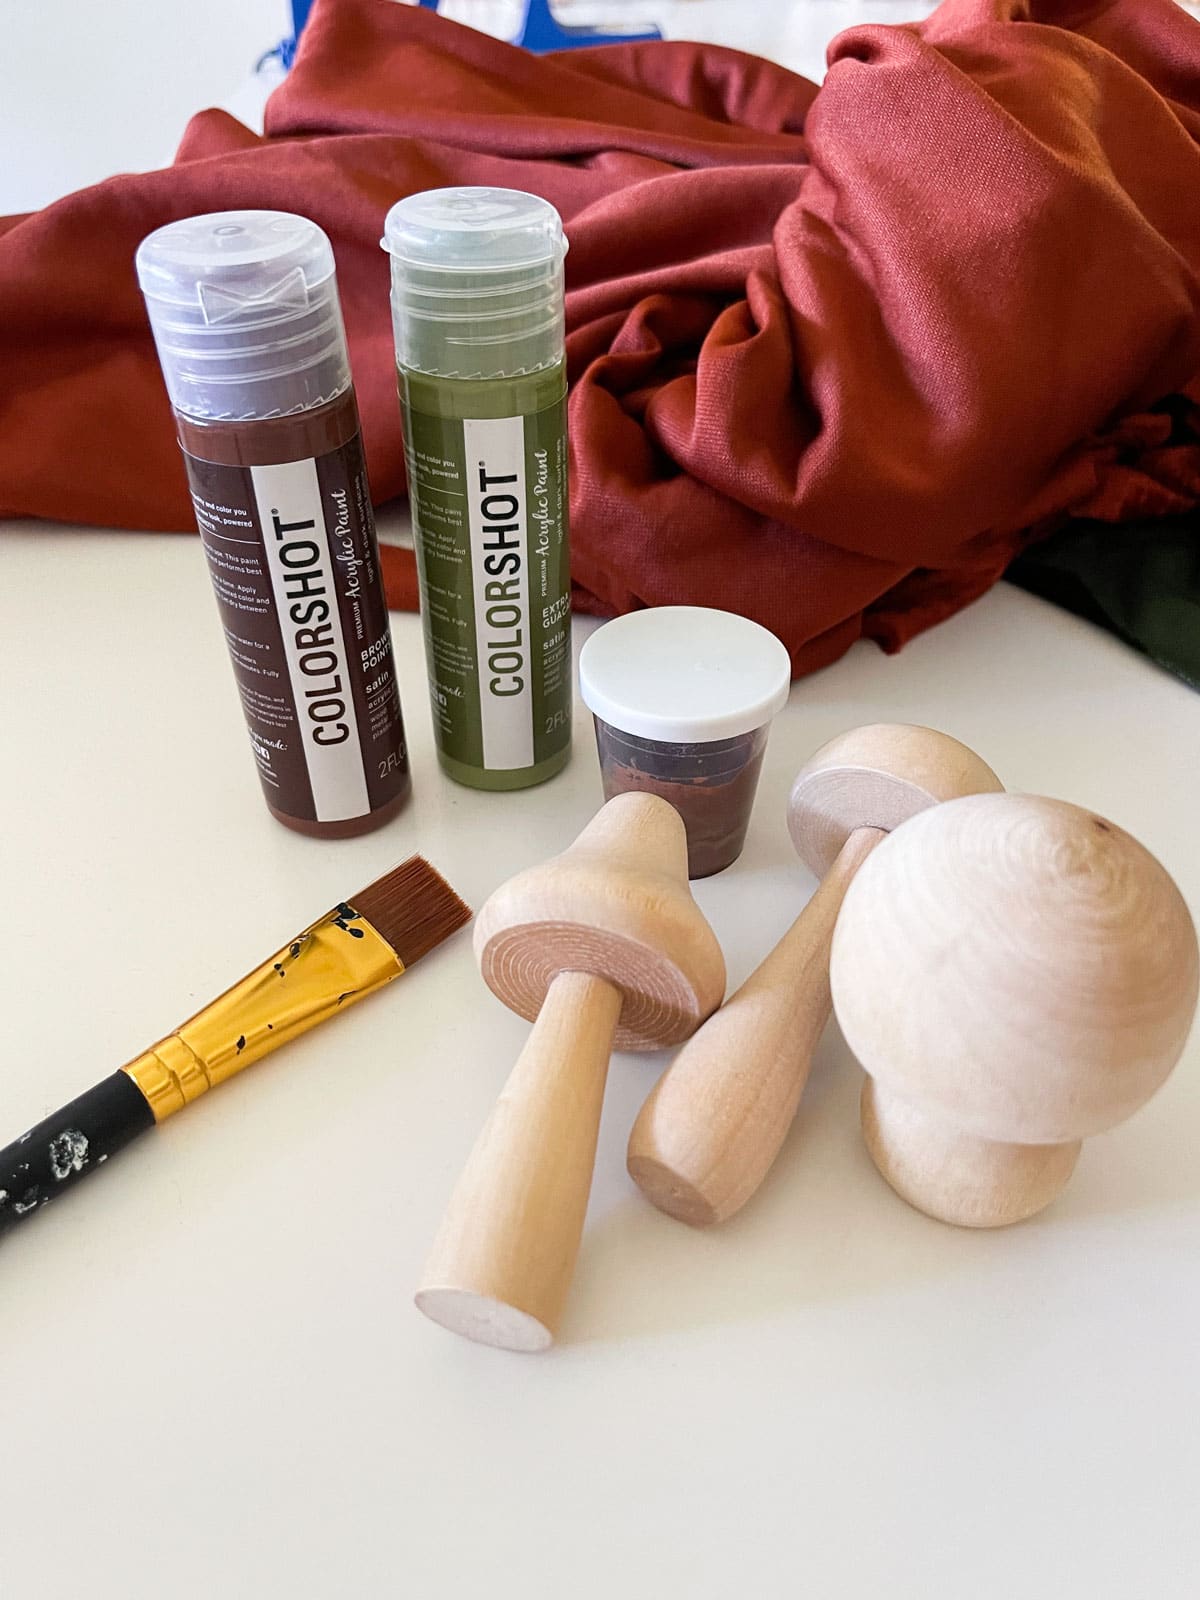
- Miniature Wood Mushrooms
- Acrylic Paint for Stem (your choice of color. I mixed my color, but I like Woodland Brown and Cafe Mocha)
- Paint brush (These FolkArt paint brushes are cheap, but super nice!)
How to Make Miniature DIY Velvet Mushrooms
Again, these are SUPER easy to make!
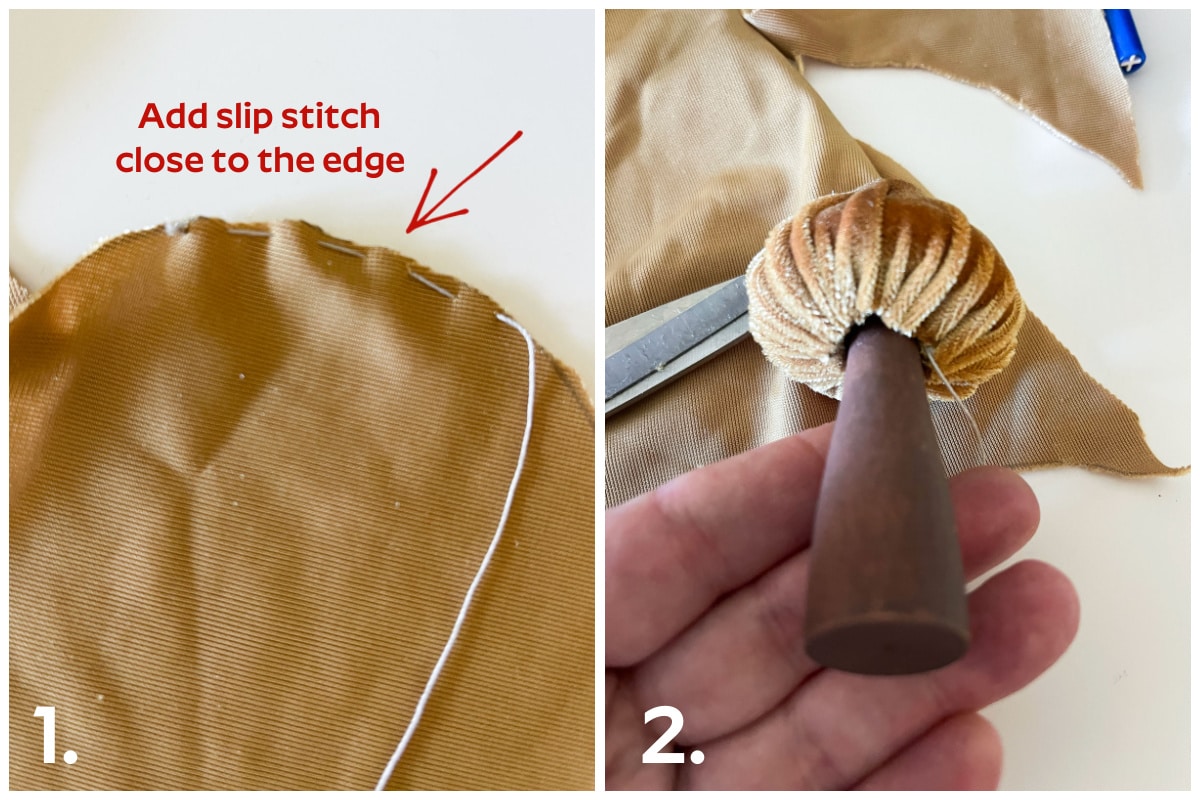
- For this easy velvet mushroom, be sure to slip stitch the velvet close to the edge (Fig 1). This will hide the stitching around the base of the mushroom cap.
- The stem is painted once, because I preferred more of a stained look, but you can paint it solid by painting two coats. Then take the velvet and wrap it over the wooden cap, pull it close to the base, and tie it off (Fig 2)!
And you end up with your third little velvet mushroom!
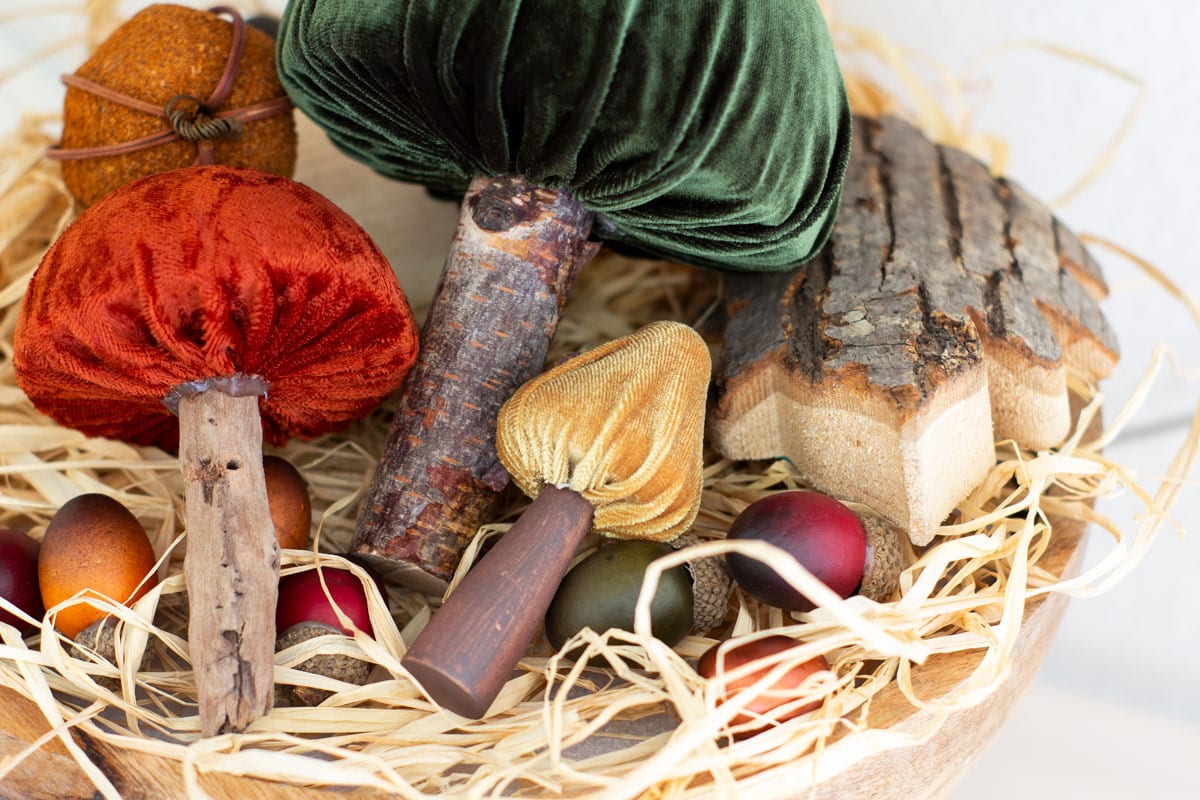
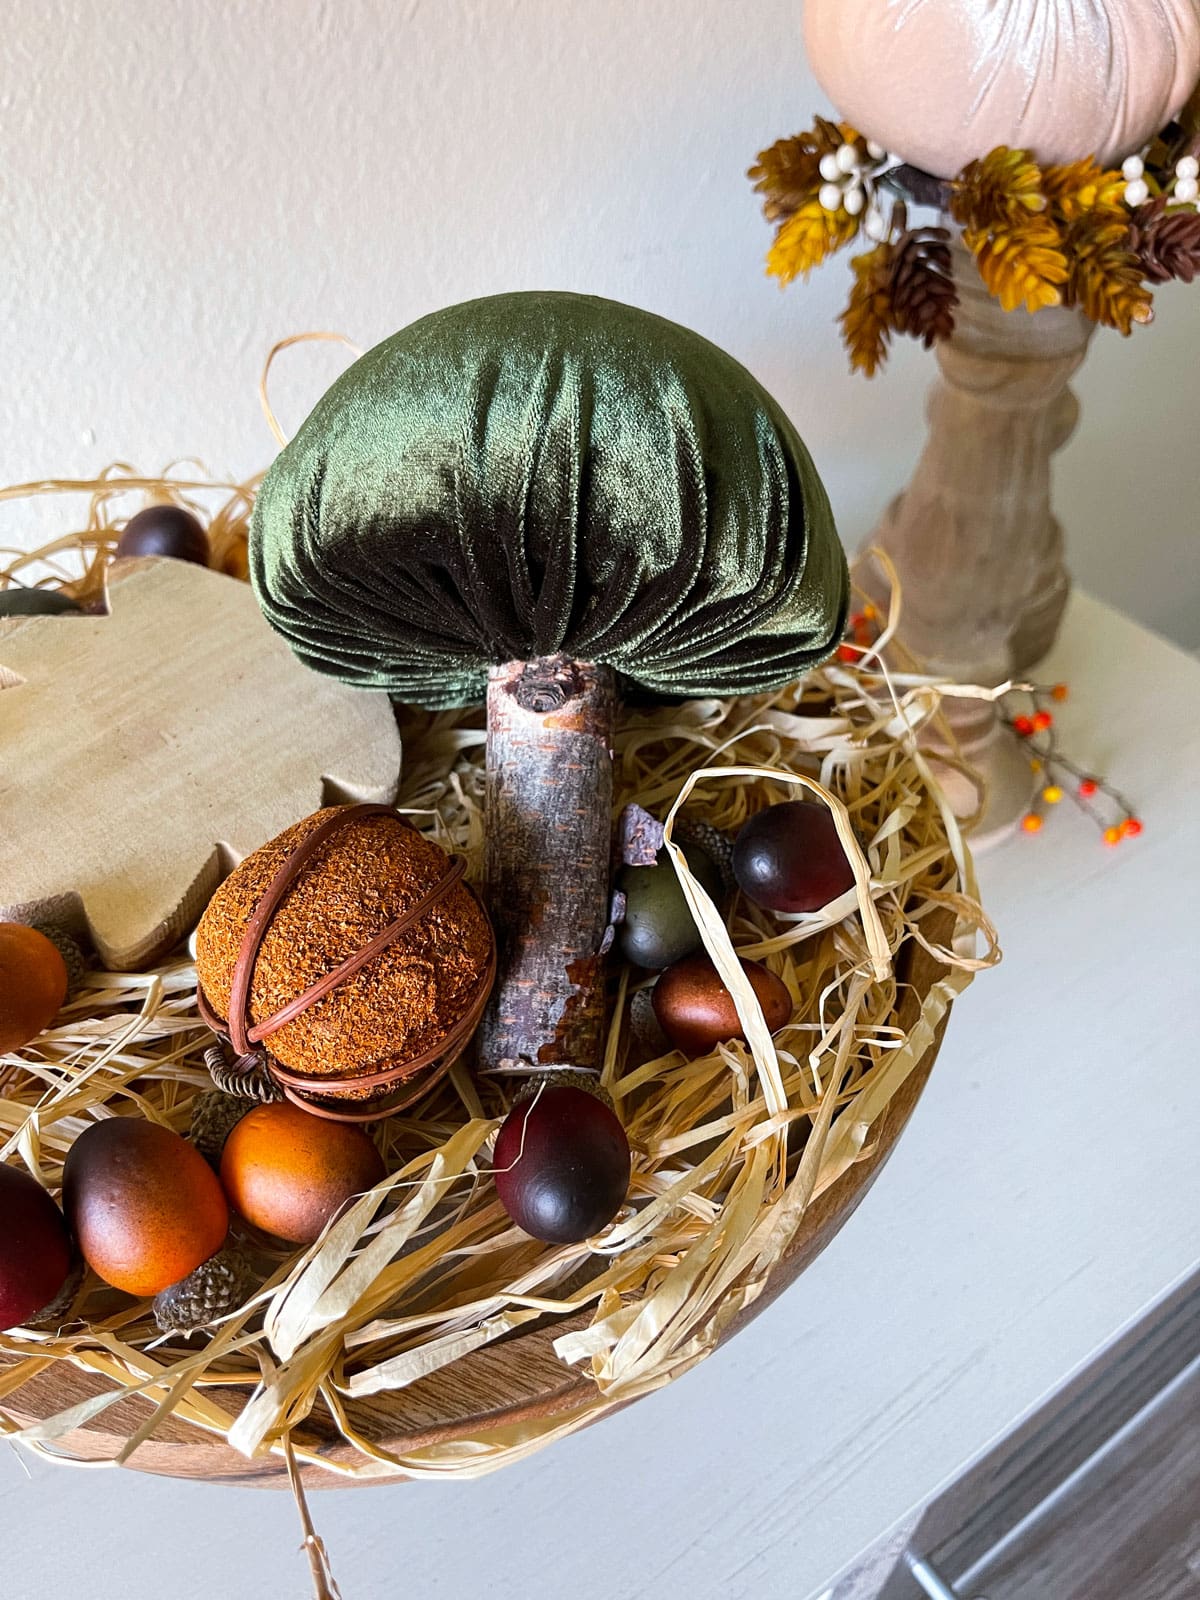
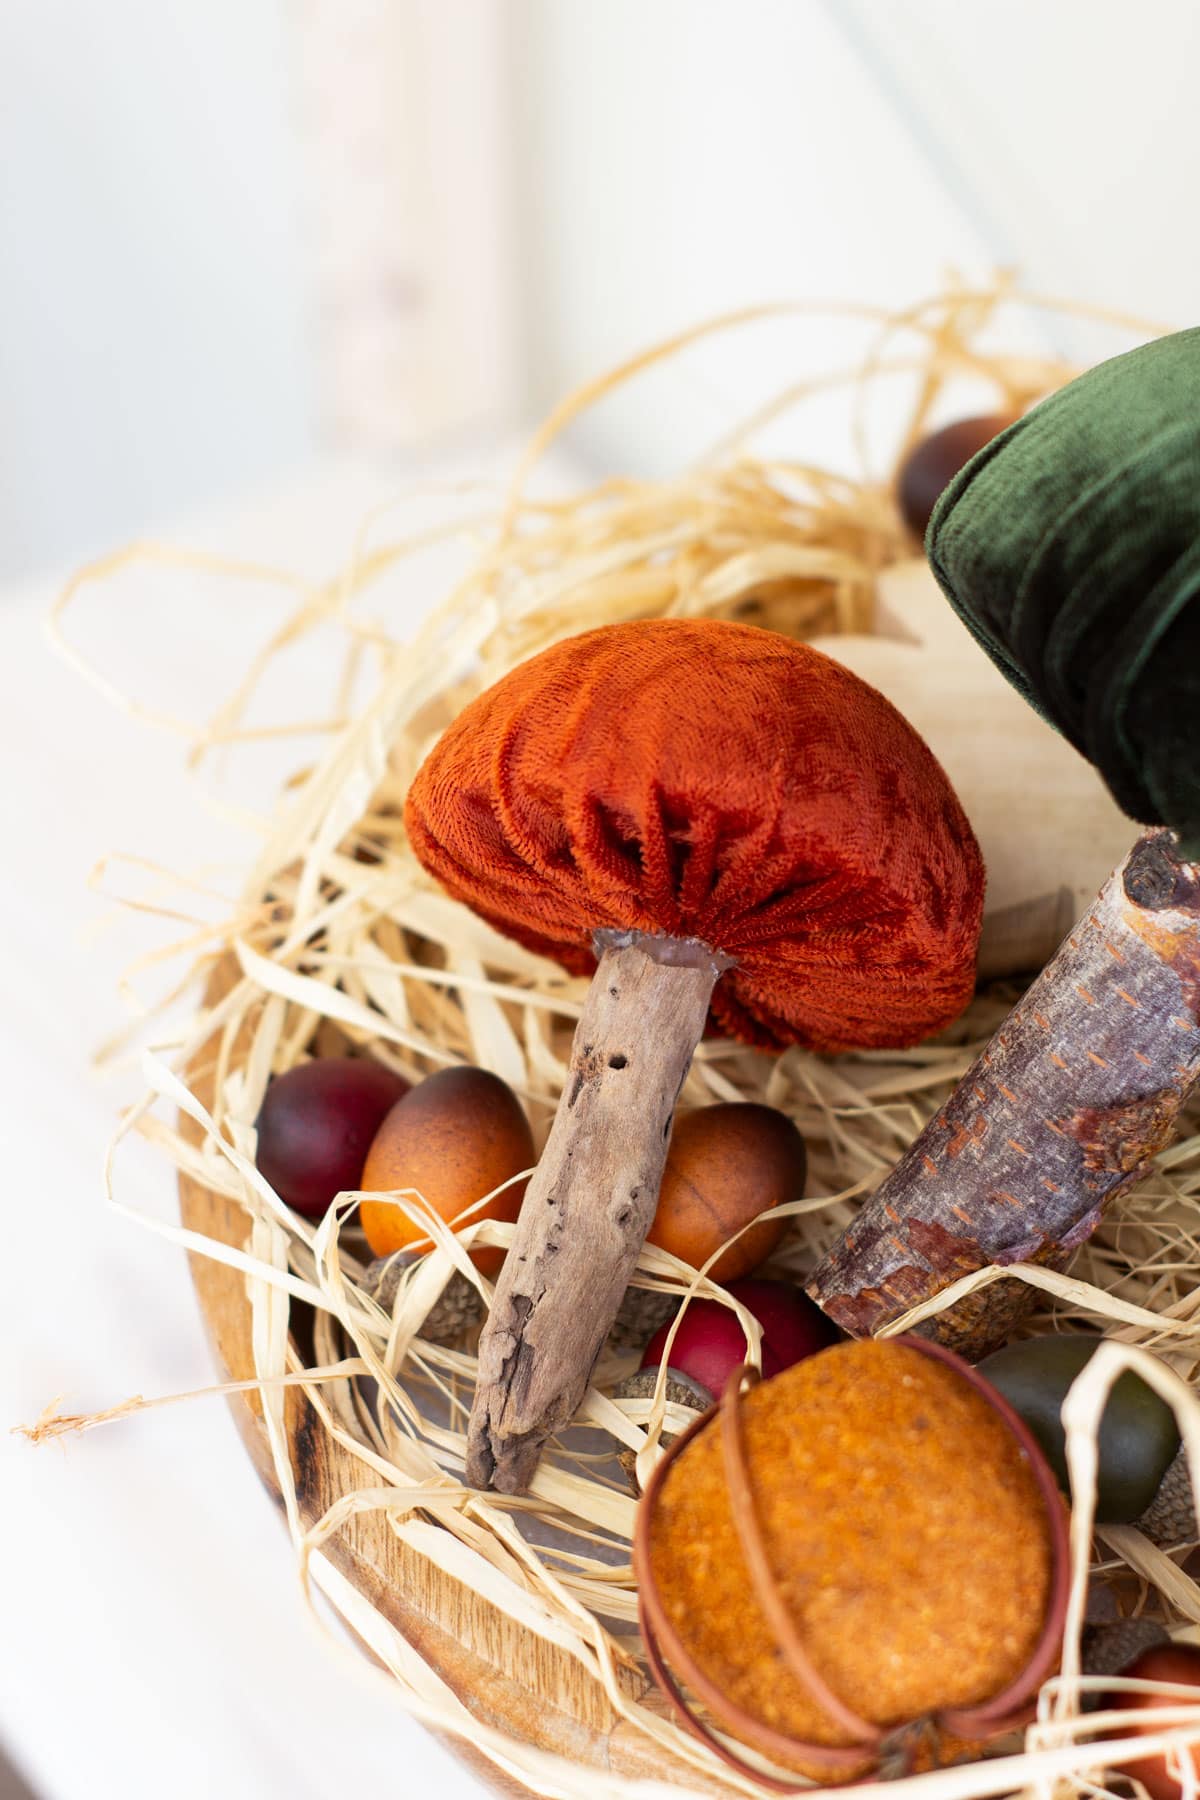
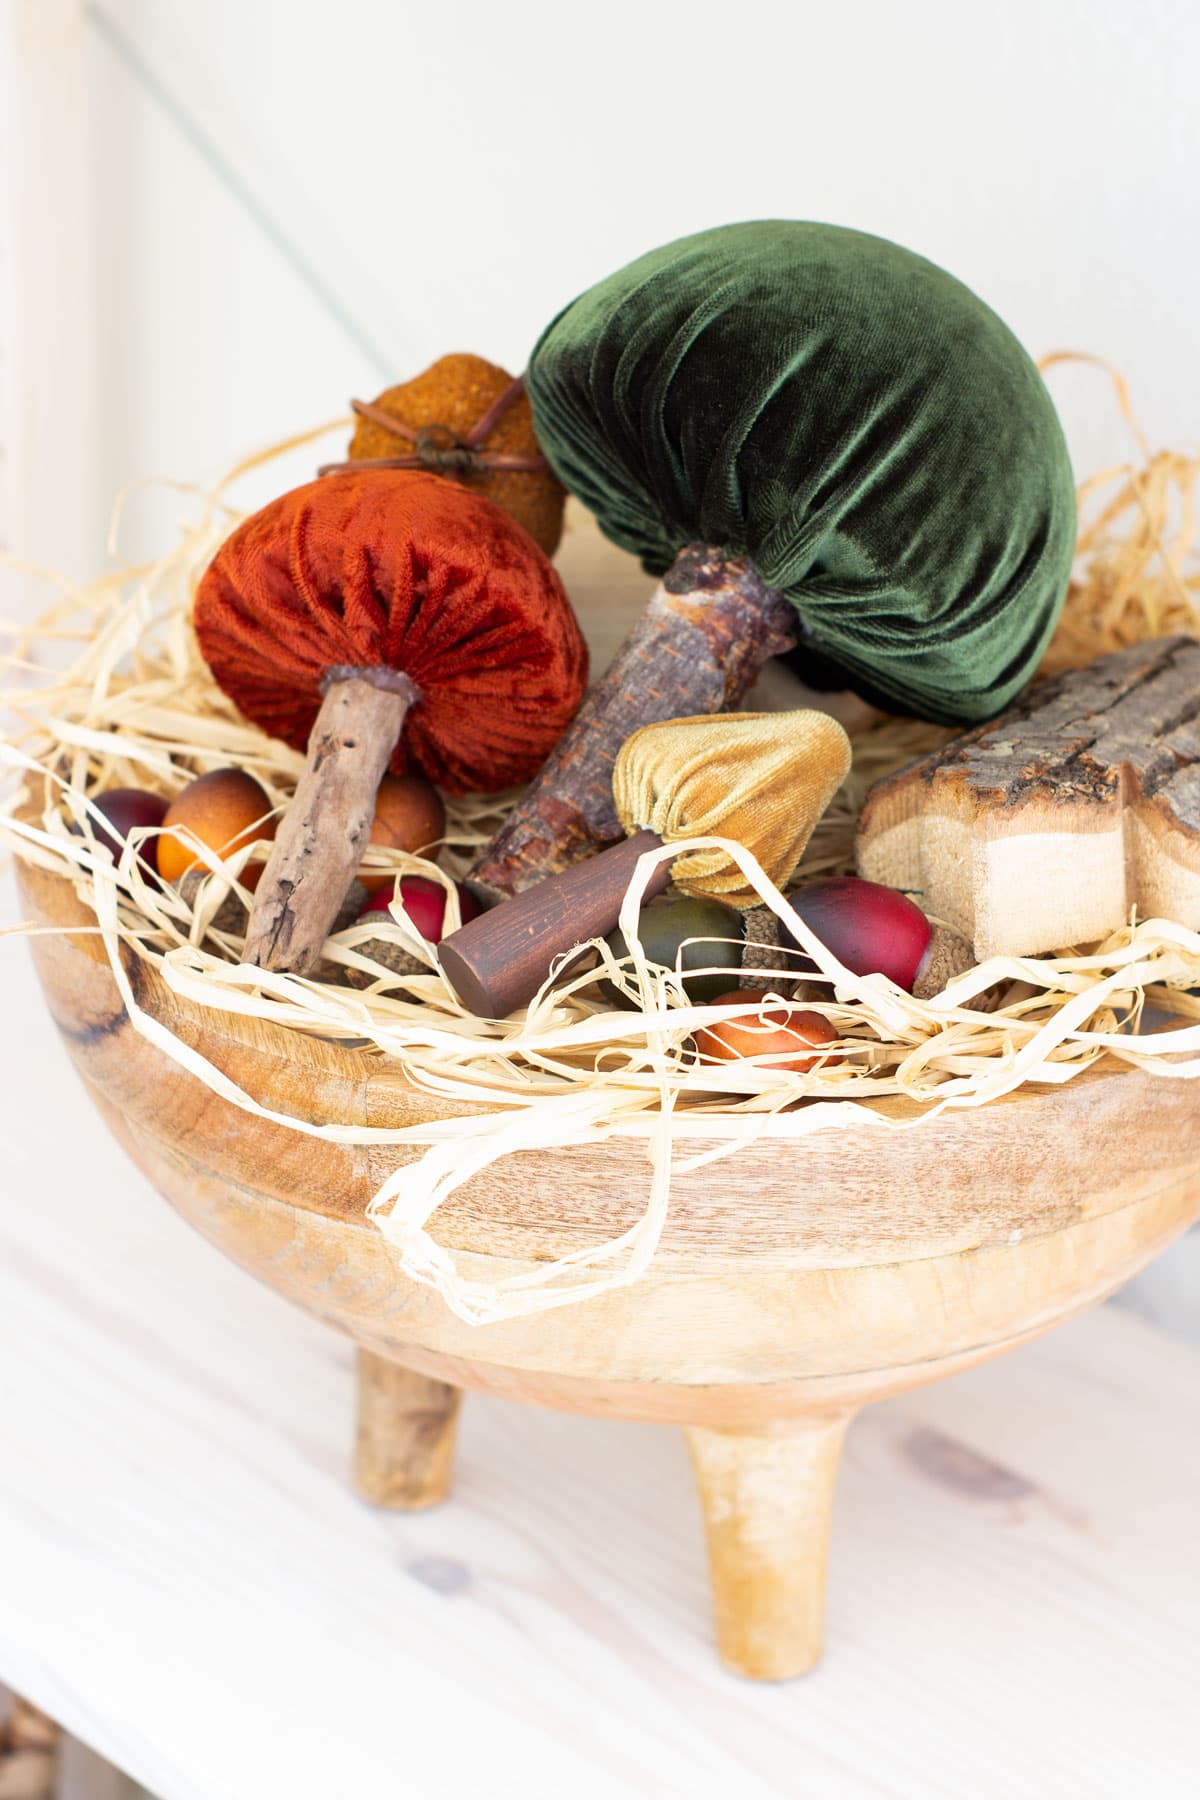
The Final Three Easy DIY Velvet Mushrooms
And here is how these mushrooms look in my favorite wooden pedestal bowl.
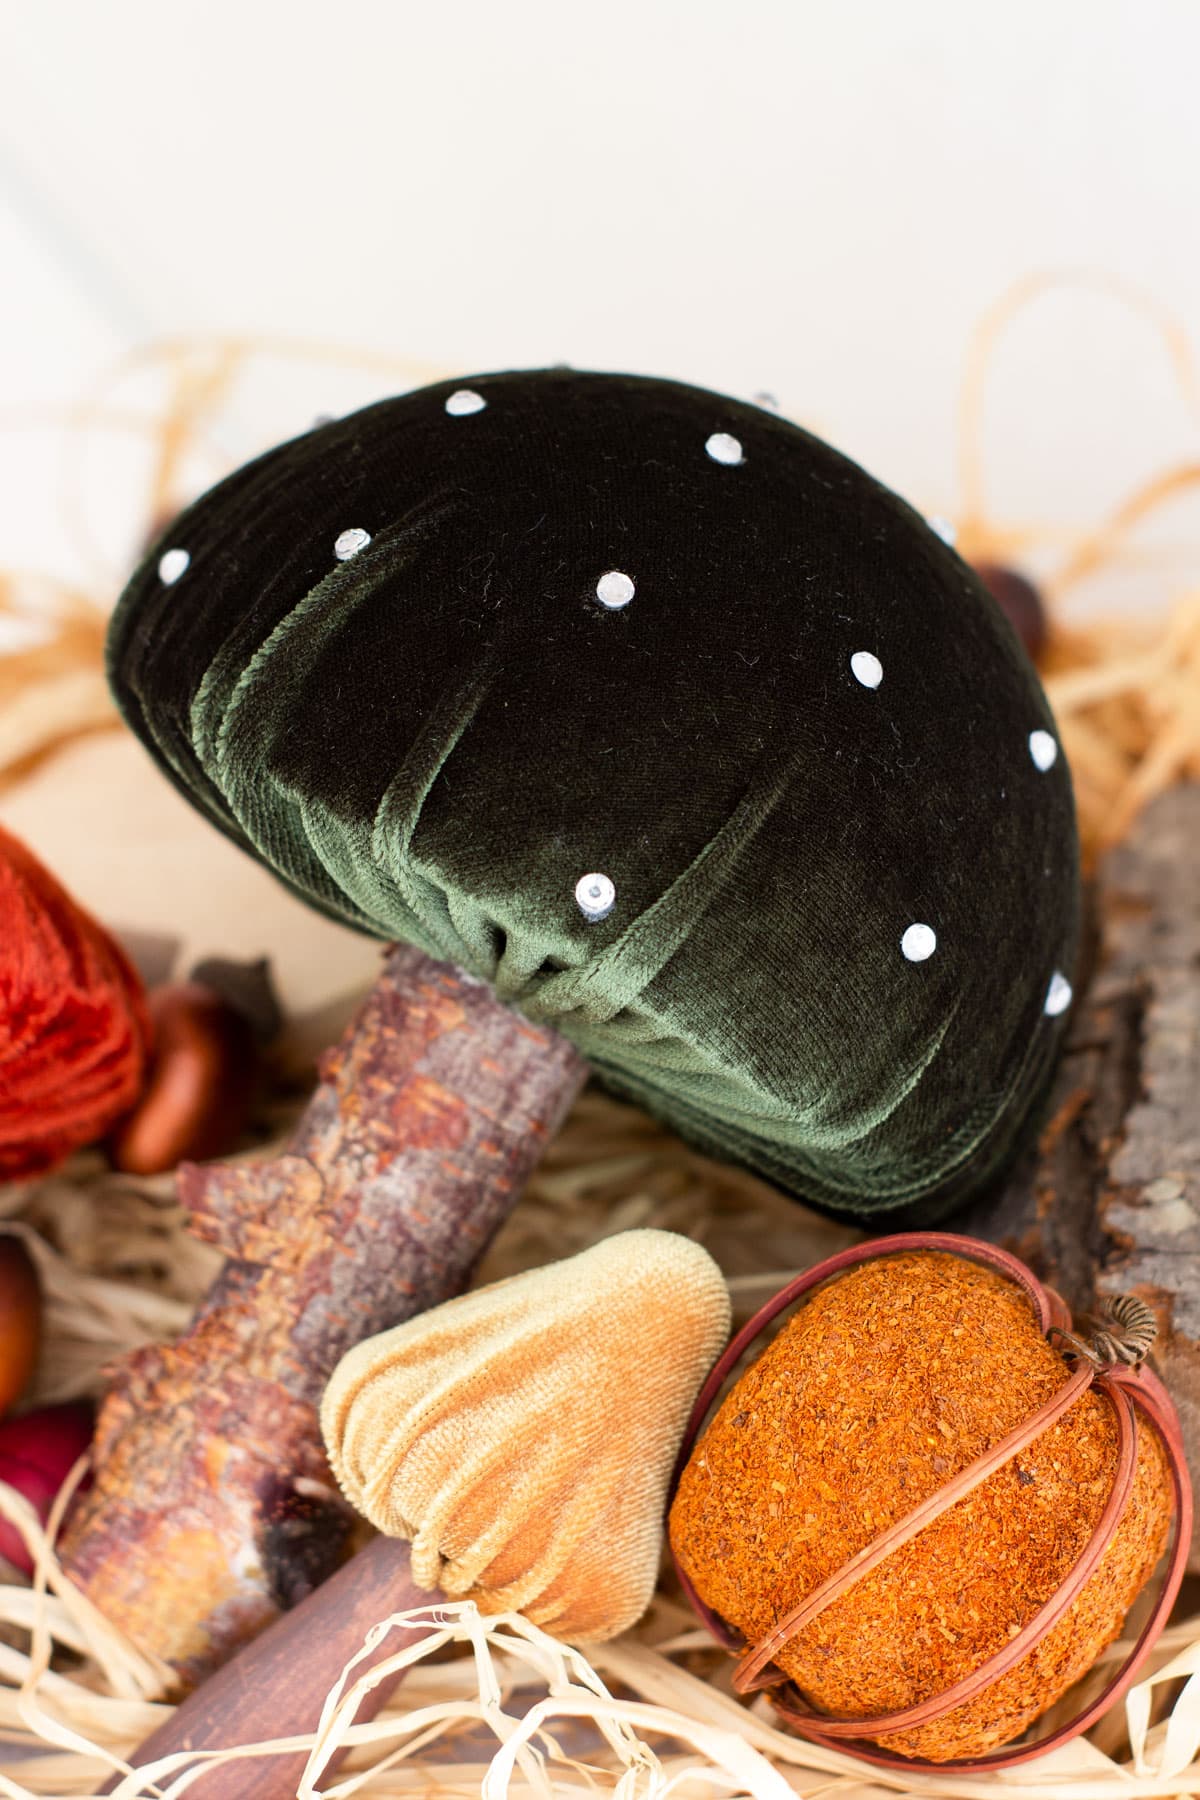
And here are the three with the rhinestone addition!
These easy DIY velvet mushrooms have been on my calendar to create for a while. I’m so glad these are finally done… and I LOVE the way they came out!
Are you loving these velvet mushrooms as much as I am? What colors would you use for your DIY velvet mushrooms?


Julie, those are adorable! I love the colors of the velvet. Great tutorial!
Thanks, Pam! These are definitely more my sister’s color scheme, but they worked with my decor this year!
Julie!!
I LOVE these and I have all of these supplies in my stash!! Thanks so much for the inspiration!!!
Hugs,
Deb
Oooo! Let me know when you make them!
These look so lovely! Watch out for a gnome invasion in your abode! 🍄
Oh, no!!! Have I told you about my aversion to gnomes? LOL!
super cute, Julie. Love the beautiful fall colors, and good companion for velvet pumpkins!
Thanks, Debra… definitely wanting to do some in more neutrals to coordinate with my pumpkins!
I’ve seen mushrooms everywhere this year and think they are so cute. Love yours and the DIY seems totally doable. Love the colors you chose as well. So fun! pinned
Thank you, sweet friend! The colors are good for this year, but I’m thinking some more neutral colors for next year!
I absolutely love these Julie. I have a thing for mushrooms and actually have a post lined up. Totally pinning these & going to give them a try. Thanks for the inspiration. XO- MJ
Looking forward to your post! Can’t wait! (Let me know when you publish.)
You know I totally love these. I didn’t make them yet so thanks for the reminder and appreciate you sharing at the Home Imagined link party. XO- MaryJo
These are adorable. Your colors are luscious. Your tutorials are always so easy to follow. I can almost hear your voice!
Oh, thank you, Kathy! You are so sweet!
Love your mushrooms! Thanks for giving us a list of places at which we can buy the items needed. I love the velvet touches. I would probably stay in the color ranges like taupe, sand, maybe light gray, but I’d throw in a teal or aqua to match my other decor!!! These areally are eyecatching.
Yes, Barbara! Those would be more my color choices, too! But, I thought I would do the classic colors to appeal to the masses. I think I’ll be doing some to match my coastal color velvet pumpkins! Thank you for the kinds words!
These mushrooms are so cute! I think I am going to buy a bunch of the wooden ones and make ornaments for my Christmas tree! Thank you for sharing!
Super cute idea, Elizabeth! They are solid wood, just FYI… a bit heavy, but I think it would work on a faux tree!
Julie your velvet mushrooms are just the sweetest! I love this craft and how cute they turned out! Pinning!
Thank you, Michelle! They are a great addition to my velvet pumpkins. 🙂 I think I want to do them in some different colors, too!
Julie, these velvet mushrooms are adorable. I shared them in my roundup post. Love them and will need to make some of my own.
Thank you so much for sharing, Tammy! So blessed!
These are SOOO stinkin’ cute! I love the birchwood stem one and the idea of adding some bling for fun.
Thanks, Janet! They are my new fave. 😉
Hi Julie! I’ve never been a fan of mushrooms, but you just changed my mind! They look lovely! Thanks for the great tutorial! Pinning now! Donna
I’m with you, Donna… mushrooms remind me of my childhood home decor! LOL! But these changed my mind, too! 😉 They are lovely and different!
Wow, Julie!!! These are INCREDIBLE!!!! I have never seen anything like this before. You did such an amazing job of creating these and I LOVE the colors!!
Thanks, Rachel! So glad you enjoyed the post! They were so easy to make!
Oh my goodness, Julie, these are the most adorable (and classiest) mushrooms EVER!
Aw, thank you SO much, Marie!
These are super cute Julie! The velvet fabric adds a touch of elegance in contrast to the stems and I love that! Pinned 🙂
Thank you, Cindy! I really am pleased with them!
LOVE THESE velvet mushrooms, Julie! We will be featuring you starting Wednesday at the Creative Crafts Linky Party!
Creatively, Beth
Oh, thank you so much! Always blessed to be featured at your party!
Love these! I’m doing a woodland theme for my daughter’s birthday and definitely want to use mushrooms!
Oooo, I did a garden theme in a bedroom once. These would have been a perfect addition! Have fun with the woodland theme! Want some cute elements to create some prints from??? https://creativemarket.com/Lemaris/3026252-ONCE-IN-THE-FOREST-Winter-set and this one… https://creativemarket.com/Lemaris/3768311-FOREST-WALK-Watercolor-set
Hi Julie. I love how these mushrooms turned out! This is such a unique idea for fall. Thank you for the step by step instructions and great photos. I hope your Mom is doing well. Thank you for submitting this post to the Home Imagined Link party!
Mom is doing well, all things considered. 🙂 Glad you liked the mushrooms!
What a beautiful craft idea! I love mushrooms and this is a craft I need to get my hands on! Popping by from Wonderful Wednesday Blog Hop 🙂
Thank you so much for stopping in and commenting, Michelle! Thanks for the kinds words!
Adorable! I have plenty of wood stems – yea! Just need the wood mushroom forms.
Rachelle
The caps are actually foam… easy to order or pickup. 😉 Have fun!
These are so adorable Julie, I have been working on some mushroom too to hang in my tree this year. Thank you for sharing.
Are you doing a themed tree? Or just love mushrooms? I have another reader that is making acorns to put on her tree!
Adorable Julie!
Aw… thanks, Amy!
These are absolutely adorable! Love the velvet (and love the rhinestones!) Thanks for a great tutorial!
Thanks so much, Missy! I really enjoyed making them!
Loving these and featuring them on Farmhouse Friday tomorrow! Thank you so much for sharing them. pinned!
Oooo! Thanks so much, Cindy!
These are about the cutest things I have ever seen!
Oh, thank you SO much, Kimberly! Did you see the acorns?! 😉
Julie – This is one of my favorite of your DIYs. I love the use of the velvet, the colors you selected and how the final product turned out. Thank you for sharing this post on the Home Imagined Link Party.
Thanks so much, Anna! Hope to see you at Tuesday Turn About this week!
Julie these are so adorable and cute. WOW, love the sparkle you added.
Thank you for sharing your links with us at #276 SSPS Linky. See you again next week.
Hi Julie – I am happy to share that your DIY velvet mushrooms will be featured tomorrow for our Home Imagined Link Party!
Oh, thank you SO much, Anna! I appreciate it… Happy Labor Day!
These are GORGEOUS, Julie!
We will be featuring you starting Wednesday at the Creative Crafts Linky Party!
Pinned and shared!
Creatively, Beth
Oh, thank you! Always fun to be featured at your LP! 😉
These are so adorable! I love mushrooms so much. I have pinned this to try making my own little mushroom collection! Thanks so much for sharing your creativity!
Shelbee
Thanks so much, Shelbee… they are so easy and fun to make!
Absolutely stunning Julie, love it
Found your post on Karins Kottage. My entries this week are numbered #98+99
Thanks, Esme!
I remember these from last year! My niece and I purchased the wooden ones and painted them for our Christmas tree!
So fun, Elizabeth! Thanks for dropping in and sharing!