
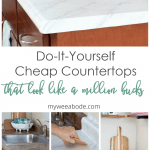
DIY Cheap Countertops with Contact Paper
Installing new countertops, whether in the kitchen or bathroom, can be pricey… and sometimes not an option (in rental homes or apartments). This post will show you how to DIY cheap countertops with contact paper, also known as adhesive film, and make your kitchen look like a million bucks!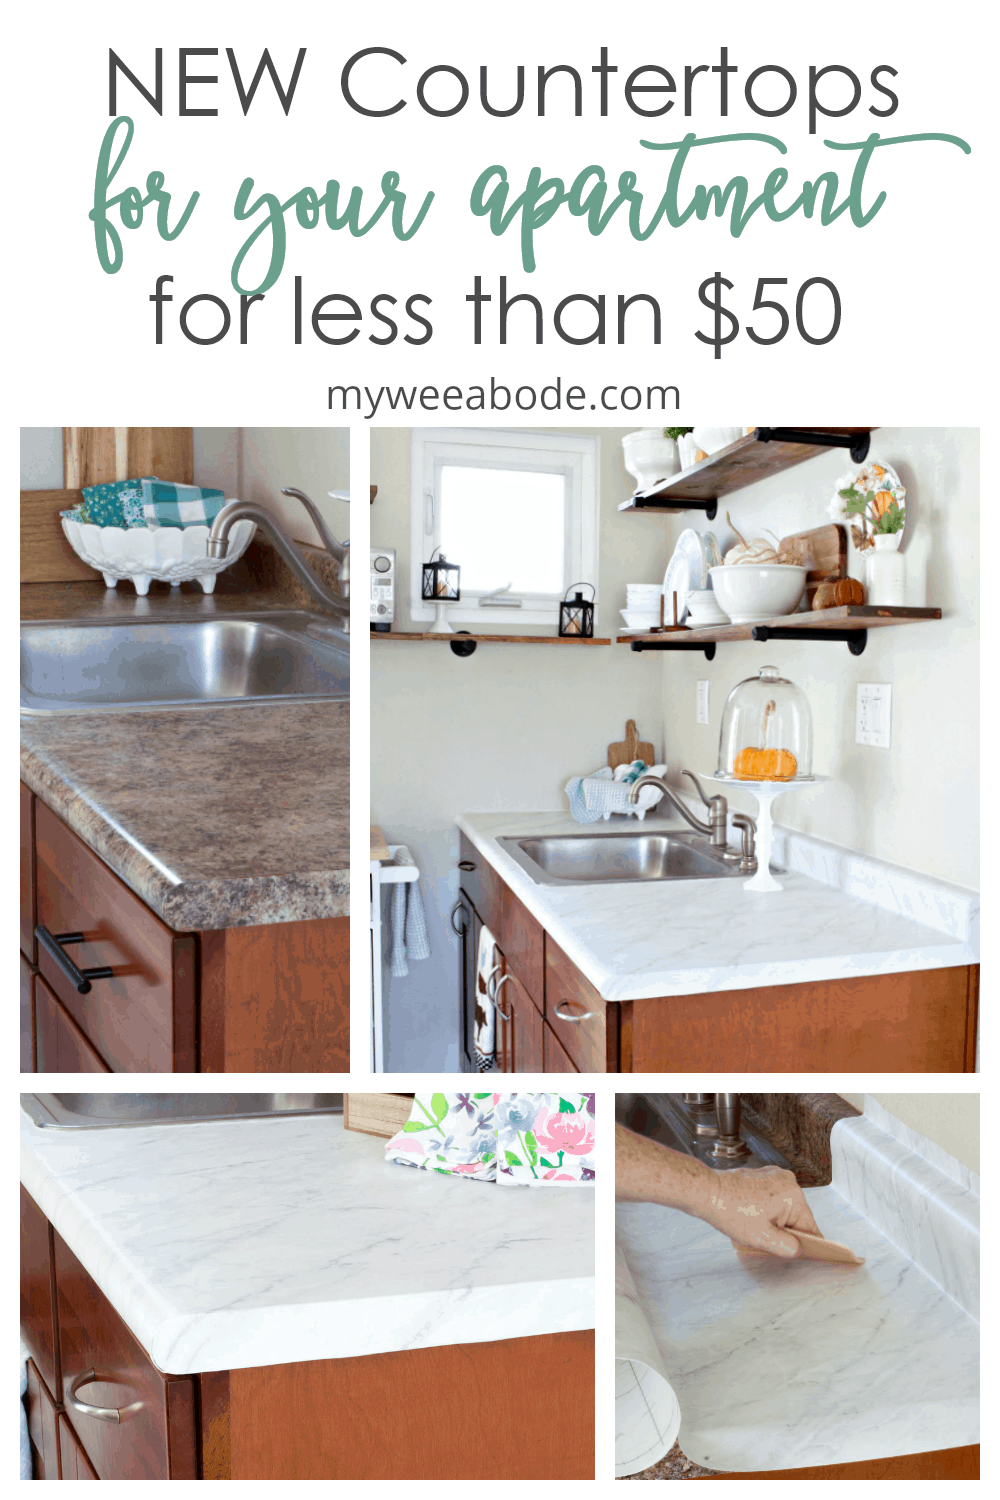
DIY CHEAP COUNTERTOPS with CONTACT PAPER
After the reveal of my new kitchen countertops, I received quite a few questions. So I thought I would try to answer the questions in this post, along with sharing a tutorial.
This post may contain affiliate links, at no additional cost to you.
For more information, see my complete disclosure HERE.
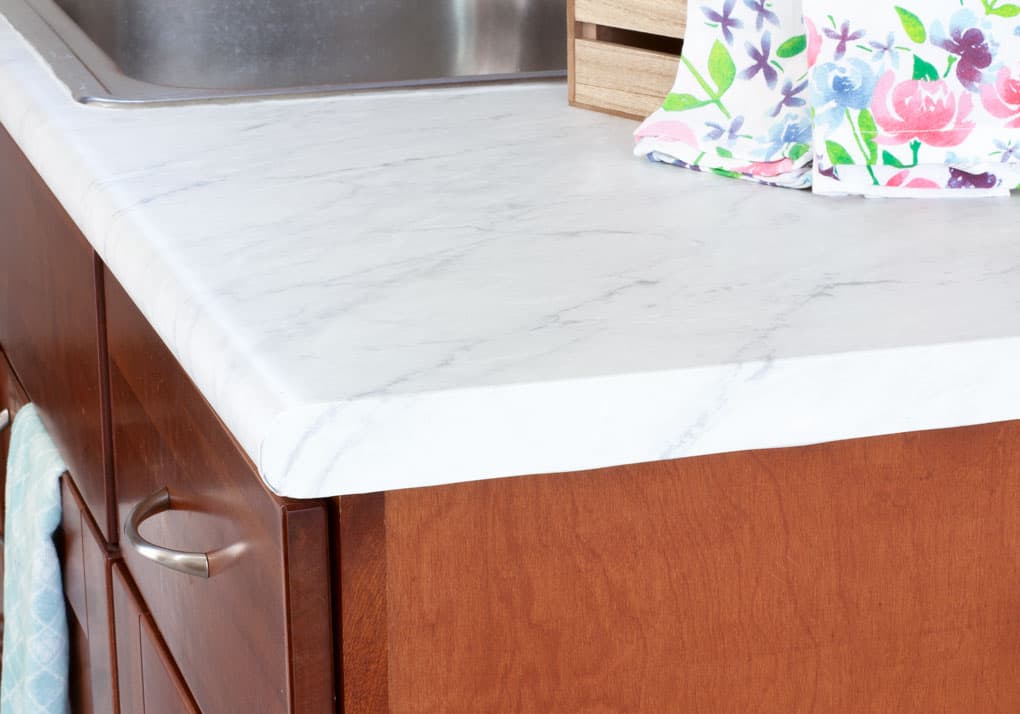
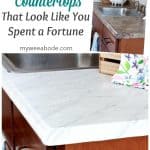
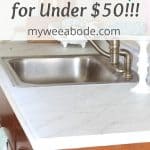
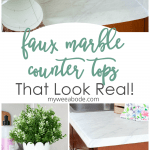
These adhesive film countertops are a perfect solution for those living in rental homes or apartments, or even those who own their home and are simply on a tight budget. This durable contact paper is AMAZING! Because the paper is so thick, it looks like marble and feels like laminate. And, the cost for my counter space was just under $50. Pretty crazy, huh?
Here are more thoughts on living in a small rental home!
The BEFORE
Before we get started, let me show you what I started with…
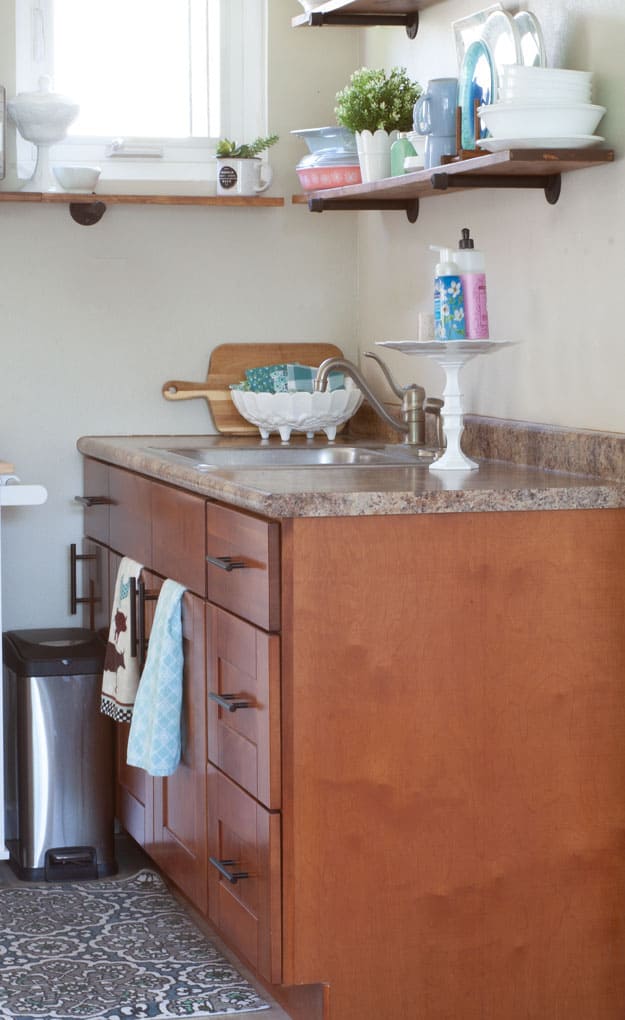
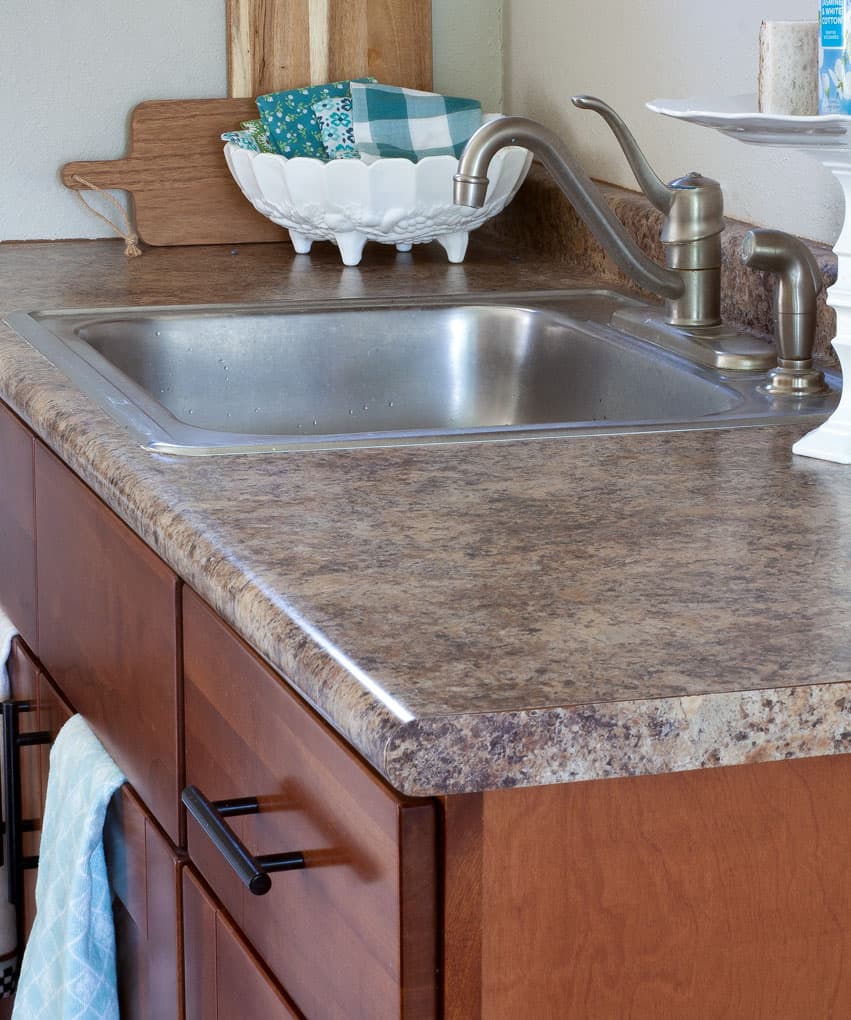
Yep, not bad… but they didn’t make me happy.
So, let me share a perfect, budget-friendly solution to update your countertops that looks like a million bucks! Well, maybe not a million, but I’m sure a lot happier! Here are my DIY countertops with contact paper applied to them.
Trick #1, Sticky Situation
The contact paper is very durable, very thick, and VERY sticky, but pretty easy to work with.
The best trick for working with it is to spray lots of water on the counter before applying the contact paper!
Seriously! If I had to do it over, I would even put just a tad bit of liquid dish soap in the water. This enables the paper to be moved around and applied properly. Then, as you smooth the paper down (with a squeegee type tool), the water ‘gushes’ out from under the paper (onto the floor and your clothes, no less) and the paper remains stuck to the counter! Pretty crazy, again, right?!
Even though the contact paper is really sticky, it can be lifted and re-positioned over and over!
Trick #2, I’m Melting!
In order for the adhesive film to fit nicely around the edges and corners, I used trick number 2! Grab your handy-dandy hairdryer!
This film becomes very pliable with just a little bit of heat. When you begin applying heat, you will notice the paper start to soften… after about 10-15 seconds, it almost feels like it’s melting. At this point, you can quickly and gently stretch the paper around the corner first, then the edge. It works just like using shrink wrap! Pretty crazy number THREE!!!
Don’t worry if you make a mistake… you can reheat, lift off, and start over again.
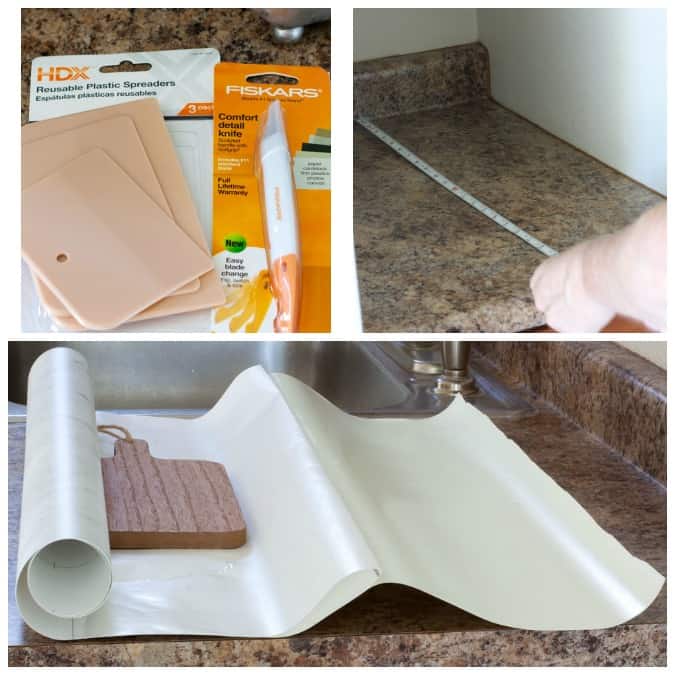
What You Will Need
- Adhesive Film aka Contact Paper (I used the brand Very Berry Sticker because they offered a matte marble finish, which will photograph better. 😉 However, they do offer a gloss finish, too. I’m SUPER happy with this product!) If you like the cement/concrete look, they have some great options HERE!
- Scissors
- Fiskars Comfort Detail Knife or similar type trimming knife (mine was a gift from Haven)
- HDX Reusable Plastic Spreaders (Couldn’t find these online, but these are similar)
- And this is a complete wallpaper smoothing tool kit that is super affordable
- Measuring tape
- Spray bottle with water and a small amount of dish washing liquid (like a drop or two)
- Hairdryer
- White Plumbers Caulk
- A free morning and/or afternoon 😉
TUTORIAL for DIY CHEAP COUNTERTOPS with CONTACT PAPER
I’m going to make this as simple as I can (because we all could use a little ‘simple’ in our lives, right?) So here you go…
Prep
- Clean your countertops with soap and water, making sure to wipe away any little crumbs or debris (you don’t want those little boogers trapped under the paper because they will just look nasty!).
- Make sure you have all the items on your list at your fingertips.
- Measure your countertops and backsplash, adding 4 inches to the length (to ensure you have room for trimming after you have applied the film). This is the length you will cut your adhesive.
- Pull down the paper backing from the adhesive about 6 inches, then fold the paper.
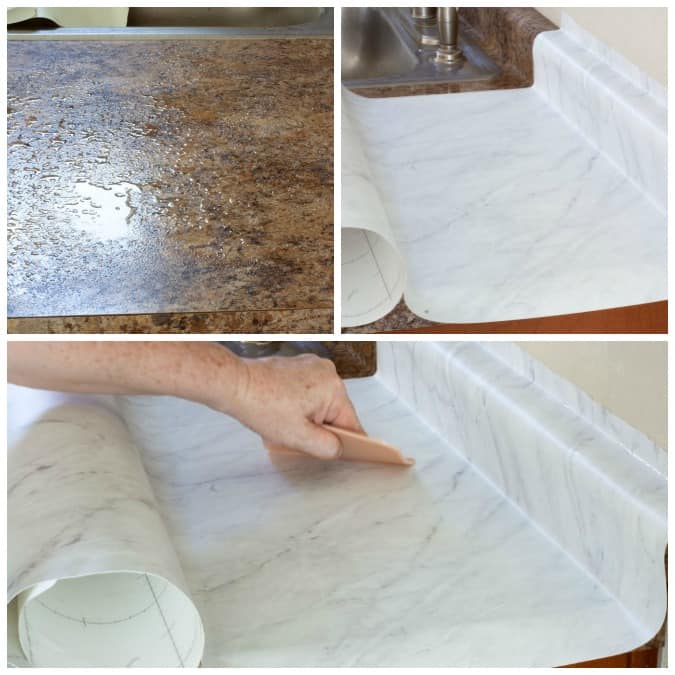
Installing the Contact Paper on the Surface
- Spray your counter with LOTS of (soapy) water…(See Trick #1 above…I’ve read many places where people have done this technique and not one person has had any issues with mildew, etc.)
- Lay down the contact paper, starting at about two inches above the backsplash, and start smoothing it down with your smoothing tool. As you pull away the paper underneath the film, continue smoothing, making sure to work out any bubbles/wrinkles. As you do this, you will notice the water ‘gushing’ out from underneath, and onto your floor and clothes! 😉 (I put a towel on the floor to help catch some of the water.)
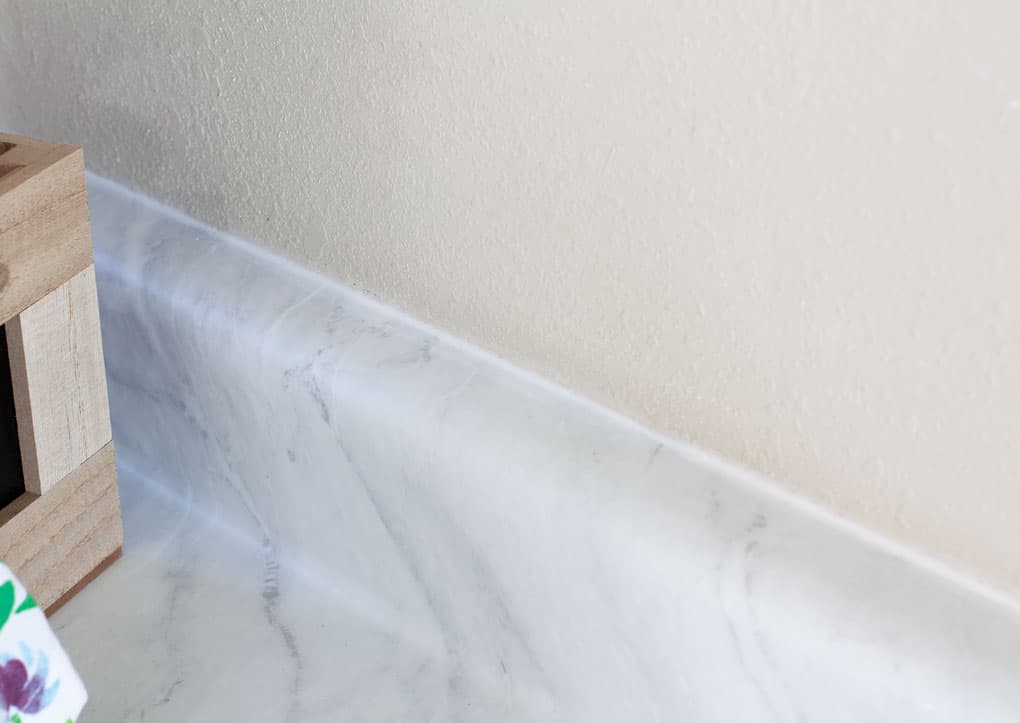
- Make sure that as you finish smoothing out the paper, you get it flat and tight along the bends and creases of the backsplash area.
Tricky Installation Areas
Let me apologize here… I didn’t get photos of this part because, well, to be honest, it took all my brain power to install these areas and I forgot to take pics! >.<
- When you get to your edges and corners, use Trick #2 (see above).
- For the sink area, I’ve seen some DIYers lay the piece over the sink, then cut it out. But, that just seemed too precarious for me. So, I measured the sink area and cut-out the size of the sink from the paper before laying it down (I won’t bore you with the details on how to do it, but if you decide to do it this way, take your time and measure and cut well, leaving some ‘wiggle-room’ to cut a nice edge around the sink after you’ve applied the contact paper.) I might even draw the measurements directly on the vinyl side of the paper, and then cut it out, instead of the side where the paper is… (I can’t believe I just thought of this! *facepalm*!)
Finishing Touches
- After your counters are covered, cut off all your excess at the top of the backsplash, front edges/corners, and around the corners and edges of the sink area with a very sharp razor or exacto-type knife. Mine looked like this after I trimmed it…

Hmmmm…
- Seal around the edge of the sink and the top edge of the backsplash with caulking for a smooth look. This also helps to keep water from getting under the adhesive film around the sink.
Much better…..
And that’s pretty much it!
Bumps In the Road
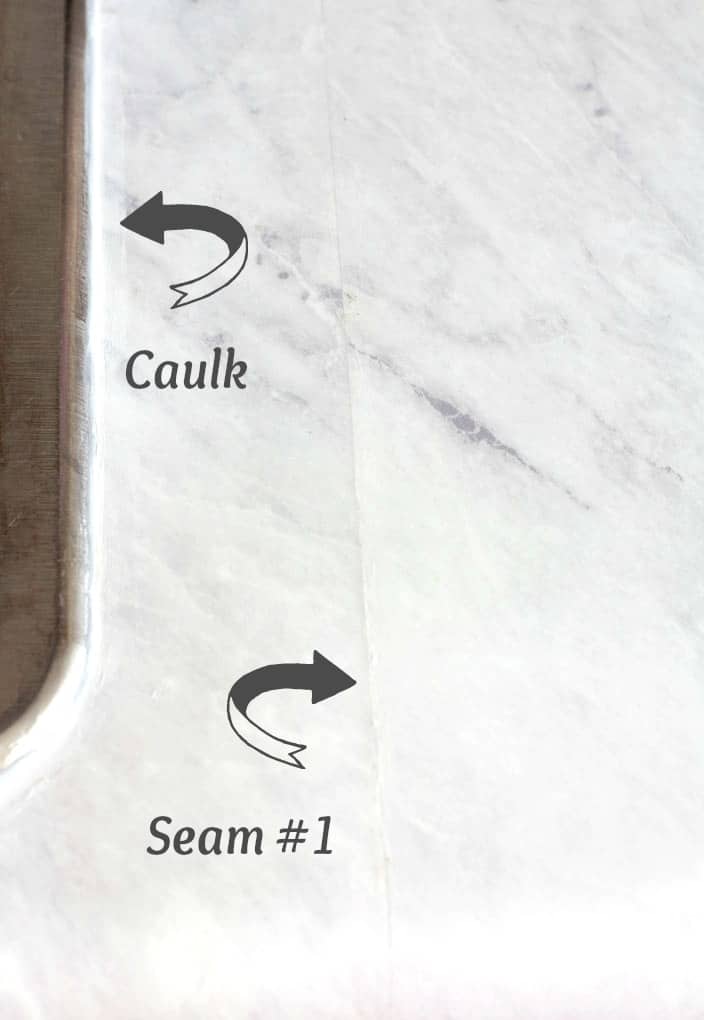
Seam #1
When it came to matching the pattern at the seam, you really don’t have to worry about it. You don’t even notice it.
However, for the seam that was in the middle of the counter, I bumped the two pieces right next to each other, and it worked pretty well, but I felt like the seam was a little noticeable (probably no one else would have ever noticed). So I took some caulk and used it to fill in the seam. This not only hid the seam, but it keeps water and other debris from getting into the area. (You can also see the caulking around the edge of the sink in this photo.)
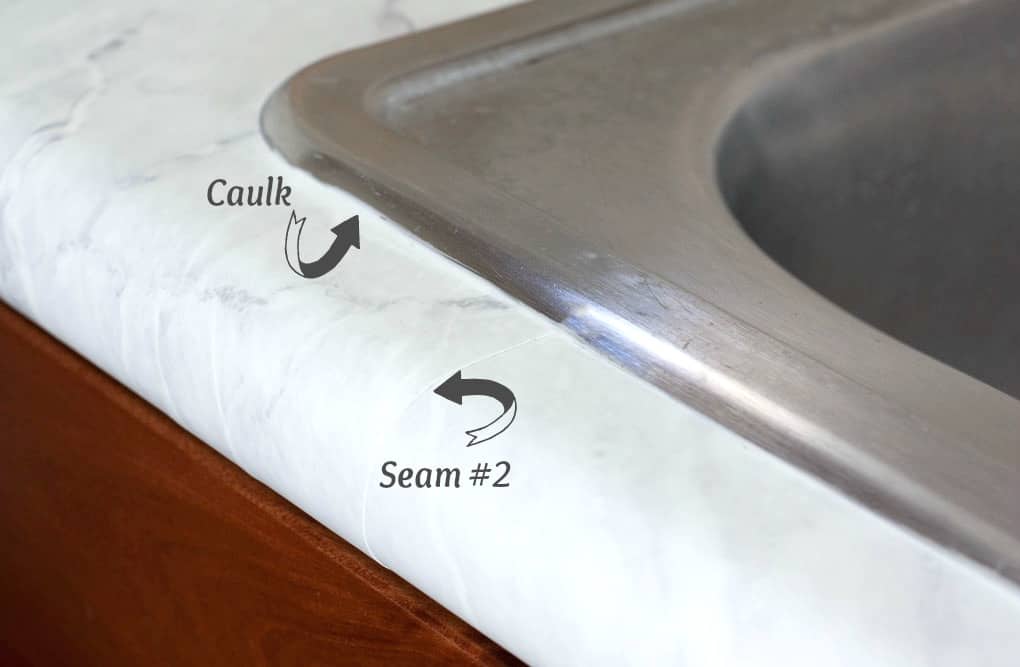
Seam #2
The second seam met at the front and back of the sink, and this time I overlapped the vinyl. It was even less visible than the first. But remember, this was at the edge of the sink. Not sure how easily items would slide over a flat counter area, if the seams were overlapped. I guess this would be a matter of preference!
Reasons for Choosing to DIY Cheap Countertops with Contact Paper
There are a few reasons why I chose to use contact paper (aka adhesive film) for my countertop makeover:
- Using adhesive film was fast and relatively easy… it took one morning/afternoon with several breaks for me to cool down on this hot So. Cal. day.
- Instant results… I didn’t have to wait for curing, drying, etc. Once the film is applied, and you are happy with the results, you are done! They can be used immediately!
- The adhesive film is super durable… According to the research I have done (and from other personal testimonies from people I trust) it won’t scratch, chip or peel.
- It’s removable and replaceable! If by any chance, something happens to it (like a hot pot is put directly on the counter, or someone gashes it with a knife), that piece of the contact paper can be removed and replaced with little time/money/effort (unlike a regular laminate countertop)!
- If I get tired of it, I can change it out for less than $50.
- As I said before, it’s a perfect solution for an apartment or rental home because it’s removable!
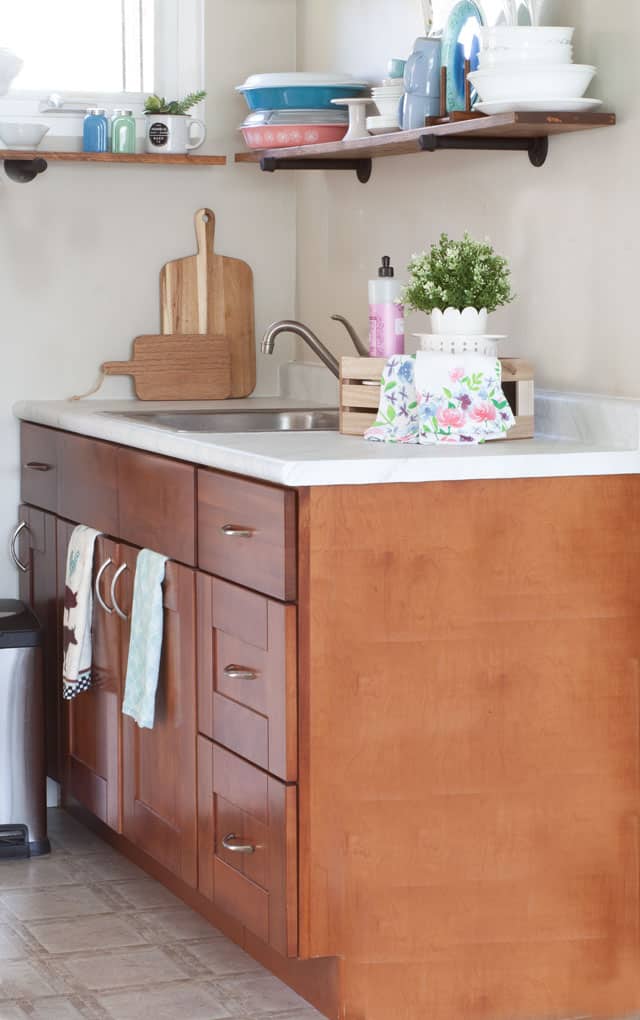
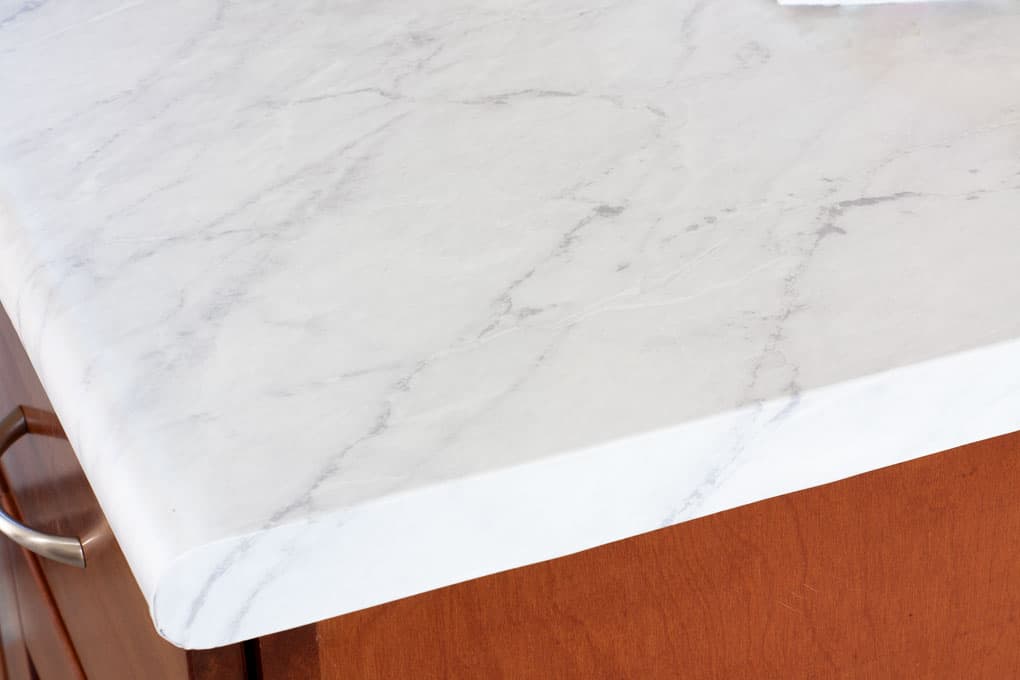
The AFTER
So, after having these counters for over a month now, I feel like they are just as durable and user-friendly as the laminate counters that are underneath. They just look a WHOLE LOT PRETTIER! What do you think?

I even added some affordable polished nickel hardware (these are similar to what I used, and even more affordable) to brighten-up the cabinets a bit!
If I can’t paint the cabinets (at least until I get the courage to ask my landlord), this is the next best thing, and I LOVE it!
And one last ‘after’!
Check out the full reveal of my DIY cheap countertops that look expensive!
More Inspiration
For even more DIY countertop inspiration, check-out some of my fellow bloggers’ posts:
- Contact Paper Countertops – Anika’s DIY Life
- DIY Contact Paper Utility Mat – Harbour Breeze
- Contact Paper Kitchen Counter – The Handyman’s Daugher
Now It’s Your Turn
Let me know in the comments if you have any questions! What do you think? Is this something you might think about doing?


Wow! That looks terrific! Thanks for the great tips. It seems very doable!!
Yep… I KNOW that *you* could do it! Enjoyed our ‘date’ this morning! Love ya!
I love them!! And, your tutorial is so helpful. I just might need to try it someday…
Thanks, Rita! They are really quite wonderful. I love that they are affordable, durable AND so pretty! Thanks for the kinds words, dear friend!
I would have NEVER guessed that was the way you did it! What a neat trick. I have only applied contact paper to foam board, which unfortunately would not work in quite the same way. 😉 Looks amazing and feels amazing not spending lots of money to have nicer counters in your rental. Win!
LOL!!! Glad I was able to surprise you! Yes, I would normally use a regular contact paper for foam board, but this is much more durable and heavy, so it needs a couple of ‘tricks’ to apply properly. Nika was over last night, and commented, again, what a difference it makes! Hugs, dear heart!
What a great tutorial. I’m sure this will come in handy for many people. Pinning!
Thanks so much, Patti! I really do hope it’s something others find helpful…and beautiful! Hugs and hearts!
Do you think it would be even more durable if you put polyurethane on it ? I want to do this but I’m afraid it won’t last long.
Hi, Rita… That is a very good question, and I totally understand your reasoning. I, personally, have no experience with using polyurethane on vinyl. I would say to test it on a piece before doing anything permanent. Also, not sure if you are wanting to remove this at some point (like a renter might), but I think the polyurethane would hinder the easy removal aspect. If it’s only the vinyl being used, simply using a hairdryer to soften the vinyl will remove the product. I have had the vinyl for well over a year now, and it looks just as good as it did the day I installed it! LOVE! Hope that helps.
Total perfection Julie! So impressed with your tutorial.
Thank you, Michelle! I hope it helps others to be able to make their apartments, rental homes, or homes a on budget a happier and brighter place! 😉 Hugs, sweet friend (we need to chat soon!)
I’m gonna do my counter tomorrow with contact paper love it how it came out perfect 👌
Oh, so fun, Jennifer! Let me know if you have any questions! What brand of adhesive film did you purchase? (It’s always fun to know!)
Beautiful job changing your counters, Julie! Love how they turned out. Shared for you. <3
Thank you, Barbara! You are such a faithful ‘sharer’ and friend! And thank you for the kinds words! Hugs!
That’s amazing-I never would’ve guessed it was contact because it looks so expensive!
Aw, thank you, Barbara! I hope this helps others that are on a budget, or are in a rental home! It really is a wonderful solution. And there are so many styles to choose from! Thanks for dropping in!
How do you do the edges? That’s my biggest concern.
Hi, Sara… The edges can be a bit daunting, but I wrote this in the middle of the post:
“In order for the adhesive film to fit nicely around the edges and corners, I used trick number 2! Grab your handy-dandy hairdryer!
This film becomes very pliable with just a little bit of heat. When you begin applying heat, you will notice the paper start to soften… after about 10-15 seconds, it almost feels like it’s melting. At this point, you can quickly and gently stretch the paper around the corner first, then the edge. It works just like using shrink wrap! Pretty crazy number THREE!!!
Don’t worry if you make a mistake… you can reheat, lift off, and start over again.”
Hope that helps!
I love budget makeovers and this one is incredible! What a transformation!!! Pinning!
Thanks so much, Roxanne! I’m, obviously, quite please, too! 😉 Thank you for pinning!
Your countertops looks so beautiful. One would never guess that you used contact paper. Such a smart and good option for renters.
Thanks, Lauren! Yes, great option for rental homes and apartments. Even those on a budget can do this in the homes they own… even just to ‘tide them over’ until they can do more expensive update! Thanks for coming by, sweet friend!
Amazing. Your tutorial gives me hope that I could do this. Thanks
You could totally do this, Donna… and you even have a good friend that lives close by to help! 😉
Omgosh Julie! That looks fantastic! You have such an artistic touch!
LOL! Thanks so much, Melan! That means a lot to me, dear friend! Was so nice to spend the weekend with you and all our friends! Hugs!
It was a wonderful weekend. I am so blessed to have you and all the other ladies in my life!
Amen, sweet friend!
That is a pretty amazing transformation. What a great new look. You probably know this but you can use any fabric on walls and use starch to make it stick yet it is removable and a great option for a rental. Possibly an idea if you feel the need to change the wall color without painting.
Hi, Tonita! Thanks for the kind words. Yes, I have seen the fabric and starch used on in other homes… it’s pretty, and a great idea for rental homes! 😉 Hugs!
Can you use contact paper over tiles, like can it cover the gaps in between tiles?
Great question, Katrina! Unfortunately, I’m thinking this would not do well in covering tile with grout lines. Because the adhesive adheres so well, I think it would ‘sink’ into the grout lines and be quite obvious. That’s just my humble opinion.
If I had tile countertops that I wanted to update, I might look on Pinterest on how to paint them, or cover tile countertops. Hope this helps, my friend!
Got it. Thank you!
Yay! 😉
Stubbled upon this tutorial and wow, just what I have been looking for except for my bathroom vanity, do you think it would hold up just as well?
Hi, Alphina! So glad you found My Wee Abode! I do believe this would work really well on bathroom vanities. The one thing I would be sure of is to really get those seams close together, or overlap them just a wee bit. Also, make sure the caulking is done very well, leaving no openings for water to penetrate. One of my blogging buddies used it on her bathroom counters… take a look HERE. Let me know how it goes! Hugs and hearts!
This really brightened up your kitchen and caulking make a HUGE difference! Great job!
I love my countertops, and they actually are very durable and look the same as they did the first day!
I really really want to try this! I have the contact paper bought, but could you please answer a couple questions?
It’s been a while since you posted this, but I see that you commented in January… They’re still holding up well as of Jan 2020? How about around the sink?
Can you please explain a little more how you did the end/corner/edge. Yours is prestine and that’s the part that’s holding me back right now!
Hi, Sharon… Thanks for the questions! Yes, my counters are still just as nice as the first day I covered them! Even around the sink… no problems at all thanks to the caulking!
The easiest way to get the corners to fit is to use the hairdryer. There’s not much more instruction to offer than what I said in the post. You kinda just have to take a step of faith and do it.;-) You’ll see how it works once you take the hairdryer to it. (You can even cut a strip off of the adhesive and ‘play’ with it on the corner before you actually lay the whole thing down. It will ALWAYS come up by just hitting it with the hairdryer again! Oooo, I may just add this hint to the post!) Hope that helps. You totally got this! Let me know if you have any other questions.
I remember seeing this one! What an AMAZING difference – beautiful budget makeover, Julie! And excellent tips to help anyone do this successfully!
Thanks, Janet! I was too busy to get a post done last week, and then I had a fall this past Wednesday. Hoping to get at least one new post by Monday, and several for next week!
Wow, your counter makeover really changes the look!
Great idea!!!
Hugs,
Kippi
It really does… and it has really been durable for the last year!
Loved this! Got the contact paper and saw this post just in time. However, I really don’t know how to do the sink part. I would love to have the totally necessary ‘boring’ (not at all 😉 details, pls!
Of course, Natalia… It’s the hardest part of the whole process… a bit tedious but TAKE YOUR TIME! (I’m yelling this from the roof-top, can you tell? 😉 ) My sink area took one piece and then another piece that finished the sink area and the rest of the counter. So, with using two pieces, I was able to precariously lay the vinyl, WITH the backing still attached, down over the sink and faucet area and cut out a large piece… still leaving PLENTY of vinyl for wiggle room. As I cut, I was able to see what I needed to cut away and what I needed to leave… I left about 2 inches over the sink area and I stopped cutting away. Then I took off the backing, laid the vinyl down as directed in the rest of the post, paying special attention to pressing in around the edge of the sink. I then took an exacto knife and carefully cut away the excess. I finished it off with caulking. Hope that helps! Let me know if you have any other questions!
These look great! What do you use to clean them? Is there a certain cleaner that we should avoid? What have you noticed with yours? Thanks!
Thanks so much, Kristina. I have used mostly just warm water and a dishcloth to clean them. Once in a while I might have a wee bit of a coffee “stain”, then I just use some dishwashing liquid, and wipe clean. I would say to NOT use Comet/Ajax. Hope that helps!
I’m going to try this with my counters! Do you think this would work on laminate counters that have a very slight texture to them? If the texture shows through I’m okay with that, but I’m worried about it not adhering! Thank you!
Hi, Montana… I don’t think adhering will be any problem at all on a *slightly* textured laminate, especially if it evenly textured. Excited for you… let me know how it goes!
My countertop is the exact width of the paper. Can I cut the edges and apply first so I don’t have a seem in the middle all the down it?
Hey, Karla… I hope you found my email replies helpful. Let me know how it goes!
Hello,
I LOVE, Love your counter! Great job!
I was wondering if the contact paper from Target will accomplish the same thing and long lasting outcome? I think the brand is named Contact Paper also. I know very berry is suppose to be thicker but I’ve read some reviews that it is thin also.
The water and soap doesn’t take away the tackiness? It seems like water and soap would keep it from adhering?
My corners are rounded. I don’t know how to stretch the rounded corners without the paper overlapping and creating creases. What would you suggest?
Thank you for taking the time to answer my questions. Your counter are amazing!
Hi, Lisa… thank you for the kind words! I really appreciate it!
I would NOT use the Contact Paper brand for the countertops. Some people HAVE used it, but it does not have the look or durability of the Very Berry brand, or any brand that is labeled “adhesive vinyl”. I liked the look of the Very Berry matte marble, but I would have used any adhesive vinyl brand that has good reviews on Amazon. The soap and water does NOT take away the tackiness… it is suggested on videos I researched to do it, and my counters have not ‘budged’, and it’s been over two years! If you read Trick #2, that will work perfectly for rounded corners… give it a try and you’ll see! 😉 Merry Christmas (and let me know how it goes!)
Hey Julie! I’ve been thinking about using contact paper to update my kitchen counters but I’m curious as to how you keep it protected from heat? With pots and pans I assume I can just do what I normally do and use a heat pad under them but what about and insta pot or crock pot?
Hi, Maria. Thanks for the questions! In my situation, yes, I have protected the surface just as I would laminate countertops. I’ve used my Instapot with no problems, but I always put something under my crock pot. I’ve used my steamer on top of the unprotected surface with no issues. 🙂 Hope that helps! Hugs and hearts!
Hi Julie. I simply love your countertops. They look pristine. I’ve been thinking to update mine using contact paper, but I was hesitant. After reading your post I feel more confident. I think I just have to take a leap of faith and do it! Thanks for your excellent tutorial. Best wishes.
Of course, Jenn! I’ll be honest, it’s not easy, but it’s worth the effort! AND, it’s hard to make a mistake… you can always fix it! Let me know how it goes!
Thank you. I will!
Wonderful!
Hi Julie, I know this post is older, but hopefully you still check the comments…
I’m in the middle of doing my countertops with contact paper, but on the very edges of the counter, did you fold the contact paper under and use the hair dryer on it, or did you cut it flush with an exacto blade?
I tried adhesive but it does not seem to work well with the “chip-board/plywood” type material.
Any suggestions would help!
Thanks!
Hi, Alyssa… So glad you commented, and asked. (I answer all my comments, as quickly as I can! 😉 ) Let’s see… I ended up doing a little bit of a fold, but if I had to do it over, I would just use the hairdryer and make it pliable and let it wrap around ‘naturally’, if that makes sense. Then cut off the excess underneath. It’s tricky, but just be patient and work with it (and don’t stretch the contact paper too much). When you say, ‘chip-board/plywood’ do you mean normal laminate, or are your trying to cover raw material? Also, I think sometimes we just need to do what looks best for our counters, if that makes sense.
Beautiful. How can I share my before & after pictures?
Kathleen… photos aren’t able to be uploaded here, but you can upload them on any Pinterest Pin that I have… like this one: https://www.pinterest.com/pin/325948091788240830/ . You can send them to my email, as well… julie@myweeabode.com . Looking forward to seeing them!
Hello! Looks beautiful, I am going to do this to my rental apartment. I see you linked the matte versus the glossy. Is this what you used? why did you go with the matte instead of glossy? I’m debating which one to do.
Oh, wonderful, Aspen. I went with the matte for two reasons… I’m not a ‘glossy’ type of girl. 🙂 I like the look of the matte finish, and I thought it would look more authentic. Second reason, I do a lot of photography in and of my kitchen… I didn’t want the light bouncing off the glossy counters. 🙂 Let me know how it goes!
I almost pulled the trigger on ordering this paper and then it dawned on me…my bathroom countertops are from 1978 and are a weird vinyl that has a leather look so it actually has a bit of texture…this contact paper isn’t going to work, is it?
I have tried painting it gray as it was a lovely brown but the paint is now peeling.
Hi, Jennifer… You know, I have no idea if the texture would show through or not. If you chose one of the gray concrete style of adhesive, it might actually look really cool! If it were me, I’d order what I needed (you want all the dye lots the same), and try it… then if it didn’t work, return what you don’t use. I hope this helps! Let me know if you have any other questions.
Thanks for sharing. We kind of put the cart ahead of the horse in our kitchen renovation and resurfaced our wood floor first. We realized pretty quick that we would need to make other updates but we didn’t want to mess up the floor. That’s why updating the countertop this way was perfect! We’re super happy with the results and the floor still looks awesome too.
Oh, so glad your floor and countertop turned out great! Thanks for sharing, Alicia!
Ugh I am having such a hard time with this exact contact paper. It’s so thick and really hard for me to work with. And nearly impossible to get seamless. Help!
I’m so sorry you are having such a hard time, Jessica. The process is definitely not easy… and it takes quite a few deep breaths. I know the vinyl is thick… that’s what makes it so durable. Are you spraying the soapy water down before you lay the vinyl? That is really a game changer. And don’t worry, it WILL still stick… I just removed it from the counters (I moved), and it was holding on for dear life. But it did come up! Also, if I had to do it over again, I would overlay the seams. It’s easier, and ends up looking better. Feel free to email me at julie@myweeabode.com if you have more questions.