
How to Make a Fake Enamel Sign
Yes… you are going to learn how to fake something today! LOL! Let’s learn how to make a fake enamel sign using paint and wood!
HOW TO MAKE A FAKE ENAMEL SIGN
The Dilemma
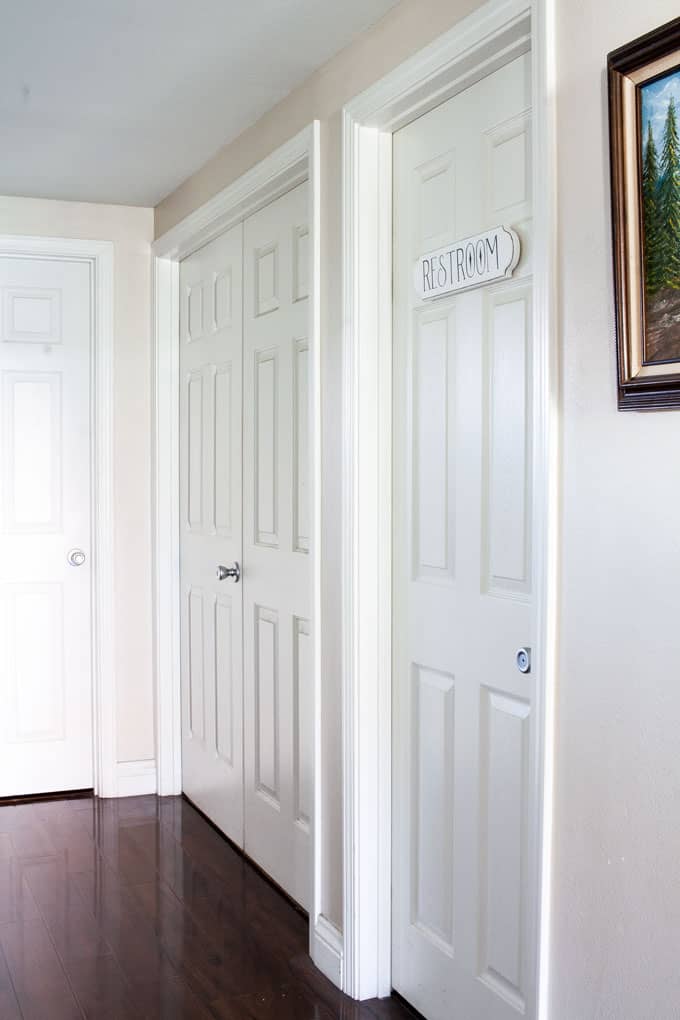
Have y’all ever had the problem of having too many doors in one hallway, and no one can tell where the bathroom is???
You have? Well, I haven’t. Hah!
Y’all… I have a 400-square-foot home! I only have three doors in my whole apartment! And one is a pocket door!
BTW, I’m cracking myself up as I’m writing this… seriously. I’m probably freakin’ out the neighbors.
Anyways, my sister DOES have this “door” problem. Let me show you…

You see all those doors? Can you guess which one is the bathroom?
Yeah, I know, most people can’t. 😉
The Solution
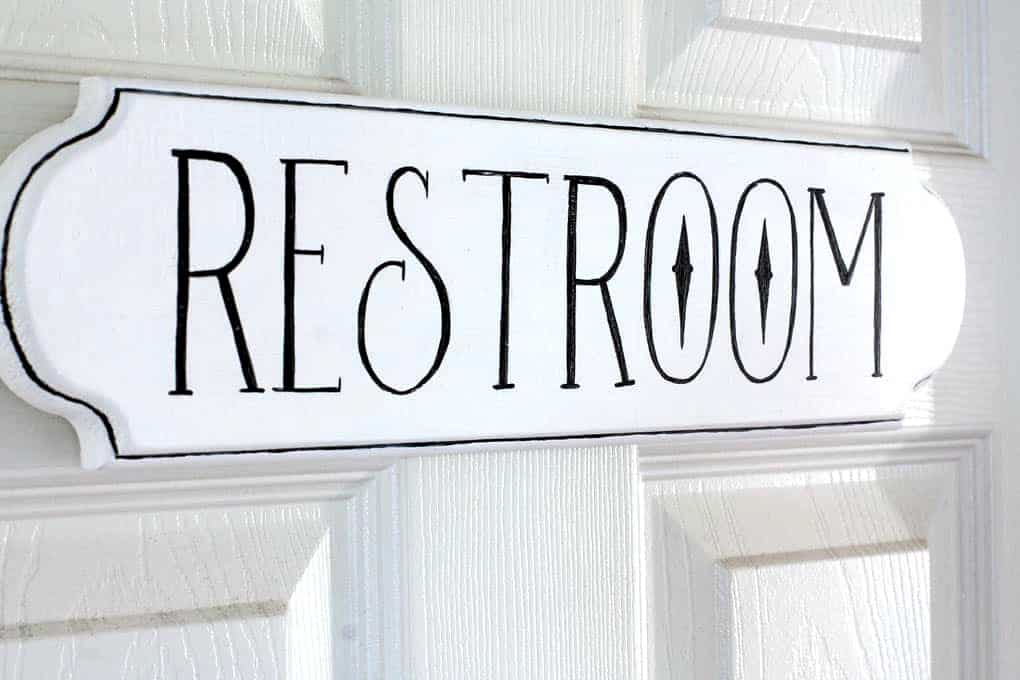
So, instead of a whiteboard hanging on the door with the words “bathroom” on it, we thought a sweet enamel sign would be, well, prettier. Am I right?
But, I couldn’t find a sweet enamel sign (that I wanted to pay for anyway).
And when you can’t find the real thing, well, sometimes you gotta fake it! And that’s just what I did!
First, we had to pick out the word(s) to use on the sign… ‘bathroom’ was definitely out!
Here are the choices:
- Washroom
- Powder Room
- Toilette (my personal fave)
- Water Closet
- Restroom
- (What other ones can you think of… leave them in the comments because I want to do a sign for MWA’s bathroom)
Guess which one my sister picked out?

This post may contain affiliate links, at no additional cost to you.
For more information, see my complete disclosure HERE.
What You Will Need
Here are the supplies you will need:
- Unfinished Wood Innkeepers Sign (You can also pick this up at Hobby Lobby for a lot less, but I’m supplying a link for your convenience)
- 320 grit sandpaper
- White acrylic or chalk paint, make sure it’s bright white, like an enamel sign (you can always make your acrylic paint into chalk paint like I did HERE)
- Black acrylic paint or Fine Tip Sharpie
- Wax Sealer or Clear Gloss spray… your choice
- Fine Liner paint brush (nice for a beginner set)
- Printer
- Pencil
How to Make a Fake Enamel Sign
Paint the Board
Unfortunately, I did not get any photos of painting the actual board… Sorry about that! Sometimes I get carried away with a project and I forget to take pics. However, it’s pretty simple.
- Sand the board with some 320 sandpaper and wipe the board off with a cloth or towel. This will give the sign a smooth finish that will make it appear more like an enamel sign.
- Paint the board with the bright white paint. This will bring up the grain of the wood, so after the first coat, sand the board again and wipe clean. Again, this will contribute to the look of a vintage enamel sign.
- Now paint the board 1-2 more times, making sure to get solid coverage.
Letter Transfer and Painting
- The first thing to do is to find a font that you like and print the size you would like for your sign. We chose to have the words go almost completely across the sign, so “rest” was printed on one piece of paper and “room” on another.
- Turn the paper over and, using a pencil, color-in the lettering from the opposite side.
- Tape the paper together (if you need to), and then carefully tape the lettering to the board, making sure to not smudge the pencil on the white paint.
- Now, trace the outline of the letters with a sharp pencil. It will transfer the pencil onto the board.

- Now you can either use the fine liner brush and paint in the lettering or you can use a fine tip Sharpie to write it in. Just be aware, if you make a mistake, you cannot go back and fix the Sharpie with paint… it will bleed through. You can fix mistakes if you paint the lettering.
For more techniques for letter transferring, hop on over to How to Paint a Cottage Farmhouse Window Sign.
Painting the Trim and Finishing
- When the lettering has dried, paint around the edge with the black paint to add to the enamel sign look.
- When everything is dry, use either your liquid wax or clear gloss to seal the paint. Since enamel signs have somewhat of a shine to them, the clear gloss sealer will definitely give the wooden sign more of a vintage enamel sign look.
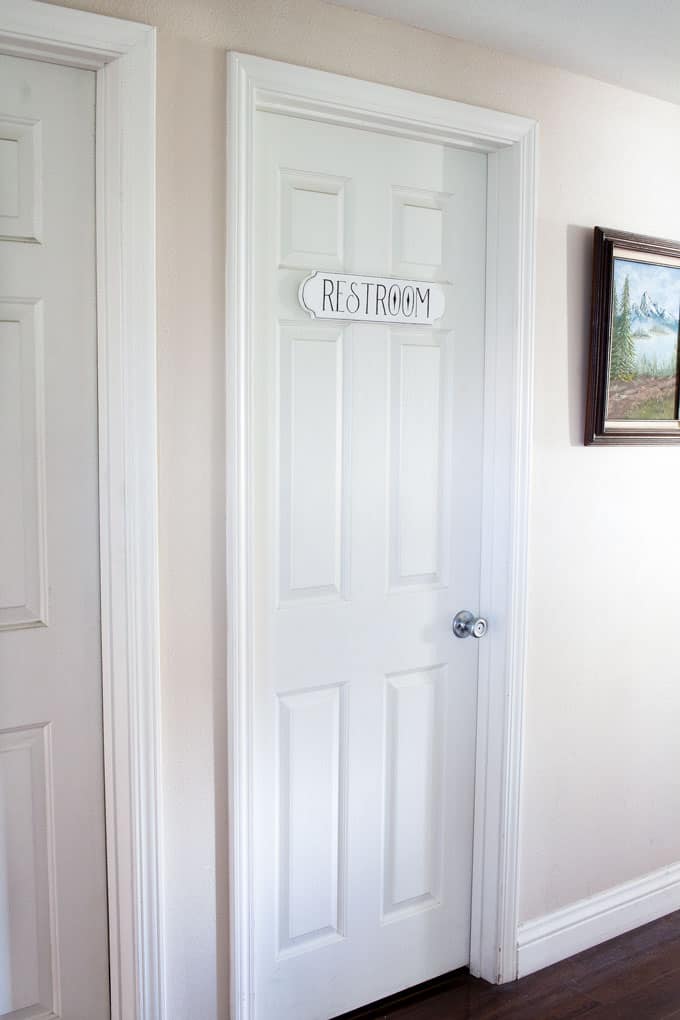
Finished Product
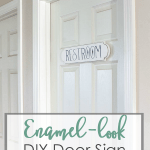
And here it is… mounted and ready for people to find… the bathroom, that is!
I really like how it looks a bit like wall art, too!
BTW, taking pictures when it’s raining outside is a bit of a challenge, but sometimes you just gotta go with it… shadows and all!
My sister is quite happy with the sign… and so is my mom. My mom shares a home with my sister, and this is the bathroom she uses.
I’m hope this has inspired you, whether you need a sign for the ‘toilette’ or a sign for something else. It’s been fun showing you how to make a fake enamel sign. Where might YOU use this type of sign?

PIN IT FOR LATER!


That sign looks great! It is perfect for that door!
Thanks so much, Laura! Glad to have you at MWA! Hugs and hearts!
Hi Julie,
Love your sign! Thanks for the tutorial. How about going British and using “The Loo”???
Have a great weekend,
Cheryl
LOVE “the loo”… a lot! 😉
Looks great! I like your choice also, but this one is really great. Such amazing things you do! Keep up the good work.
Melan
Thank you, Melan! I appreciate your love and encouragement! (Let’s make a coffee date!)
such a cute idea! I haven’t had the “find the bathroom door problem” before, but this is such a clever way to solve it. Pinned 😉 p.s. and happy 1 year blog anniversary!
Thanks, Tiffany! Yeah, it’s crazy how this hallway is… and the doors have to be closed because of the dog. I think I may do a smaller version for my door on MWA! Thanks for the pin, too!
Fun project Julie! The sign looks so professional. Love it!
Oh, thank, Michelle! It was so easy… and it can be done with so many styles, depending on the font!
Julie, this sign is precious! You explained the process so well!! I love the idea of using the spray in a gloss to make it shiny like enamel signs! Thanks for sharing!
Thank you, Cindy! It was an easy and fun project!
Very cute Julie! Your hallway looks like mine and I have a sign on my door too 🙂
Thanks, Susan… this is actually my sister’s hallway… My hallway only has my closet doors! LOL! 😉
I need to make signs for all the doors in my 600 Sq foot cabin. This might be exactly what I’m lookin for…,
Fun! I’ll help you if you want! 😉
Love your sweet sign! I need to make one of those! Our family room has 4 doors, including our bathroom door. BTW, what did you use to hang the sign on the door?
Yes, I want to make one for my bathroom now… I used two small Command Picture Strips. 🙂
That sign is adorable! What a great solution. Thanks for sharing at Thursday Favorite Things!
Thank YOU, Pam! Hugs!
Julie,
What a great idea! I’ve been looking for labels for my doors and I couldn’t find the right words. And now? I can just make my own!
Thanks for the inspiration!
Happy day!
karianne
Very fun! Would love to see something like this in one of your posts, sweet friend! Hugs!
Hi Julie,
Can’t wait to see it done up! I love about everything British.
Cheryl
Hopefully will be able to get it done soon!
This is a perfect solution for a restroom. I have a similar issue on the top floor of our house with four doors and a closet all off a little hallway. The restroom sign looks MUCH nicer than the open door.
Yes… my mom can’t leave the door open because my sister’s fam has a dog. So the sign is really helpful. 😉 Thanks for commenting, friend!
The sign came out great and looks like a fun and easy project.
Thank you, Sonya… Gotta love those easy projects! Hugs!
Julie,
You did an amazing job on your restroom sign. Stop by Thursday Favorite Things since you are being featured.
Have a great day!
Hugs,
Bev
Thanks so much, Bev! You are a sweetheart!