
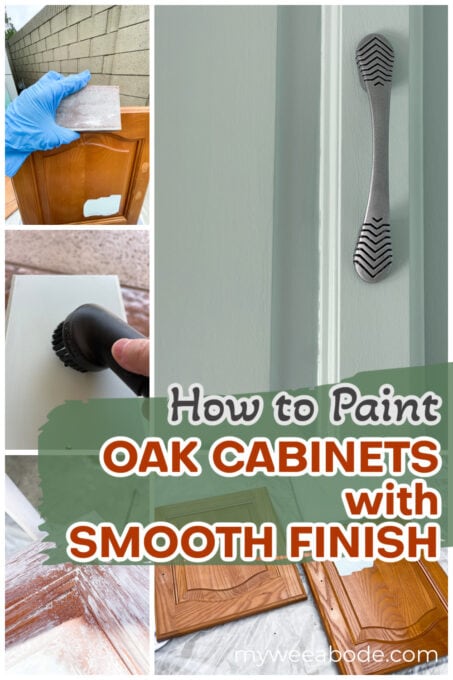
How to Paint Oak Cabinets with a Smooth Finish
It’s been 1.5 years since I started talking about refinishing my RV kitchen cabinets! Well, the day is finally here. Let’s learn how to paint oak cabinets with a smooth finish.
How to Paint Oak Cabinets with a Smooth Finish
Do you have a love-hate relationship with your oak cabinets?
Love the sturdy wood, but hate the grain and the golden-red color?
Well, let’s be friends!
This year, I learned how to paint oak cabinets with a smooth finish, and it was a lot easier than I thought it would be.
At least it was easy after I made some mistakes!
But, that’s what I’m here for… to make the mistakes, so you don’t have to!
A Bit of Back Story
If you’ve been part of the My Wee Abode family for a while, you may have seen the early reveal of the finished cabinets.
However, if you are new to this community, welcome! My Wee Abode has been through quite a few stages! The original MWA was a 400 sf loft apartment that I moved into in 2017.
In 2022, I became my mom’s primary caregiver, and we moved into a 900+ sf apartment in a senior plus community.
After Mom passed away in 2024 from complications of Alzheimer’s, I purchased a 2009 Keystone Springdale trailer, which I am slowly (we’re talkin’ a snail’s pace) renovating from dingy ‘camping’ brown, to light and airy classic coastal.
The Before – Golden Oak Kitchen Cabinets
Here’s the “before”, along with all the things that have been, or are going to be, changed:

Since this photo was taken, the completed projects include:
- Oak cabinets painted with a smooth finish (you are here!)
- Hardware is refinished
- Window coverings are removed and replaced
- Kitchen countertops have been refinished
- Wallpaper border removed
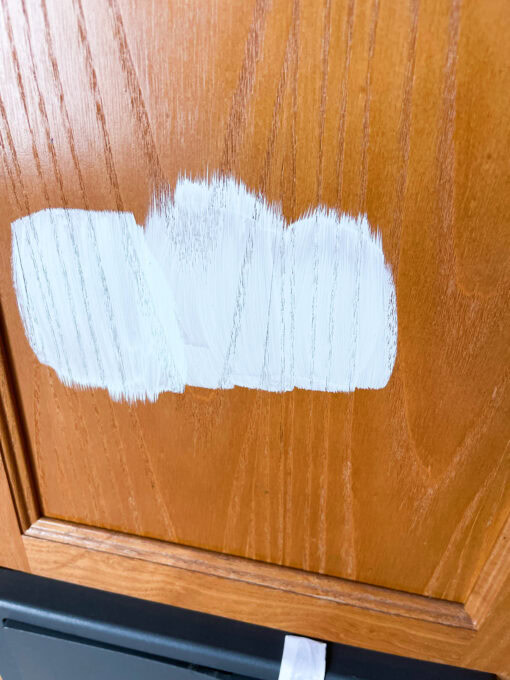
Here’s a close-up of the grain on the cabinet doors. There is a patch of paint to show just how deep and wide the wood grain is!
The After – Refinished Oak Cabinets with Smooth Finish
And here is the after of the refinished kitchen oak cabinets:

To show you just how smooth these cabinets are now:
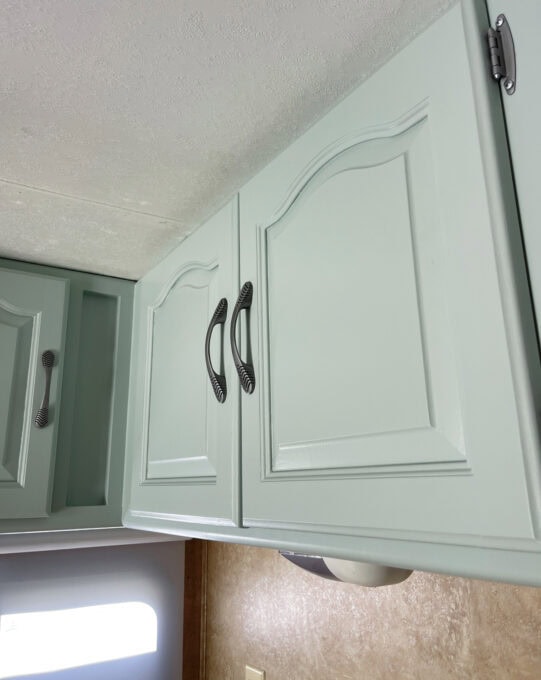
The grain is just about invisible!
Take a look at more details of the cabinets on the full reveal post.
Now, let’s learn exactly HOW to paint oak cabinets with a smooth finish!
This post may contain affiliate links, at no additional cost to you. For more information, see my complete disclosure HERE.
Step-by-Step Instructions: How to Paint Oak Cabinets with a Smooth Grain-free Finish
Not gonna lie… The list of items you will need for this project is quite extensive. HOWEVER, I already had many of the supplies in my DIY ‘toolbox’, and you might, too.
The supplies you need are broken into sections and include the items *I* used for the project. This is not exhaustive. More details later in this post for exhaustive lists, supplies, and instructions.
As I alluded to in a recent Tuesday Turn About post, this blogger (that would be me) often gets involved in a project and forgets to take, what some would call (again, that would be me), important photos of the process.
With that being said, please be sure to READ the instructional steps… don’t just look at the photos. 🙂
Step 1: Prep the Room
At the beginning of each section, a supplies list will be included for that step!
What You’ll Need
This post may contain affiliate links, at no additional cost to you. For more information, see my complete disclosure.

- Vacuum the floors in the room, and then tape off edges and cover floor with craft paper. I only taped the edge of my floor because I wasn’t too worried about getting paint on my ugly sheet vinyl (Photo 3) (plus, I easily removed the paint drops with rubbing alcohol).
- Tape off countertops and cover with craft paper. Again, I wasn’t too worried about my countertops because I knew they would be a DIY soon after. Only areas that I didn’t want to get paint on were taped off (such as my fuse box, Photo 3, and the oven hood).
- Remove and/or tape off and cover appliances with plastic sheeting (Photos 1 and 2). I used the 3M Hand Masker for this… it’s actually great for building room barriers, as well!
Step 2: Prep Cabinets for Refinishing
What You’ll Need
This post may contain affiliate links, at no additional cost to you. For more information, see my complete disclosure.

- Clean cabinet doors and frames with degreaser. I use Clean Slate by Amy Howard because it’s easy to use, doesn’t require rinsing, and works great (Photos 4 & 5)!
- Remove doors and drawers. Use painter’s tape and a black marker to number each door and drawer and the ‘hole’ (opening) in the frame that it belongs to.
- At this point, you can cover the frame openings with painter’s tape and plastic (the 3M Masker is great for this, too), but I chose not to do this (Photo 6). (FYI, I didn’t paint the insides of my cabinets).
- Lightly sand frames and all cabinets doors with a 120 grit sanding sponge (no need for a heaving sanding). Then vacuum all the frames and doors!
“Pro” Tip 1
- You can build retaining walls with plastic sheeting at this point, but I did not do this, as most of my sanding was done outside, and the frame-sanding gave off very little dust because they are not solid wood.
- You might want to cover walls and ceilings, as well. Again, I did not do this because all these will be painted in the future.
Step 3: How to Fill the Grain on Oak Cabinets
This part is a little daunting but, trust me, it’s not that difficult at all.
What You’ll Need
This post may contain affiliate links, at no additional cost to you. For more information, see my complete disclosure.

- Use all-purpose joint compound (I use Westpac from Home Depot), a mixing bucket, stir stick, and inexpensive paint brush (Photo 8).
- Take about 1/2-3/4 cup of compound and place in bucket. Then, add a bit of water to it (Photo 9, arrow pointing to water). Start with just a couple tablespoons and add more as needed. You are looking for the consistency of a thick paint (Photo 10), because you want to brush this on to your cabinet doors like paint (Photo 11).
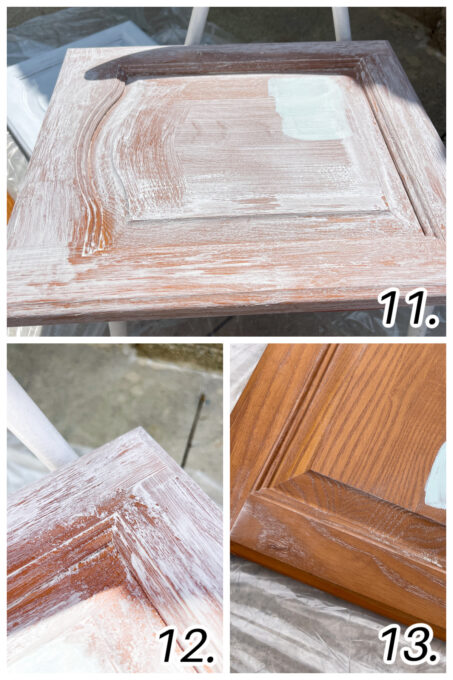
- The filler will go on almost clear, but dry to a chalky finish. As you finish “painting”, take your brush and wipe up/off excess in the grooves (Photo 12). This will help when sanding these areas after it is dry.
- After filler is dry, use a 120 grit sanding sponge and sand away excess compound. You only want the filler to remain in the grain, not the flat surface of the cabinet doors (Photo 13).
- Vacuum all doors, again.
- When sanding is completed, check for any areas that need more filler and repeat the process in that area. Be sure to vacuum everything after sanding. 🙂
- If needed, add more water to your filler as it thickens throughout the process.
Step 4: Prime Cabinet Doors and Frames
What You’ll Need
This post may contain affiliate links, at no additional cost to you. For more information, see my complete disclosure.
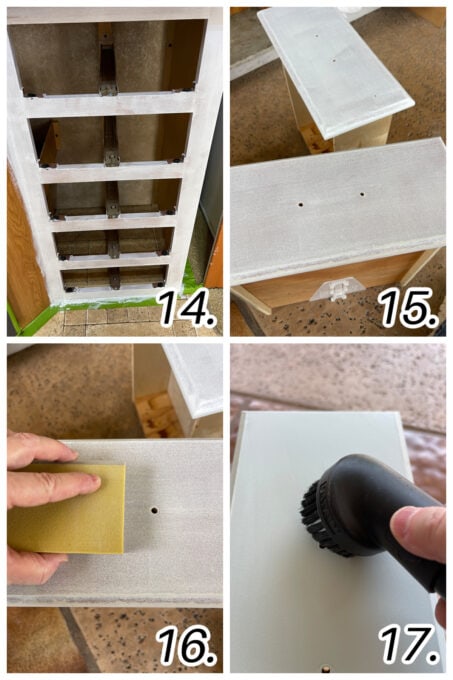
- Paint all the frames, drawers, and doors with AT LEAST one coat of primer (Photos 14 and 15). Use a sponge roller (4-inch worked great) and a quality paint brush (such as my favorite 2″ Zibra brush and Zibra Corner brush at Zibra paint brushes) for both priming and painting. I did two coats on the upper frames of the cabinets and all the doors, and I feel like the colored paint (aka topcoat) bonded the best there (with only two coats of paint needed). I did one coat of primer on the bottom frames and drawers, and there are not any issues, but I felt like the drawers needed three coats of colored paint, so that’s what I did.
- After each coat of primer, let dry and lightly sand with 220 grit sanding sponge and vacuum (Photo 16 and 17).
- This is when you may see some grain that you missed filling. Simply fill these areas with more filler, let dry, sand, vacuum and then prime again.
“Pro” Tip 2
- I DID try using my HomeRight paint sprayer, but found that my tiny kitchen was just not a large enough job to warrant the set-up and clean-up for how I needed to use it. Also, I didn’t have an area where I could safely spray (even with my spray tent) without fear of dust and debris landing in the painted surfaces.
If I had an average size kitchen and/or my own garage, I would have definitely used the sprayer. - The drawers/doors should have tape with their numbers that coincide with the frames. Move the tape from front to back as you paint (making sure the paint is dry where you place the tape).
- Don’t clean your brushes and sponge rollers every time you paint one coat. Cover the bristles/foam in plastic wrap and place in the refrigerator. Works like a dream!
Step 5: Paint the Cabinet Drawers
What You’ll Need
This post may contain affiliate links, at no additional cost to you. For more information, see my complete disclosure.
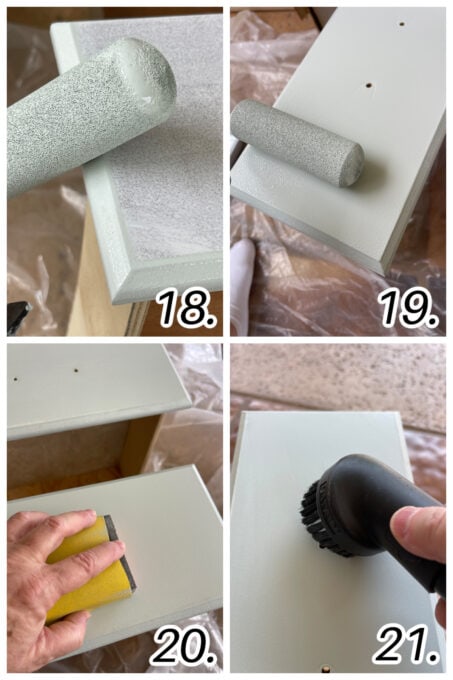
- When painting the drawers, paint the edges first, using a sponge roller (Photo 18). Next, paint the top with the sponge roller (Photo 19). Then, touch up the drips, etc., around the edges and corners using a light hand with the roller.
- Let dry and lightly sand with a 220 grit (Photo 20). Then remember to vacuum (Photo 21)! Repeat the process as needed. (My drawers are not wood… they are pressed board with a ‘cheap’ finish. Therefore, I did three coats.)
Step 6: Paint the Cabinet Doors

- The process for the doors is very similar… paint, let dry, sand, vacuum, repeat. However, priming the doors twice is a good idea, and painting them twice should be sufficient.
- Use the Zibra triangle brush to get in the corners and details, and draw the paint out towards the middle (Photo 22).
- Next, using the foam roller, roll one direction on the inside surface (Photo 23), and then roll the other way (Photo 24). This will help ensure a smooth and even finish.
- After the inside panel is painted, paint the edges around the door, as well as the flat areas on the door surface. You can see in Photo 25 that the flat area has not been rolled for the second time… yet.

- Guess what’s next? You got it! Let dry, then sand and vacuum and repeat the process as needed (Photos 26 & 27). You can see that there is some grain still visible on the door in Photo 27. That is because it is the INSIDE of the door. Filling the grain inside of the door wasn’t necessary (for me) and it’s not noticeable.
“Pro” Tip 3
- The paint I used, and highly recommend, is Sherwin Williams Emerald in the Satin finish. This paint is very popular in cabinet-painting circles, and the finish is not shiny, but the cabinets are easy to clean with this finish. As far as I’m concerned, the Satin finish is perfect for cabinets.
Finishing Touches on Smooth Finish Oak Cabinets
Let your doors and drawers cure for about four days before replacing. Then match the numbered tape with the numbers on the frames. (Aren’t you glad you labeled them?)
The old hardware was refinished and reused, as well as the hinges, on my kitchen cabinets! It worked out great and another tutorial is coming for that!
However, if you want to replace with new hardware, Home Depot has some great ‘value’ deals on simple hardware, and Hobby Lobby’s specialty hardware (Home Decor department) goes on sale for 50% off on a regular basis.
And that’s it, ya’ll! It only took me 1.5 years to accomplish and share!🙄 If you hung with me throughout the post, you are quite the MWA VIP! 😉
If you have ANY questions at all, let me know! I’m sure I missed some details that might help you… and other readers, as well!
The counters are finished, too! Would you like the post for the refinished hardware first, or the counters?
My next projects is the backsplash. Everything is ready, I just need the time (management)!


Wow, Julie, so many steps, prep and actual execution! No wonder it took so long to document it, but what a great job you did in doing that for anyone who wants to attempt it. Fabulous job!
Yeah… it’s a lot, but worth it. AND, I think it would be so much easier if I had my own garage. It would have gone much faster, too!
It looks so good! Can’t wait to see it in person next time in there. As someone who has also redone my oak cabinets, I appreciate the effort that has gone into this process.
Thank you, Joy! Looking forward to seeing you in a couple weeks!
Oh, Julie, this looks SO GOOD! I have been thinking (for a while) about doing this with my own kitchen cabinets but have been dragging my feet on the job. Now that I have your step-by-step guidance, I feel I should get moving. I do have to admit that I probably will wait until after the New Year due to all the upcoming holiday confusion but will take the time to review all this and gather materials. Thanks for sharing your processes. I know you are enjoying the change.
Yeah… I think I would wait until after the holiday, as well! Also, be sure to do this when it isn’t a rainy season. The paint will dry and cure MUCH better with a bit of warmer weather and less humidity!
They are beautiful! The color is stunning and you really put in the work! Great job my friend!
Oh, thanks so much, Melan! Hope your Sunday went well today. Mark did great preaching at Coastal!
I love love love it! You did a beautiful job. I am so looking forward to seeing what you do with this lovely little home. Bless you
Thanks, Josee! Working on the next post!
I am not in the market to paint my doors but my grandson just bought a house and is thinking of painting the cabinets so am sending this advise to him if he wants. Yours are beautiful and I love your color choice.
Oh, thank you, Fernie, for sending my info his way! I’m so happy with my cabinets and can’t believe how smooth they are, and lovely… if I do say so myself!
Wow! It looks awesome! Well done on the effort!
Thank you, son! Always fun to see you pop in to the blog! 😉
Great tips, Julie. I will keep them in mind when I finally get around to painting my kitchen cabinets!
Hope it helps!
Wow Julie! You really did a terrific job. Great job getting a smooth finish and the color is fabulous. Enjoy your hard work and it will be fun to decorate for the holidays. Thanks for sharing all the step by step work. It’s priceless. XO- MaryJo
Thanks, MaryJo. It was a long time in coming. I’m so glad it’s all done. The cabinets AND the post! 😉
Julie,
They look wonderful!! I love the color!! Great job!!
Hugs,
Deb
Debbie-Dabble Blog
Thanks, Deb! So glad to have the post finally done!
Oh my goodness, Julie! What a transformation! I love the color. It made all the difference, and your painting tips are top-notch.
Thanks, Crissy. So glad to have this part of the renovation done and blogged!
The transformation is astounding, Julie! Thanks for taking us step-by-step through your process! Beautiful!
Oh, thank you, Laura… I’m so glad it’s done!
Wow! I just love all the attention to details and how you capture them in this DIY project. Links are super helpful- the corner zebra brush!! 🤩 💯
The final product is lovely, awesome transformation! It truly brings a warm, updated, coziness to the kitchen area.
Thank you, Diane! You are always such a great support, and wonderful friend!