
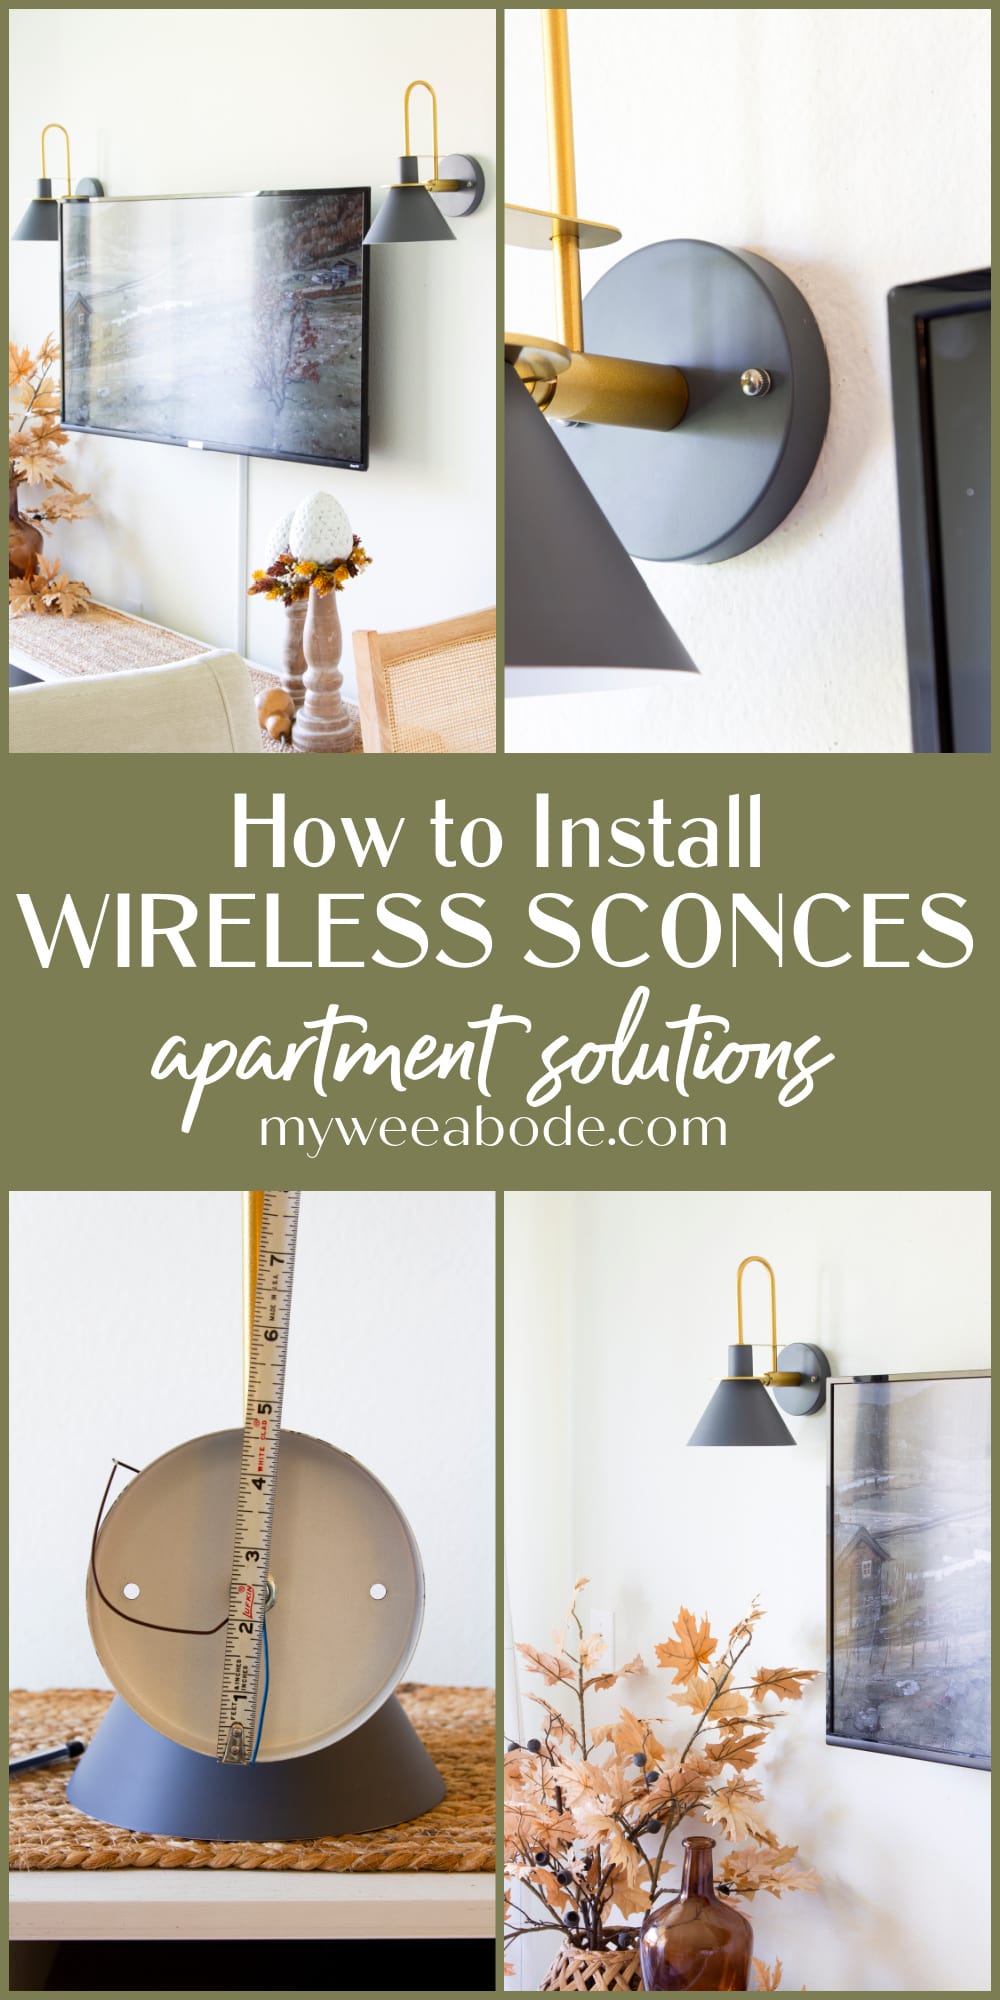
How to Install Renter Friendly Wall Lamps with 3 Way LED Magic Bulb
Learn How to Install Renter Friendly Wall Lamps with 3 way LED Magic Bulb: Whether you’re a renter looking to brighten up your apartment without making permanent changes or a homeowner seeking an energy-efficient lighting solution, this step-by-step tutorial will walk you through the process of installing wall lamps and utilizing the versatility of 3 Way LED Magic Bulbs.
HOW TO INSTALL RENTER FRIENDLY WALL LAMPS WITH 3 WAY LED MAGIC BULB
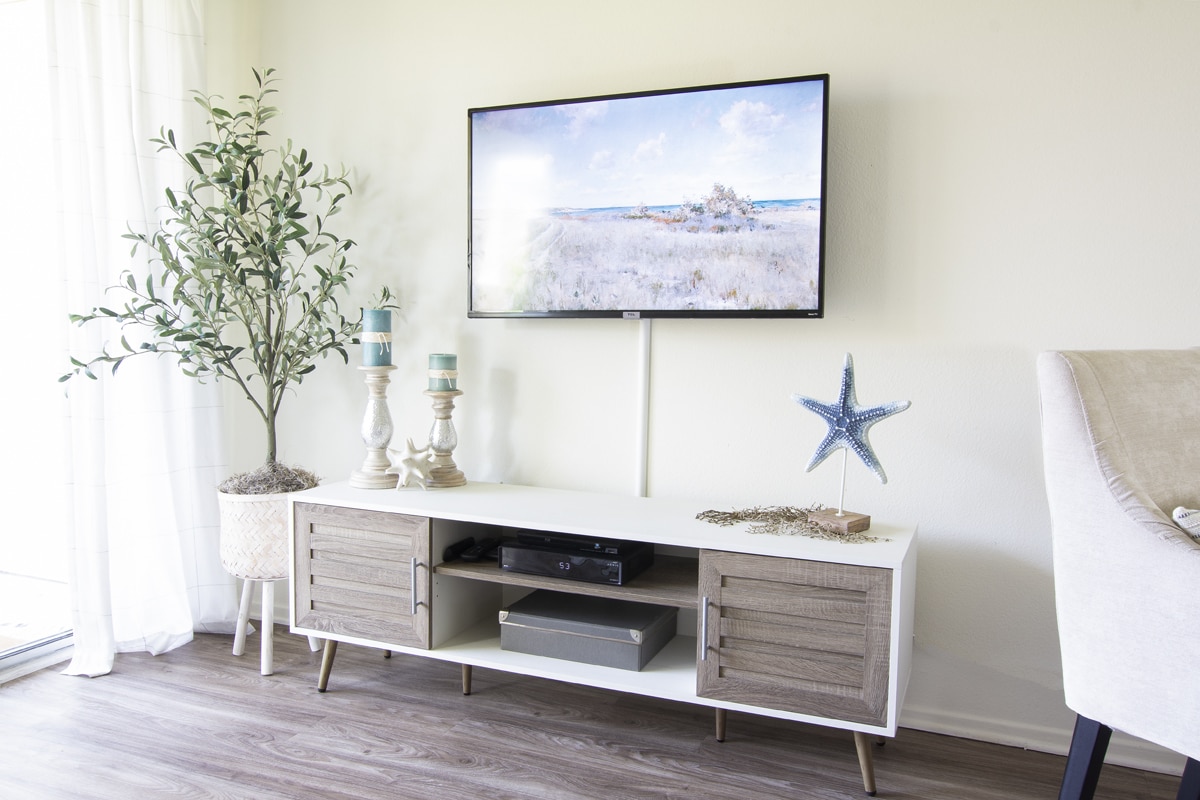
Ever since I settled into My Wee Abode 2.0 more than a year and a half ago, I’ve been engaged in a staring contest with the mostly-boring wall that hosts my TV.
Can you relate?
Home Decor Dilemmas…
I’m constantly caught in this whirlwind of ideas swirling through my head on how to add my own style to the apartment. It’s like I’ve got a whole Pinterest board up there, and I just can’t commit to bringing one of those design concepts to life!
However, from the very beginning, I new I wanted to add wall mounted light fixtures on either side of the screen. Practical, but pretty… ya know?
So, I finally jumped off the merry-go-round of ideas (for now), and added stylish sconces to my blank wall.
And, It’s Different…
Do you remember the wireless ceiling light I installed at the loft? Talk about a jury-rigged job!
Don’t get me wrong… it was a great light fixture hack… 4 years ago! And it was all the rage… they were called “Magic Lights”. But, rental home hacks have come a long way, baby!
We’re talkin’ apartment-friendly wall lights with NO puck lights! And it’s WAY easier to adapt! Actually, there is no jury-rigging necessary!
Today, I’m gonna show YOU how to install renter-friendly wall lamps with 3 way LED magic bulbs! No puck-light ‘magic’ for these lovely light fixtures!
Psst… are you listening?
Here’s just PART of the little secret: You can actually install all sorts of lovely light fixtures in your cozy abode, trendy apartment, or your humble dorm room, even if there’s not a hint of hardwiring in sight!
AND, you won’t leave any permanent damage if you move out! Simply spackle, sand, and go!
You won’t believe the options! We’re talking pendant light fixtures that can add a sparkle to your kitchen, sconces that’ll give your walls a makeover (or at least START a makeover 😉 ), track lighting for the ultimate spotlight moment, ceiling lights to shed some brightness in the area, bathroom fixtures to lighten-up your morning routine, even that ordinary table lamp without an outlet or plug nearby!
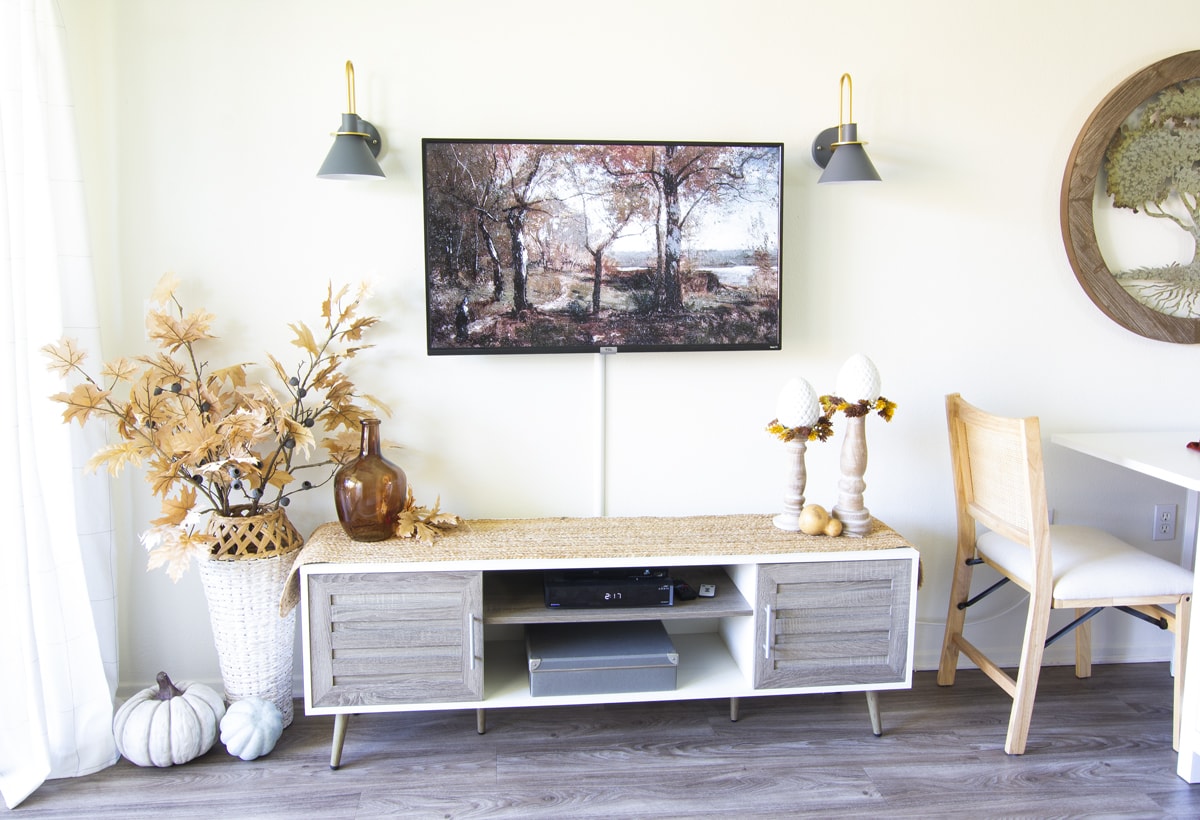
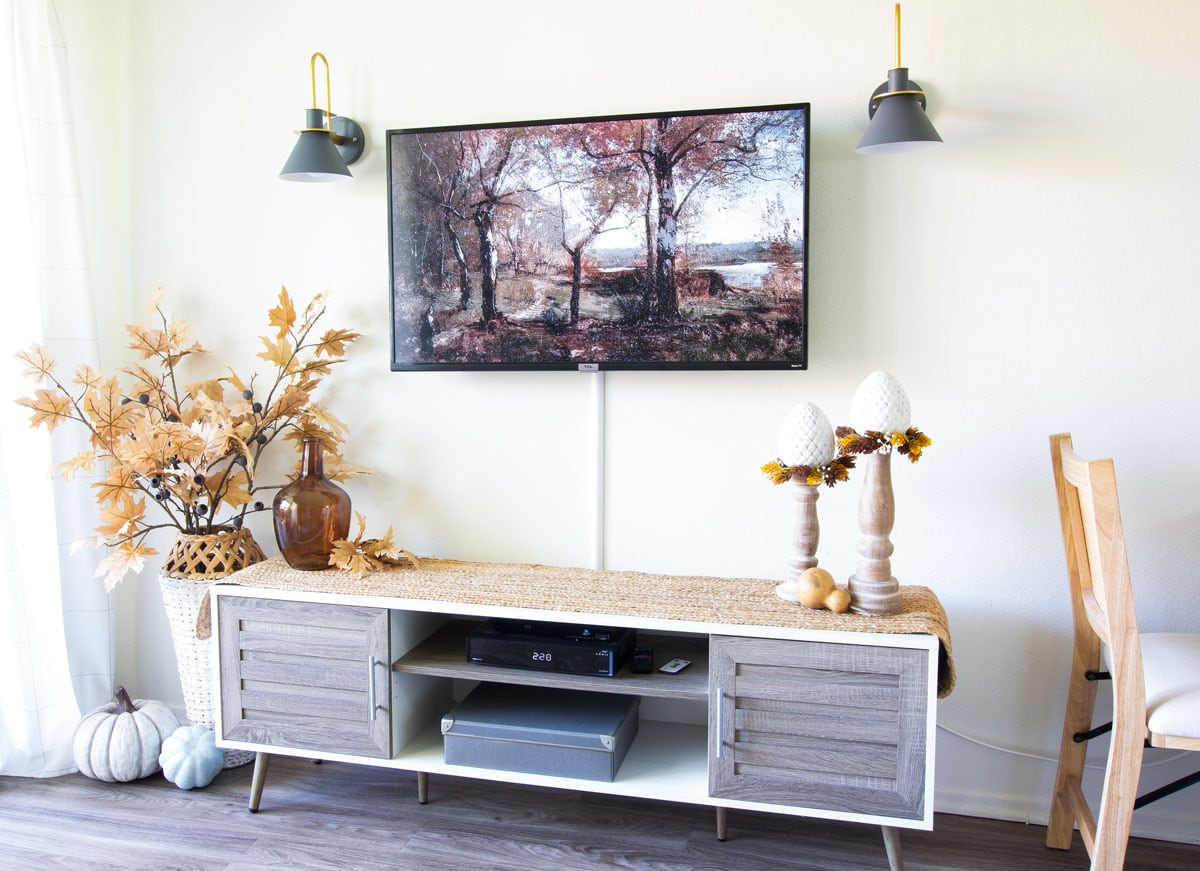
For today’s post, I’m excited to share step-by-step instructions on how to mount these handsome gray and gold wall sconces, which actually landed on either side of my wall-mounted television:

And at the end of this post, I’m sharing even more sconces to fit just about everyone’s design flair!
How to Install Wireless Lighting Fixtures in an Apartment

Tools you’ll need
This post may contain affiliate links, at no additional cost to you. For more information, see my complete disclosure.
So, let’s get to those steps, shall we?
Mark and Measure and Mark Again – Install a Magic Wall Sconce
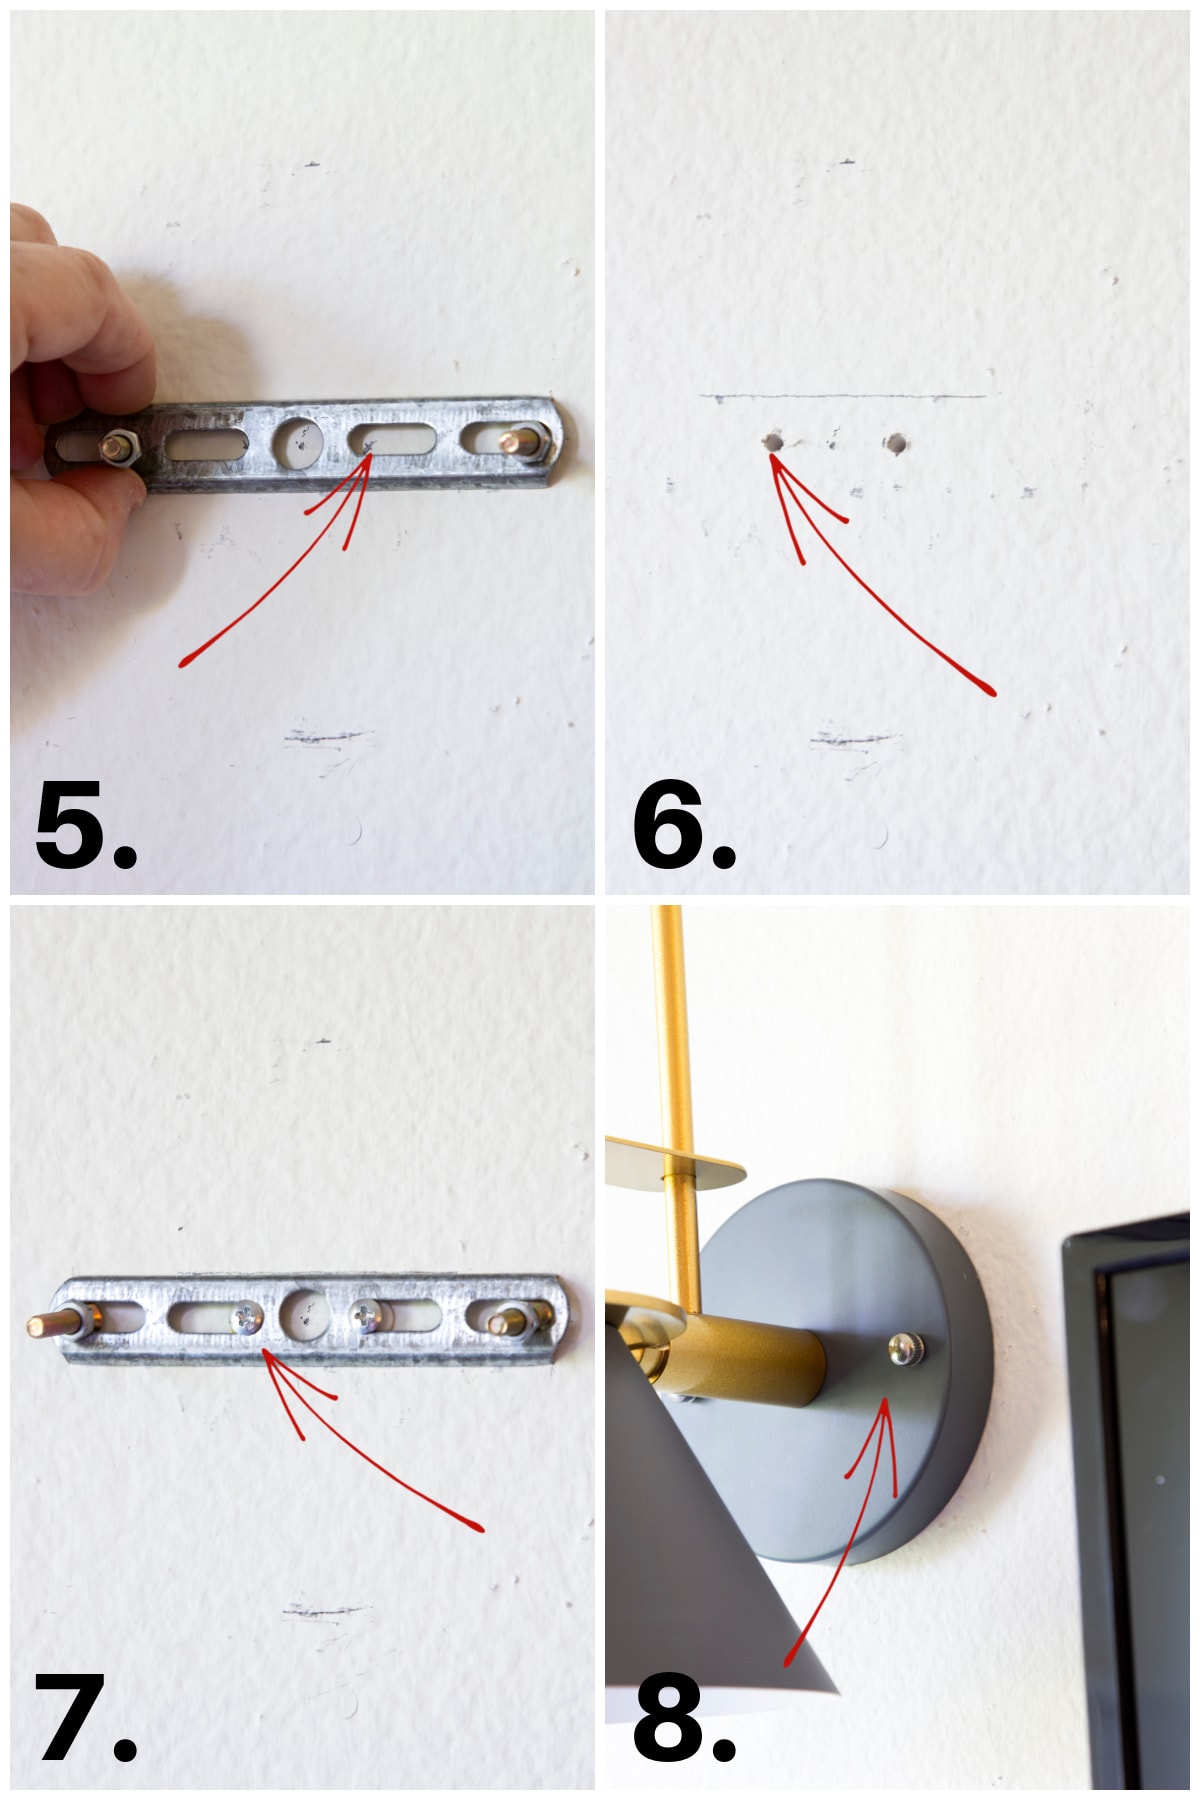
- First, hold the fixture where you want to mount it. If you install two on either side of a television (or frame, etc.), the first one is more about just placing it where it looks good. Then mark the wall on top and bottom of the fixture’s base with a pencil (Photo 1).
- Find the center of the base. Measure the diameter or height of the fixture base and divide by 2 (Photo 2). You can also use the markings made on the wall to mark the center (I realized this after I started writing these instructions! Duh!). Then mark the center (Photo 3).

- Now, take the mounting hardware and place it over the center mark. Use a level (or a level app on your phone) to ensure that the hardware is placed correctly. The level should read between 0.0″ and 0.2″ for a nice level mount (Photo 4).
- Mark the leveled hardware on the top, as well as where you want the screws in the wall to enter (Photo 5). (The screws that are ‘backwards’ are for attaching the actual fixture.)
Attach the Mount Plate
- Drill the holes making sure to follow instructions for your light fixture for the size for the drill bit size (Photo 6). Then hammer in anchors (not pictured).
- The ‘backwards’ screws will be loose… tighten the bolt down until they are close to the plate, but are still able to easily move. Then, place the plate on the wall and mount with screws into the anchors (Photo 7).
Almost There – How to Install Renter Friendly Wall Lamps with 3 Way LED Magic Bulb
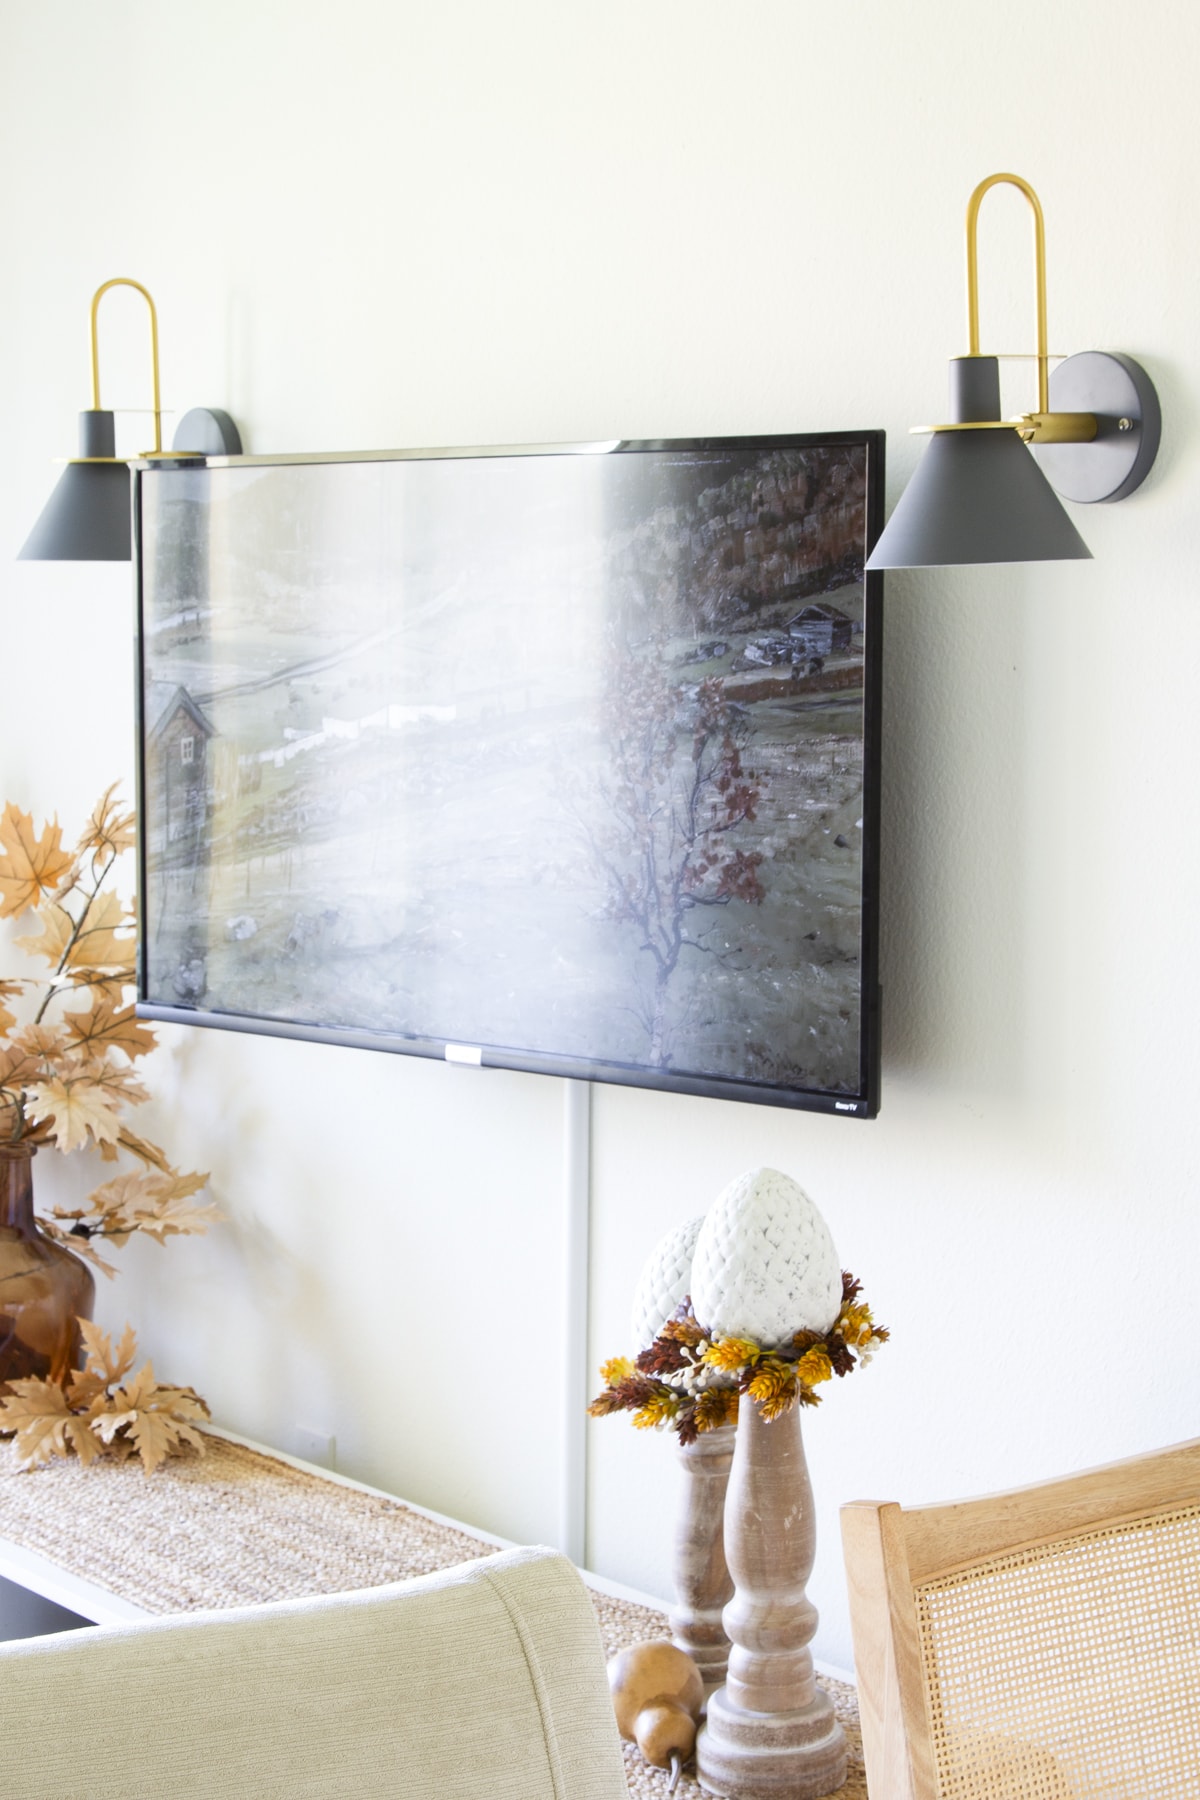
- The second-to-the-last step is to place the wall lamp over the protruding mounting screws and tighten down with caps (Photo 8). This will take a bit of effort as the screws are loose underneath. The easiest way to tighten is to pull the cap towards you and turn. This will eventually tighten the screw underneath… trust me.
Now, don’t forget… when you add the second light on the opposite side of a television or artwork, you want to be sure it’s symmetrical to the first wall lamp… or at least the same distance from the TV or frame.

Measure from the edge of the anchor item (TV or frame) to the top and the bottom (bottom measuring not pictured) of the fixture, in order to get a true measurement. Then transfer and mark those measurements to the other side of the frame, and repeat the steps listed above!
The REAL Magic – Install Renter Friendly Wall Lamps with 3 Way LED Magic Bulb
The final step is where the REAL magic is revealed!
Remember how I said there was no jury-rigging with these fixtures?
Don’t you LOVE how you don’t have to have any hardwiring, and you don’t have to figure out HOW to wire it either?!
PLUS, you don’t have to use puck lights, like in the ‘olden days’. 😉
But, here’s the question. HOW do you get these wireless wall lamps to, well, light up?
Without further adieu, here’s the answer:
As long as you have a normal E26/E27 socket base on your light fixture, these magic bulbs will do the trick!
Here are just some of the great features of the magic bulb:
- 7W rechargeable LED light bulb is equivalent to a 60W tungsten light bulb. That means it’s BRIGHT!
- The bulbs come in warm or cool tones.
- These are considered battery operated, but the rechargeable battery is built-in. To recharge (specifically the ones I use), just screw them into a standard lamp and turn it on! No charging cable needed! (There’s a bit more to it, but that is the gist.)
- Remote controlled. Each bulb comes with a remote, but one remote will work on BOTH bulbs… no reprogramming required.
- These are 3-way bulbs. You get to choose how bright you want them to light!
- Long-lasting charge. Depending on brightness used, charge lasts 4-12 hours!
Rechargeable 3-Way Magic Bulb – Comparison
Take a look at how the percentage of lighting works for the 3-way magic bulb:
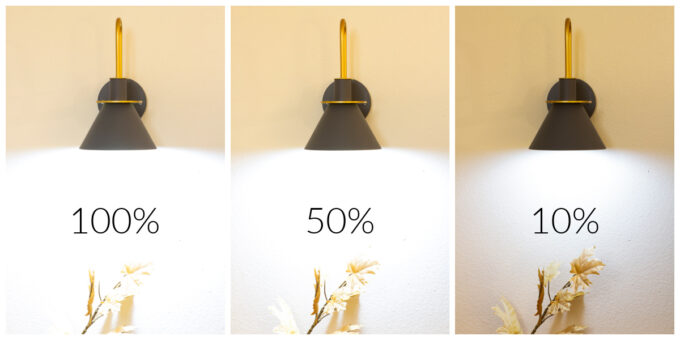
Pretty impressive, right?
The 3-way rechargeable magic bulbs come in different shapes and sizes, as well as different wattages.
Think of using the magic bulbs in different types of light fixtures and locations that you never would have imagined before:
- Above the sofa in the living room
- In the dining room
- Bathroom light fixture that has issues (I had an epiphany while writing this post for my off-centered bathroom light fixture)
- Ceiling light in a dressing room
- Pendants above a bar or island in the kitchen
- Light fixture above the kitchen sink
- Sconces over a bookcase for highlighting
- Hallway accent lighting
- Wall lamp or ceiling light in entryway
- Outdoor lighting on a porch
You might even want to flank an Anthropologie mirror dupe with a sconce on either side!
What would YOU add to this list?
The Final Result – Apartment Friendly Wall Lamps Using a Magic Bulb
I’m super happy with the final result…

It actually isn’t the final look, as I’m still trying to figure out what else to add to the wall… if anything.
What do you think? Any suggestions?
Several thoughts I’ve had is wallpaper (not the whole wall, but framing it out… similar to this bedroom wall treatment or this idea), or a wood slat accent (but not quite so intense), or even some diy picture ledge shelves.
Shop the Look
Here are some great options for wireless wall sconces… remember, even if they HAVE wires, you can always use them without attaching the wires!
How ’bout it… are you day-dreaming of where YOU can shed some light in your home with this easy light fixture hack? I promise you… it’s super easy!

all the freebies!
BECOME A VIP!
Get instant access to the My Wee Abode FREE Printables Library!
They look fabulous! I love that they are 3 way bulbs too; definitely Pinning this idea for my sons’ dorms.
Thanks, Joanne… I’m thinking a bathroom light ‘fix’, and maybe even some pendants above my bar/sink! Too fun!
Love the look and the 3 way bulb is a must have. If I don’t need a ladder I can do it myself as you did. No ladder is Dr.’s orders as I have broken enough bones for my lifetime. Glad you were able to show us different lighting choices for Magic Bulbs.
Okay, Fernie… I agree! NO LADDER! 😉 I was able to do this DIY without a ladder, and just one power tool… my drill. 😉 Thanks for stopping in!
Who knew! Thanks for this great post! Pinning for reference!
Crazy easy, right? And I love that you can use just about any light fixture. My bathroom light is off-centered (I have NO idea why!), and I’m thinking’ I may be able to correct it with this magic trick! 😉
I have always wanted hanging pendant lights over my kitchen island, but the electrical quote plus popcorn ceiling repair put it out of reach. I read your blog and OMG…..just so happy!! Found two really great pendants on Lowe’s website and they will be here soon. What great tech to be able to have lighting without hard-wiring! Thank you so much for sharing your great find and the sconces look wonderful flanking the tv. Have you considered grass cloth wallpaper for that wall? It would add depth and interest without trying to be another focal point and would “ground” the tv and hide the cable. There are so many colours available now and it would be a great backdrop for the consol. And available in peel and stick for rentals. Thanks again!
Oh, Gwyn! I’m so glad this post helped you! I’m so excited for you! And, yes, I have actually looked through LOTS of peel and stick grass cloth wallpaper, and actually have purchased some… With my large wall, doing the WHOLE wall (it’s vaulted) might be too big of a job. Also, I have to take into consideration the humidity in our area. Peel and stick has some issues. However… I HAVE thought of using it to frame out behind the TV and console. But I’m afraid it might break up the wall too much. Ahhh, decisions, decisions!
Another helpful post to send to send to my daughter in NYC apartment with good light in her room or licving room.
Thank you for letting her know, Linda! I think this is a gamechanger for MOST homes!
Thank you! I’m going to try these. I think it looks great!!
Of course! I’m planning on putting some above my bar!
Finally got my hanging pendants from Lowes’ and went to order the light bulbs you suggested, but some really negative reviews on Amazon. So I wondered, since you’ve had these for awhile in your sconces, what you felt were the pros and cons. I don’t want to take a chance installing them in the ceiling (the dreaded popcorn!!) and over my kitchen island if they aren’t going to give enough light. Thanks in advance for your honest opinion/advice. I appreciate the help! Thanks from Gwyn
Hi, Gwyn… Mine are doing JUST fine! They emit the same brightness as what a 60W bulb light would. AND, if you are using more than one, it’s even better. I haven’t had any issues thus far, and I’m planning on using them above my bar area, as well! With 3K reviews, and a 4 star rating, I wouldn’t worry about what others are saying. The only thing to remember is, they do need to be recharged, so remember to turn them off when not in use! 🙂
Thanks so much for replying to my enquiry. I will get the bulbs ordered and enjoy my new lights! Really appreciate your website.
Your lights look fabulous! So many people need to know this is an option, so I’m going to share your post in my weekly newsletter on Friday! Happy Day!
Oh, thank you so much, Donna! What a blessing!