
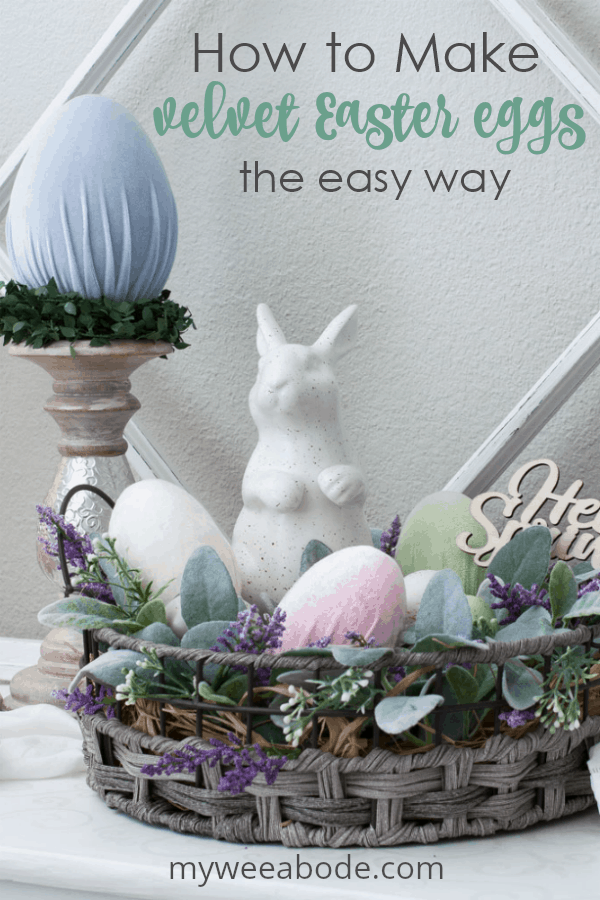
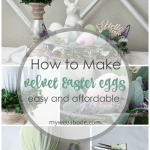
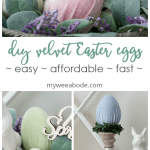
How to Make Velvet Easter Eggs the Easy Way
Velvet Easter eggs are plush and beautiful. Today, we are going to learn how to make velvet Easter eggs the easy way.
HOW TO MAKE VELVET EASTER EGGS the EASY WAY
Happy day, everyone! Hope you are having a wonderful day that is full of special blessings.
This month, when I was working on putting together my Spring Centerpiece, I did a search on ‘velvet eggs’, ‘velvet Easter eggs’, and specifically, ‘how to make velvet Easter eggs’.
You know what I found?
LOTS of recipes for red velvet cake with eggs…
One Etsy store that sells velvet Easter eggs (and they are lovely, and my inspiration).
And, NOTHING on how to make or DIY velvet Easter eggs!
So, you KNOW what happened next, right?
Yep… a girl’s gotta do what a girl’s gotta do! I made them, of course.
Would you like to learn how to make velvet Easter eggs the easy way? Well, I’m thinkin’ you wouldn’t be here unless you did! But first, let’s see what they look like in a spring vignette.
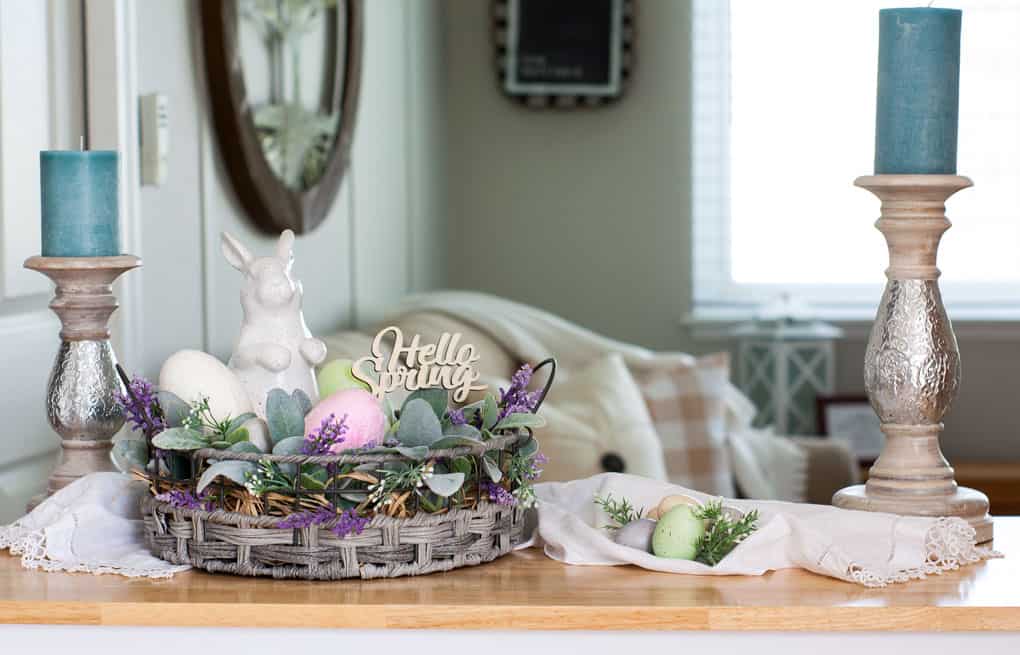
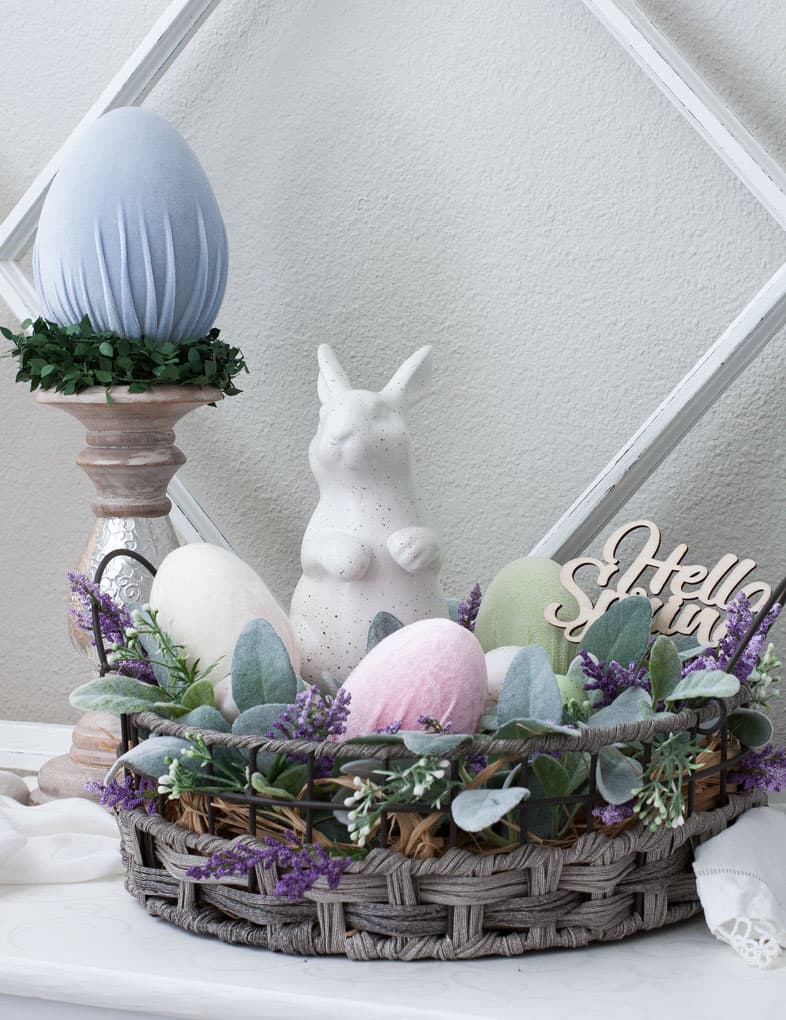
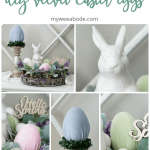
Spring Vignette and Velvet Easter Eggs
You can restyle table centerpieces and vignettes to create new looks. Here’s what my spring centerpiece looked like before, with a just few of the velvet covered Easter eggs in the basket.
(You can take a look at how to create the spring and Easter centerpiece by clicking HERE.)
Simply move the items to a new area, changeup and/or eliminate a few items, and…
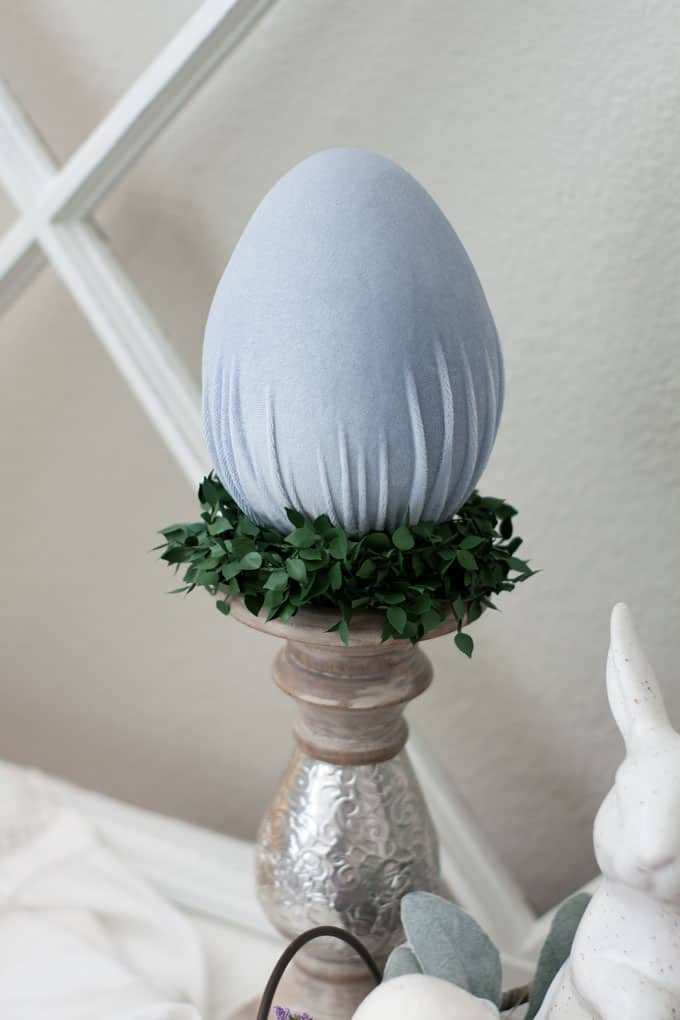
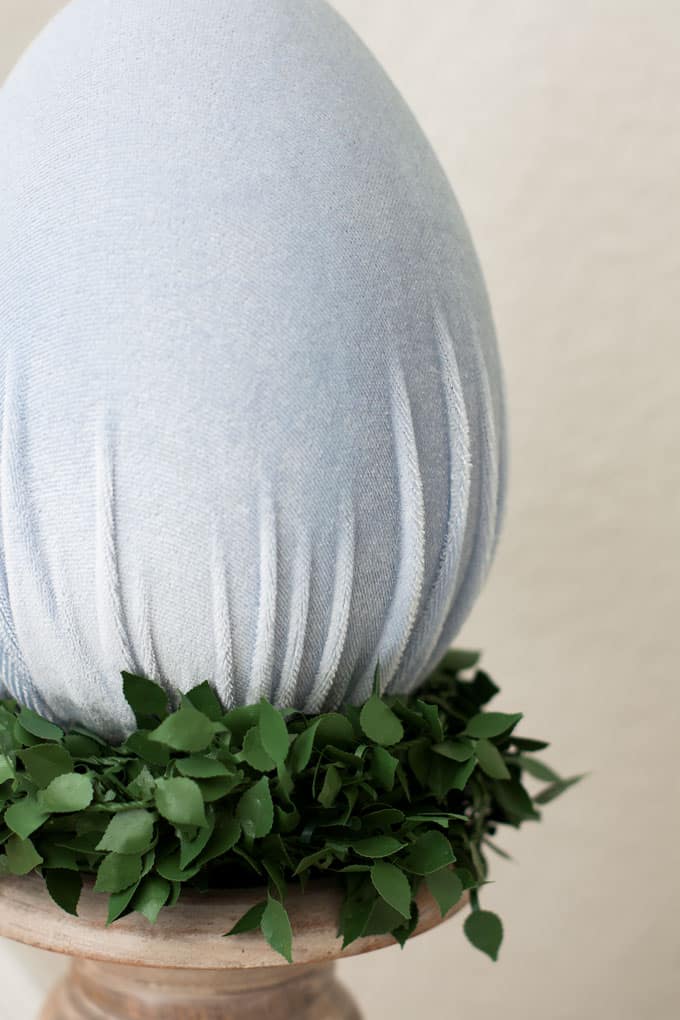
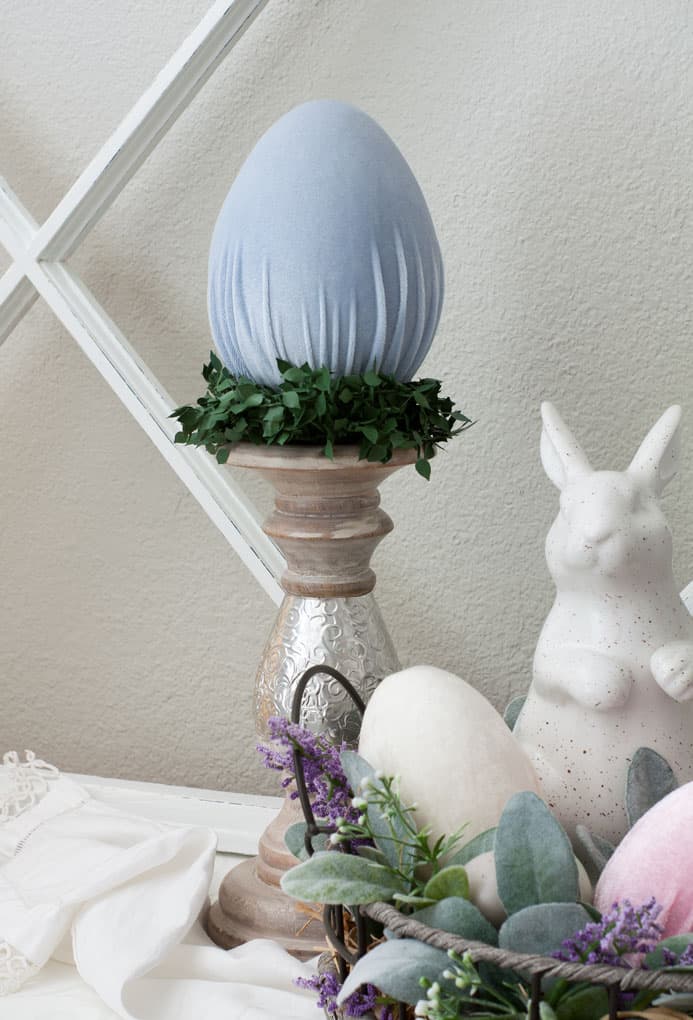
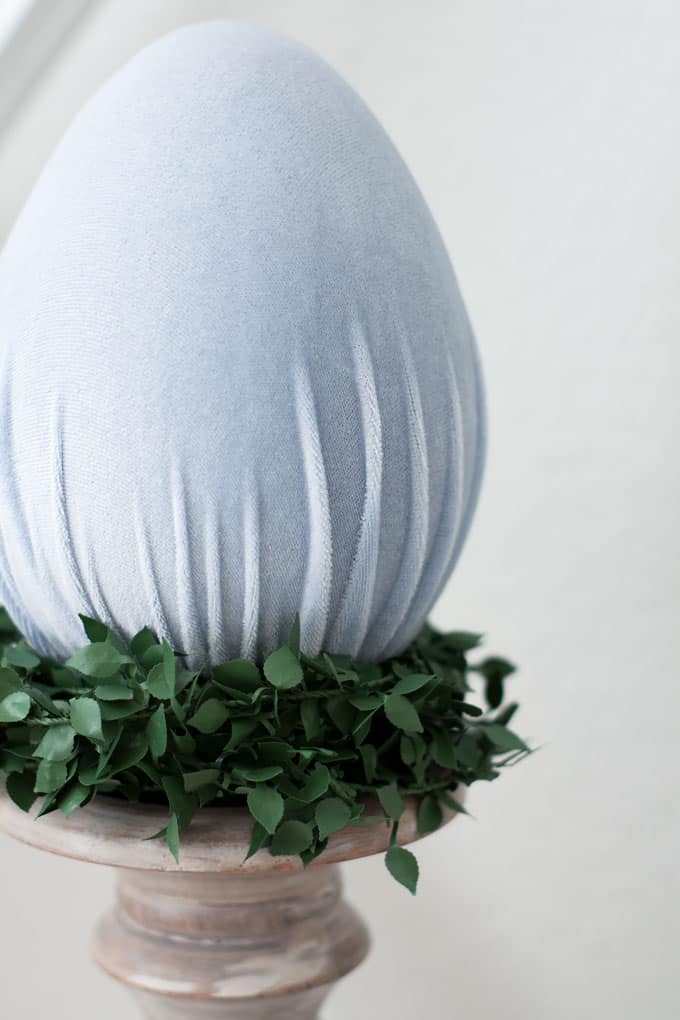
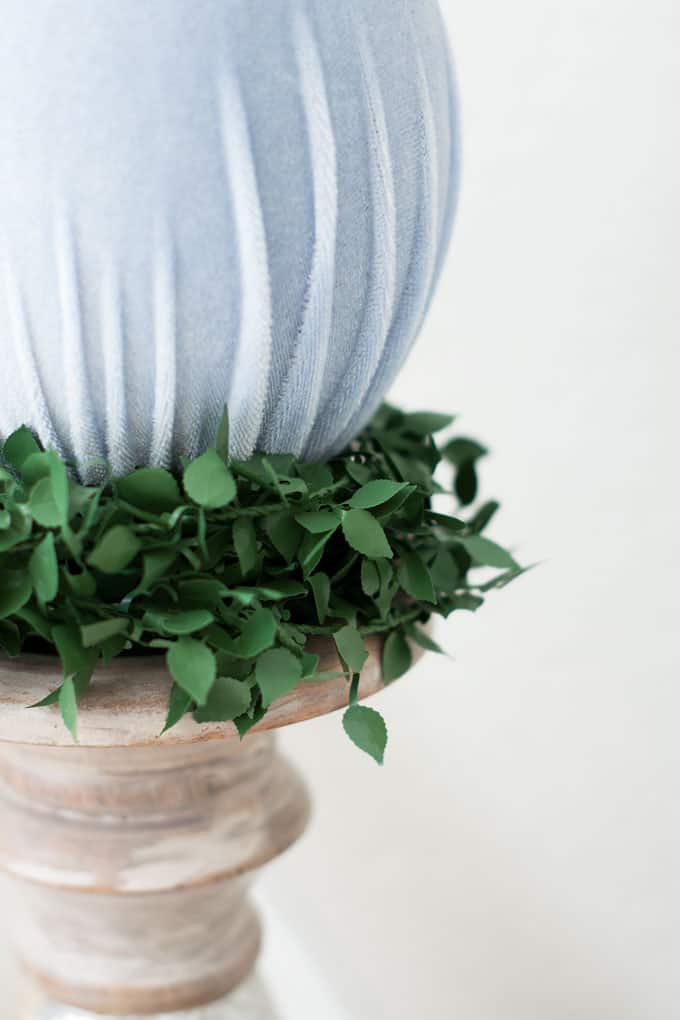
Yep… that’s a pretty blue velvet Easter egg on the candle holder! I added a bit of ivy to create a ‘nest’.
Let’s learn how to make these velvet covered eggs, then we’ll take a look at more ‘after’ pics!
This post may contain affiliate links, at no additional cost to you.
For more information, see my complete disclosure HERE.
What You Will Need
The items for these velvet eggs are really easy to find and not expensive, at all. I would say each egg costs less than four dollars to make! Such a deal! Here’s what I used:
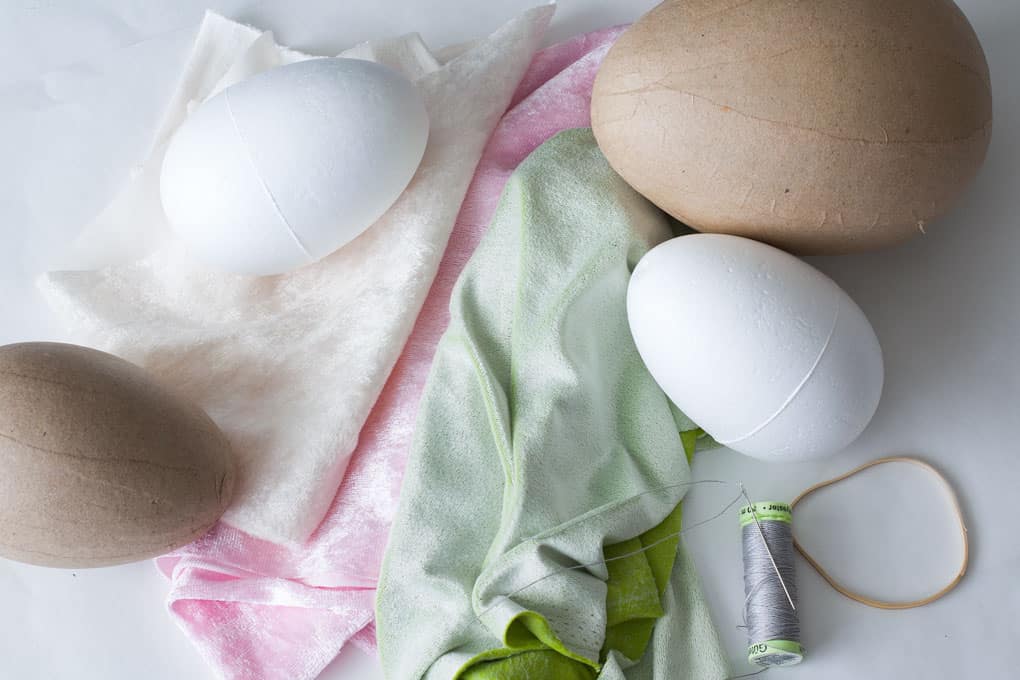
- Various sizes of egg forms. I used 4″ and 6″ but you can do smaller ones, too! (Tip: You can use paper mache or SMOOTHfoam brand, both work great. Buy what’s most economical. I picked up mine from Hobby Lobby. Amazon carries these, but they are all WAY more expensive than getting them at your local craft store.)
- Stretch velvet or Stretch Velvet at Amazon (I’ve linked to my favorite supplier. Pastels are HARD to find at local stores, but not HERE. You can use Panne velvet or regular velvet, it just has to have stretch.)
- Rubberbands (medium gauge are good so they don’t break)
- Needle with a large ‘eye’
- Heavy duty upholstery thread (gray is easy to see, but still doesn’t ‘show’ on the finished product)
- Round Lace ‘patches’, you can also use these mini doilies, or these tiny ones (just be sure to check the size in the description)
- Scissors
How to Make Velvet Easter Eggs the Easy Way
Here are the steps for easy DIY velvet Easter eggs:
Prep
- Decide what size egg form you will start with. I used 4″ Smoothfoam forms for the velvet eggs in the basket and 6″ paper mache for the blue one on the candle holder.
- You only need about 1/3 yard of fabric for these eggs… that will give you plenty of yardage for multiple eggs of each color. (Tip: You can only buy Stylish Fabric’s velvet in 1-yard increments. Buy colors that you can use for multiple projects, like my Designer Velvet Pumpkins!) For the 4″ eggs, you will cut about a 7″-length of material from the 1/3 yard of fabric. For the 6″ egg, I would cut about 9-10″. These pieces will easily cover your eggs.
- Center the piece of fabric on the narrow end of the egg and pull it around the egg, gathering it at the bottom with your hand. (Adjust for the ‘gathered’ look you want… you can adjust this later, too.)
- Tightly wrap a rubber band at the bottom gather of material. This will hold the material in place while you tack down the fabric.
- Cut off the excess fabric below the rubber band.
Sewing
- Double thread a large needle with heavy duty upholstery thread and tie a large-ish knot at the end.
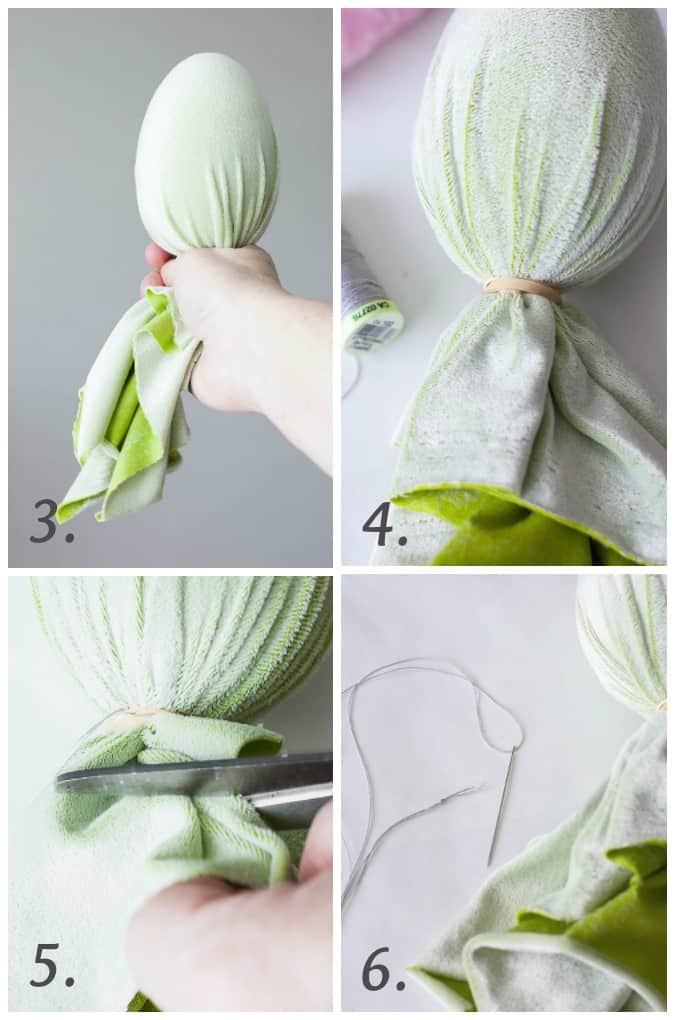
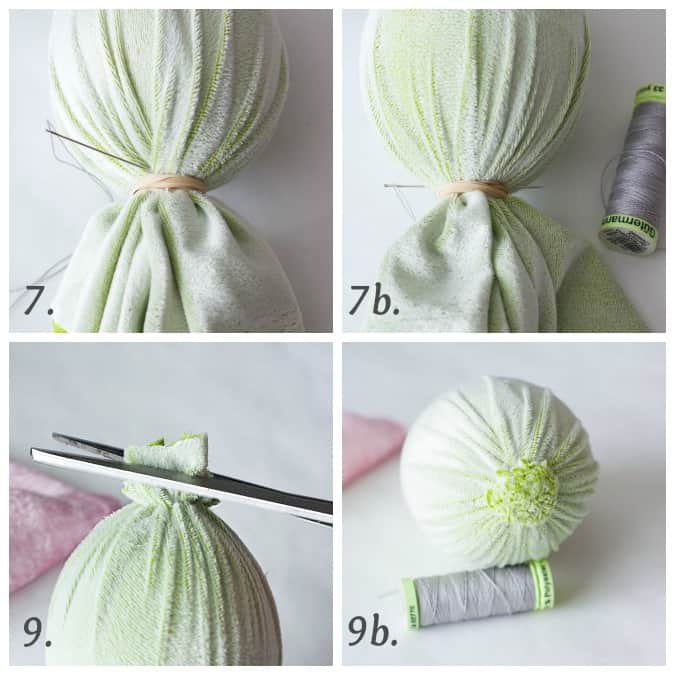
- Between the base of the egg and the rubberband, push your needle from one side straight across to the other side and pull through tightly. The tighter you pull (without breaking the thread… which hasn’t happened to me), the better. Continue to do this step around the base of the egg to tightly gather the fabric.
- After you feel you have stitched around the egg to create a tight gather, remove the rubber band and check if there are any ‘loose’ gathers. Continue with step 7 until you feel that the gathers are all secure.
Finishing
- Cut off the remaining fabric as close to the base of the egg as possible, being careful to not cut the thread/stitches. You will have a ‘button’ left at the base of the egg, but this is easily hidden, as you can see in my vignette. (Tip: If you want, you can hide the ‘button’ with a little embroidered applique (I would purchase or ‘dye’ ones to match the fabric for a cohesive look). I’ve listed some links in the “What You’ll Need” list.)
- Add eggs to your favorite centerpiece, vignette, or project and stand back and let out a happy sigh! 😉
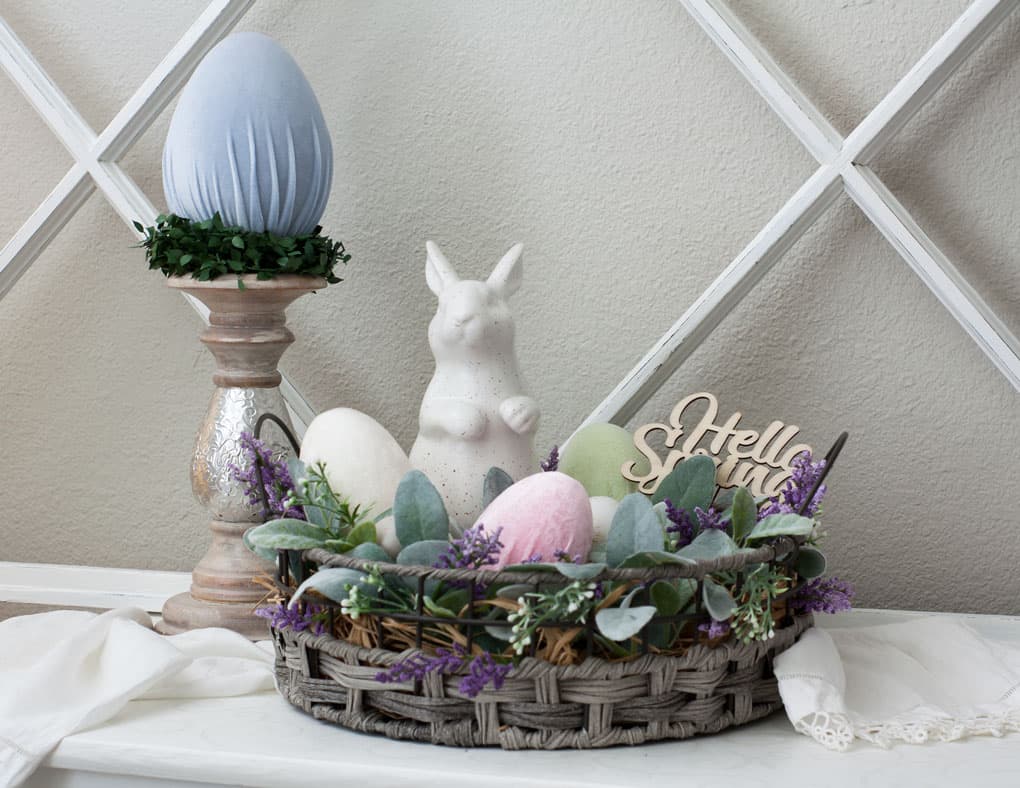
The Finished Velvet Easter Eggs
Let’s take a look at how to position/place our lovely velvet Easter eggs.
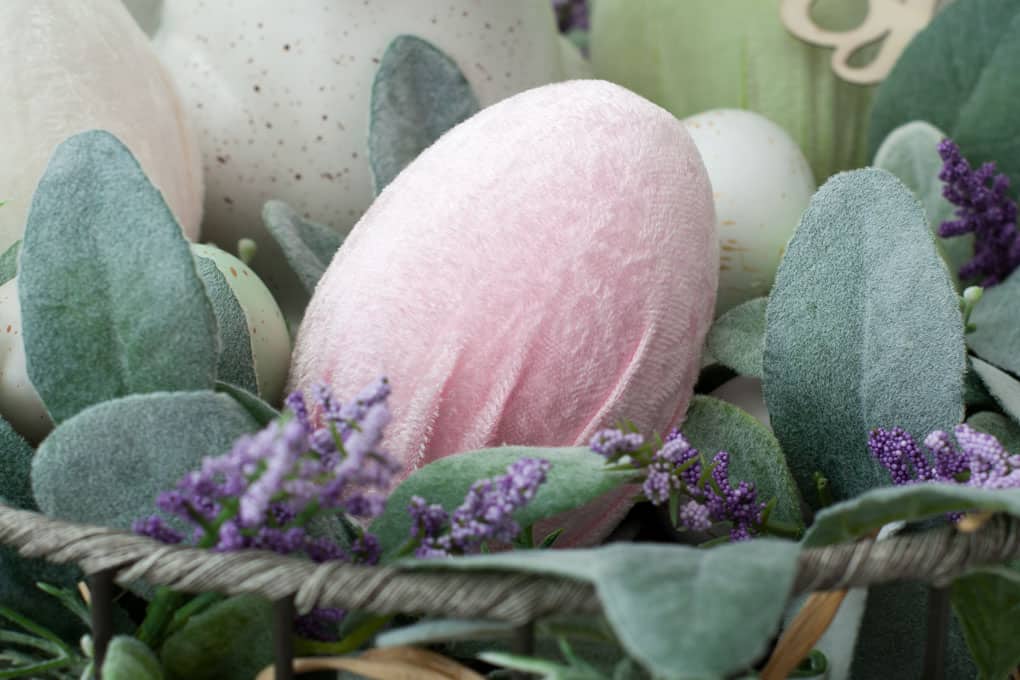
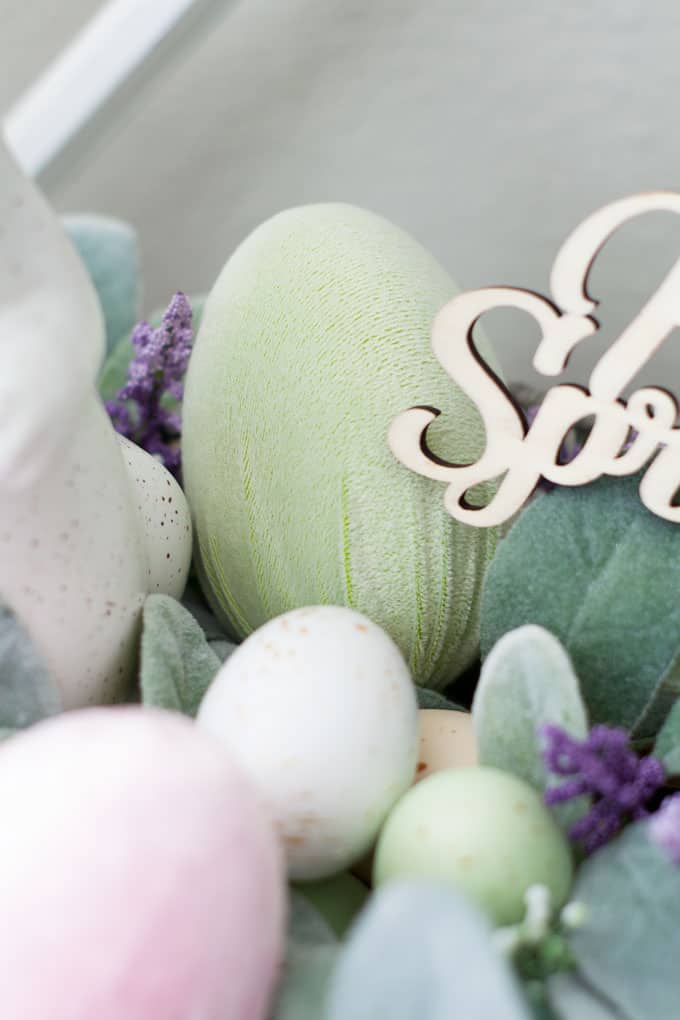
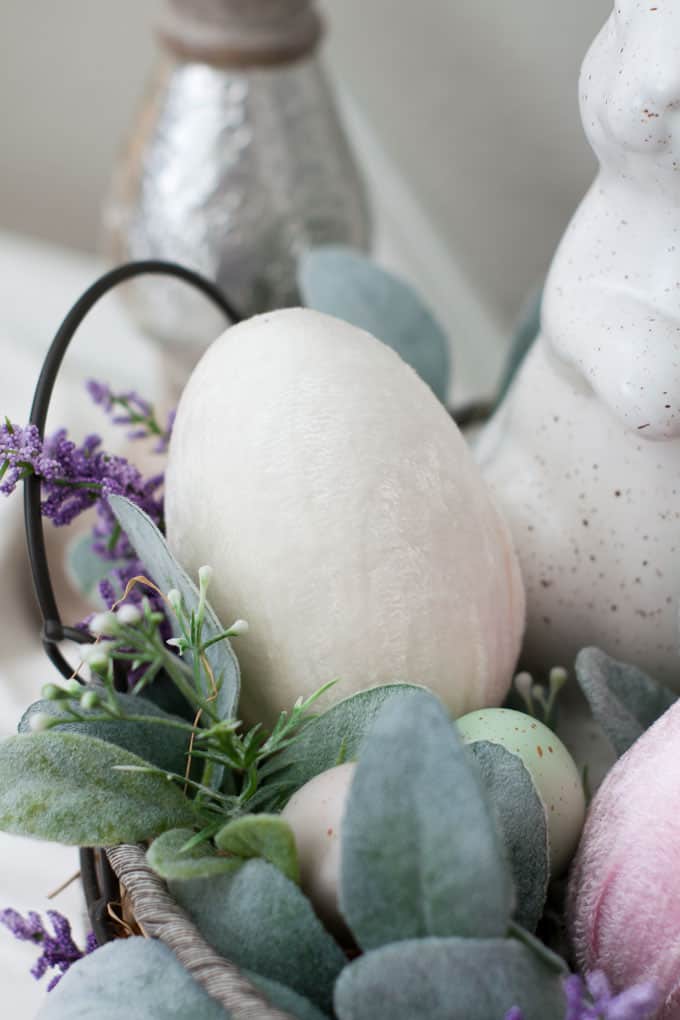
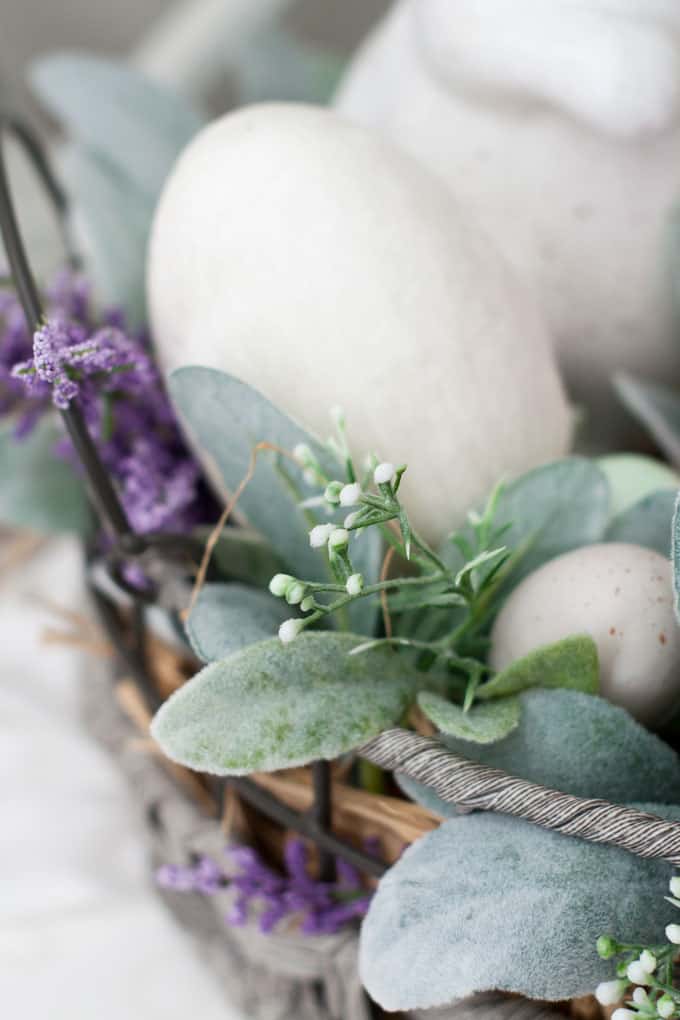
There are three of the 4″ velvet eggs in the basket… the ivory and pink ones are Panne (crushed) velvet and the green one is regular stretch velvet.
Be sure to postion them without exposing the bottom ‘buttons’. Also, tilt and place them in different directions for more interest.
The blue “candle” velvet Easter egg is standard stretch velvet, too.
The stretch crushed velvet gives some added texture (and it was the only pink I could find at my local fabric store!)
And the green velvet egg that was used in the tutorial.
Spring is in the air, even if you’re weather doesn’t know it! 😉
I think my favorite is the candle velvet egg! What about you?
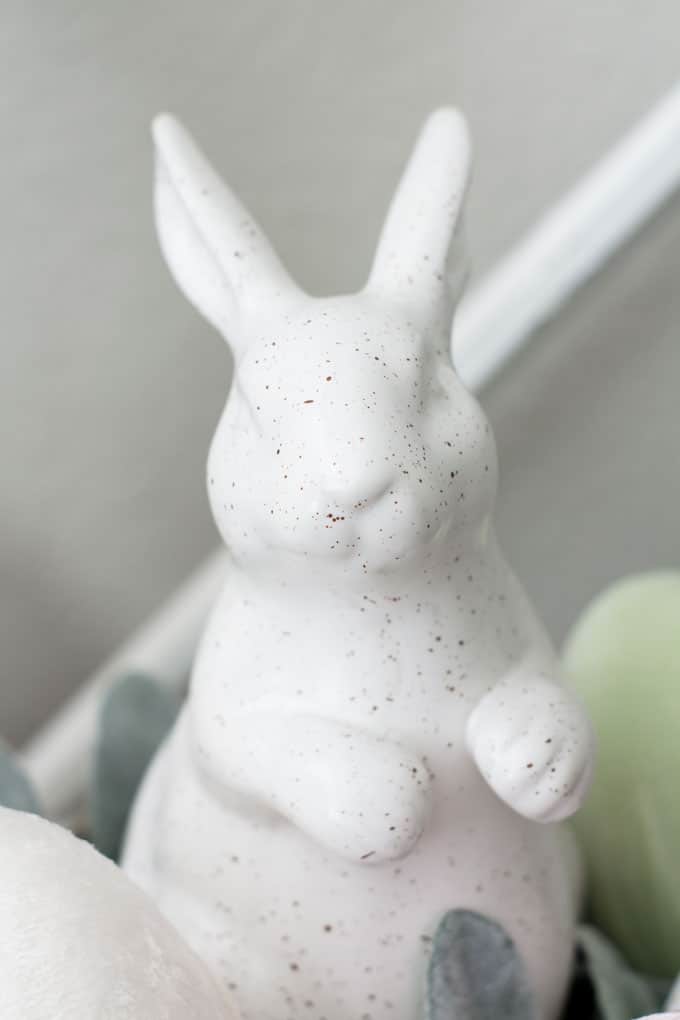
And of course, Mr. Bunny is adorable! Those speckles make his so special!
Can you tell I’m happy with these photos? (For those that are new to My Wee Abode… photography has been a difficult learning curve, to say the least!)
I might replace this ivory one with the ivory used on my velvet pumpkins. This seems a little pale… what do you think?
But, I do love the pink one!

And what about those faux florals? They last forever, and can be used over and over!
Okay… one last full photo and we’re done… I promise!
Now It’s Your Turn To Share
Now that we’ve learned how to make velvet Easter eggs, what do you think? Easy enough to make yourself? Where would you put these pretty little velvet eggs? I bet children would LOVE these in their Easter baskets! (Well, maybe not so much without candy in them… 😉 ).
Let me know in the comments if you have questions, and of course, let me know how beautiful you think they are, too! LOL!

PIN IT FOR LATER!!!

These are so beautiful! You are a genius for figuring out how to DIY them! Thank you!
Aw, thanks Chelli! I’m excited to see if others decide to make them, too! 😉 Hope you have a wonderful week. Hugs and hearts!
Your eggs are beautiful, Julie! I am not sure which I like more, your velvet eggs or your velvet pumpkins.
I know… I think I still love my pumpkins the best, but these are a close second. However, not sure anyone has put these out on Pinterest, so that’s a good thing! (I saw that you pinned it, thanks so much!)
These are SO adorable and I just love the vignette you set up for these velvet eggs with the lambs ear and that cute white bunny! Pinning!
Carrie
curlycraftymom.com
Thank you, sweet Carrie! You are always a wonderful support!
Julie, your eggs are beautiful. The tutorial seems very easy. I think I like the ivory egg the way it is. Thanks for all your crafty goodness and stylings.
Thanks for the input, and the encouragement, Wendy! Hugs!
How pretty! I love your detailed tutorial. Thanks for sharing at Snickerdoodle Party, Julie. Pinning to my Easter Board.
Thanks, Bev… I think I may use them on one or two more spring projects!
I especially love the large blue egg on the candlestick! So elegant.
🙂 gwingal
Yep… it’s my fave, too! 😉 Thanks, Nikki!
Oh aren’t these pretty! I’ve not seen velvet eggs- they’re really nice!
Love doing something ‘new’. 😉 Thanks for the sweet words, Kay. Hugs!
Your velvet eggs are so pretty and elegant in these soft muted colors. So original too! Well done Julie!
Thank you! I hope that lots of people see them and are inspired, right? 😉
Super easy project with major cuteness! I love the idea of using velvet!
Thanks, Mary! They were so fun to make!
This is such a fun craft! I think that velvet eggs are in my future!
Happy day friend!
karianne
Fun, easy, AND purdy! 😉 It’s the best combo, right, sweet friend!;-) Always appreciate you stopping in!
These are so creative, Julie! I love them in your centerpiece. They’re totally dreamy. Hugs, CoCo
Well, thanks, Coco! I had a lot of fun with them! Hugs!
Love the velvet eggs, Julie! I especially love those close-up detailed shots. Very pretty vignettes! Pinning!
Thanks, Crissy… had so much fun with these!
Very beautiful, thanks for the tutorial, I love all your Easter decorations, I have to get moving on my house.
Thank you, Sue! More coming this week! Very fun!
How sweet these eggs are!! I love all of your spring fabric choices and the egg on the candle holder is too adorable!! Also, your photography looks amazing!! Yay for learning new things at our age my friend!!
Thank you, Cindy! You made my day! 😉
These are so cute! Thank you so much for all the wonderful ideas you shared with us at the Welcome Spring party. I pinned them all.
Thank you so much, Joanne! Appreciate the love! 😉
These are really pretty! They look like something you would find at HomeGoods 🙂
>> Christene
Keys to Inspiration
Oh, thanks, Christene. Super easy and they come out so lovely! 😉
They’re beautiful Julie. I love the “tactile-ness” of velvet. It always adds so much interest to something and the colours you chose are just gorgeous
Thank you, Michelle… they are so fun to make, and I found more velvet colors, so more to come!
What a clever idea. Love all the pastel colors!
Thanks, Patti! More coming this week! I found more velvet colors at my local store!
These are so lovely, pinned to my holiday board.
Thanks so much, Maria! I had fun making them, and there are more to come this week!
Thank you for sharing at #ThursdayFavoriteThings. Pinned and shared.
Thank you for sharing and pinning! Hugs!
Congratulations! Your post was my feature pick at #ThursdayFavoriteThings this week. Visit me at https://www.marilynstreats.com on thursday morning to see your feature! All hosts choose their own features from the comments left on their blog so be sure to return to my blog to see your feature. I invite you to leave more links to be shared and commented upon. Please don’t forget to add your link numbers or post title so we can be sure to visit!
Thank you, again, sweet friend! 😉
I love your velvet eggs, I hope to try to make them. I have made the pumpkins before and loved the look of them.The eggs looked so good with the lambs ear and the lavender. I think they would be adorable with a hen and chicks instead of a rabbit. You would just have to use the little eggs.
Oh, I’m so glad you liked the eggs, Sandra! Let me know if you make them… would love to see how they come out. You can always email me a photo. 😉 (If you check out my Spring Decor with velvet eggs post, you can see I did some little ones, too!) Hugs!
I LOVE the colors of these!! Your spring centerpiece is gorgeous!
Thank you, Pamela! You made my day!
I’ve tried a lot of crafts over the years Julie, but I’ve never made beautiful velvet eggs. You are speaking my language with those gorgeous pastel colours too! Such a sweet DIY.
Thank you for sharing your easy velvet eggs at Create, Bake, Grow & Gather this week. I’m delighted to be featuring this post at tomorrow’s party and pinning too.
Stay safe my friend,
Kerryanne
Thank you so much, Kerryanne! I’m a little surprised, then not, that these eggs have not been more popular this year. Probably the current situation keeping people from some purchases. 😉
Your eggs are simply beautiful and tone so beautifully with the lamb’s ear greenery! I think I am gonna be on the cheap side and look for pastel velour-ish tops once the Goodwills of the area are open again! Or 40% off c/os at Joann’s! Wonder what’s in my closet….hmmm! Thank you for a wonderful idea and tutorial. Happy Easter, stay safe!
Oh, thank you, Kathy! Using Goodwill clothing made from velvet is a GREAT idea! Just make sure it’s in good shape as ‘worn’ velvet can look thread-bare when you stretch it over the egg. 🙂 Let me know if you make them!
Julie,
I love these velvet eggs. So beautiful. Congratulations, you are being featured at Thursday Favorite Things. I hope you stop by.
https://www.eclecticredbarn.com/2020/04/thursday-favorite-things_8.html
Hugs,
Bev
Thank you so much, Bev!!!
Julie your eggs are so beautiful my friend🙌🏻 Thank you for joining us over at our new link party Charming Homes & Gardens🙋🏼♀️
Of course… have you down on my list to visit each week!
These are so pretty! What a great idea! Pinned to remember the tutorial! I love the color and texture and so pretty next to the lamb’s ear! Love the one on the wreath nest too! Thanks for sharing at Charming Homes and Gardens!
Of course! Always fun to join a new party!
I love these velvet eggs, they are absolutely gorgeous. I want to make some for my home, they would fit into my decor perfectly.
Oh, I hope you make them, Sarah… they are quite easy, and really bring spring in! 😉
So very pretty, and I love the pastel colour scheme.
Thank you so much, Jo! And hello to the UK!
So pretty Julie! Love the colors and the way you’ve arranged them. And… your pictures are gorgeous! Have a wonderful weekend!
Awwww, thanks so much, Denise. It warms my heart when someone enjoys my photos!
Still love these little cuties! Thanks for linking up all of your posts on the Farmhouse Friday LP. Much appreciated!
Of course! Thanks, Cindy!
Julie, I love your pretty Easter eggs and the sweet vignette! Thank you for sharing at Celebrate Your Story! Link Party. You’ve been featured this week 🙂
Wonderful! Thank you so much!
I’m pretty sure I say this every year Julie, but I really do need some gorgeous velvet Easter eggs. I’m smitten with them!
Thank you for sharing your DIY velvet Easter eggs at Create, Bake, Grow & Gather this week. I’m delighted to be featuring this project at tomorrow’s party and pinning too.
Hugs,
Kerryanne
Thank you so much, Kerryanne… I bet your velvet eggs would be GORGEOUS! 😉
Julie,
I love your velvet eggs. I always forget to make them, but this year I think I just might. I have stuff. Congratulations, you are being featured on Thursday Favorite Things. I hope you stop by. https://www.eclecticredbarn.com/2021/03/thursday-favorite-things-party_17.html
Hugs,
Bev
Thanks for the feature, Bev! Be sure to let me know if you make the velvet eggs!
Absolutely gorgeous, Julie! I expect no less from you, of course. . . your velvet pumpkins are still the prettiest I’ve ever seen! Thank you for this–I’ve pinned it to my Easter board.
Thanks so much for joining the Grace at Home party at Imparting Grace. I’m featuring you this week!
Well thank you, thank you, thank you, Richella! Your are so kind! #blessed
Still adorbs, Julie! I can’t believe it’s almost Easter again already!
I know! These months rush by!
These are SO PRETTY! I’ve never seen anything like them!! They are so smooth and the colors are lovely. What a beautiful vignette you made!
Thanks, Rachel! I do love a project with velvet!
What a lovely arrangement!
Thank you so much, Donna!
I just came across your blog for these velvet eggs. You have created a beautiful vignette and you have given such great instructions. Do you by chance know where to buy the embroidered appliques? I have searched and cannot find them. Any suggestions would be appreciated.
Again, you do such beautiful work!
Hi, Lynn! Thanks for the kinds words and encouragement! I’ve updated the “What You’ll Need” list to include the embroidered patches! It’s helpful that you asked, as I was able to update the post!
Thank you so much. I never thought to look for doilies.
Thank you again.
Lynn
Me neither! LOL! But when I searched for them again, they came up! Thanks for YOUR help! 😉
Thank you so much. I really do appreciate the suggestions. I never thought to look for doilies.
Thank you again.
Lynn
Well done, Julie; well done! I’ve told you this before, but it bears repeating: your velvet creations are just the loveliest! I’m glad to feature these at the Grace at Home party; thank you so much for joining.
Oh, thank you, Richella! So kind of you, in all the ways!
FABULOUS inspiration for Spring and Easter, Julie! I love a quick and easy DIY that is also affordable! Thanks for sharing! Creatively, Beth
Oh, thank you!