
RV Kitchen Remodel on a Budget: DIY Marble Counters
RV Kitchen Remodel on a Budget: DIY Marble Counters : Let’s learn how to DIY RV budget kitchen remodel marble counters.
RV Kitchen Remodel on a Budget: DIY Marble Counters
The budget-friendly kitchen countertops are finished in the RV trailer, and they look pretty good, if I do say so myself!
And I will! 😉
Let me be honest…
This was not the easiest DIY I have done.
You might even say it has been the most challenging.
Similar to my kitchen cabinet transformation, but different.
This post may contain affiliate links, at no additional cost to you. For more information, see my complete disclosure HERE.

Using the Giani Marble Countertop Paint Kit in Carrera White is super affordable. AND, it does give the look of glossy marble countertops that you can customize to your own preference. PLUS, it truly only take two days to complete the process.
BUT, it DOES take some patience.
I’ll explain more on this as you read the post.
But first…
The Before: RV Trailer Marble Counter DIY
With each step of the RV kitchen renovation, I like to share the before and after…

Since this photo was taken, the completed projects include:
- Oak cabines paint with a smooth finish
- Hardware is refinished
- Window coverings are removed and replaced
- Kitchen countertops have been refinished (your are here!)
- Wallpaper border removed
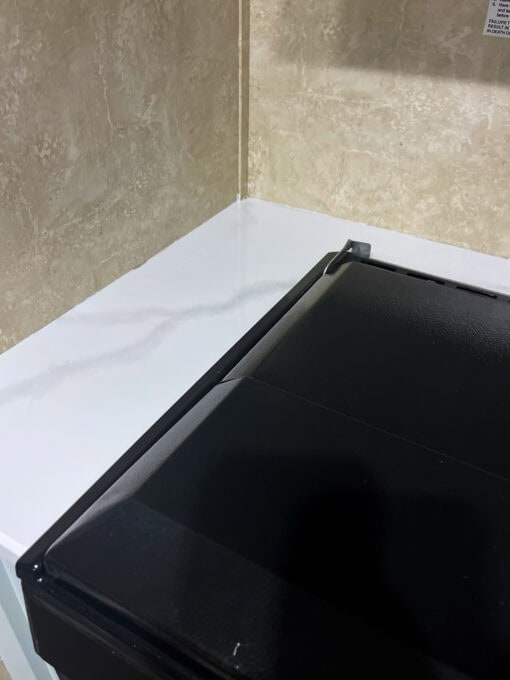
The After: RV Trailer Marble Counter DIY
Here is the after of the kitchen counters… I still need to do the after of the whole kitchen, but I want to finish the backsplash before I share that!
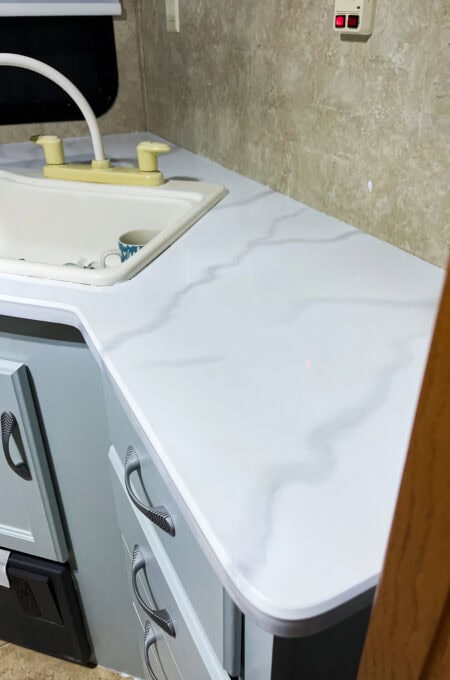
This is not the most glamorous photo I have on the blog (reminds me of some of the photos I uploaded when I first started the blog)! But, it definitely shows how pretty the counters came out!
This is a good example of customizing the look. Veining can go light are heavy when it comes to marble. I wanted a really clean look that wasn’t “too much”, so I went with a light hand when creating the veins on the countertop.
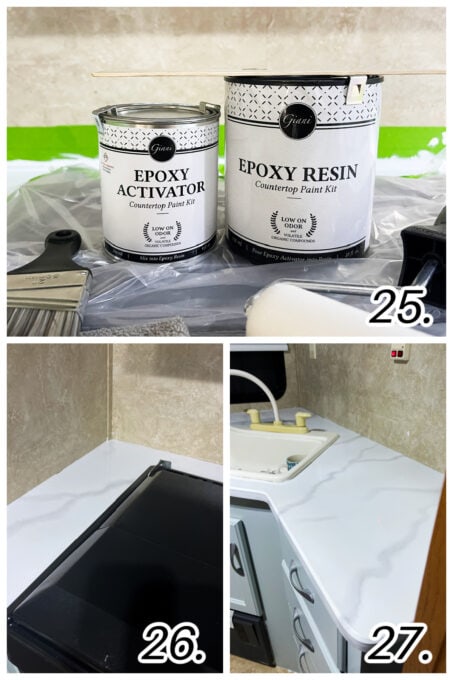
Now, let’s take a look at how the Giani Marble Countertop Paint Kit is used!
Supplies for Creating a Marble Countertop Look
Everything you’ll need is included in the kit, except for a few miscellaneous items:
What You’ll Need
This post may contain affiliate links, at no additional cost to you. For more information, see my complete disclosure.
How to Create a Marble Countertop Look without the Cost
As I said before, the whole process for my tiny RV trailer kitchen literally took only two days. And only half days, at that. Start early, to beat any heat issues. Plus, you’ll have the late afternoon/evening free for whatever else is on your agenda!
Another tip… Because my tutorial is missing some photos of steps that I did, be sure to watch the complete how-to video from Giani. The video is invaluable!
How to Prep Your Counters to Use the Giani Countertop Paint Kit
Preparing your countertops to use the Giani Kit is a bit tedious and actually takes more time than the other steps! So be prepared!
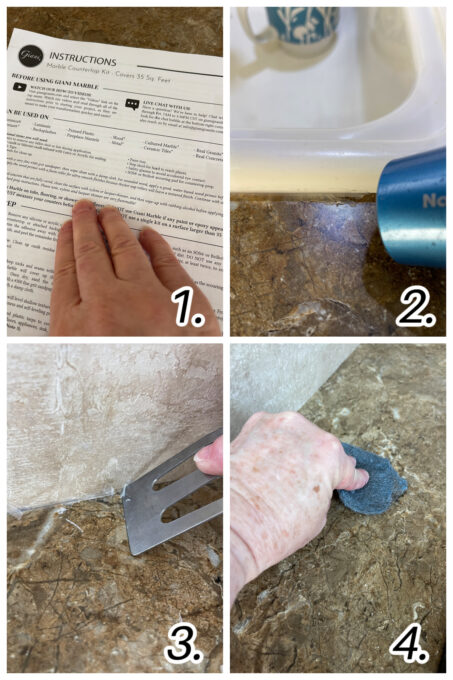
- This is IMPORTANT! Carefully read through ALL the instructions (Photo 1). There are a lot of instructions, but the end result will be worth it!
Remove the Caulking
- Remove all caulk/sealant from your counters and around your sink/appliances. Start by softening the caulk with a hair dryer (Photo 2), then find a tool to scrape away the caulk. I found my small metal spatula did a better job than even a putty knife (which I tried first) (Photo 3). Be sure that this is COMPLETELY REMOVED, and wipe or vacuum away any pieces on the counter.
Scrub the Counter
- Next, take your SOS/Brillo pad and scrub the counter with it. Be sure to scour every bit of the counter (Photo 4). This will degrease and clean the counter of any extra debris, plus it will remove some of the gloss, helping the base coat to adhere.
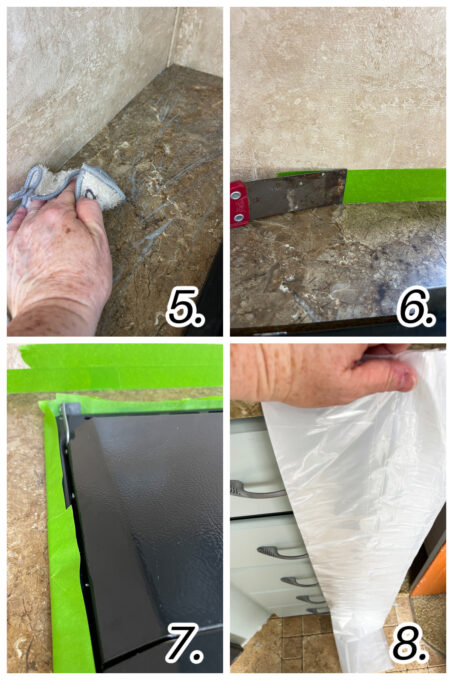
- Wipe the counter clean of all the residue from the SOS/Brillo. Do this step at least two times, preferable three times (Photo 5).
Tape off the Counters/Appliances
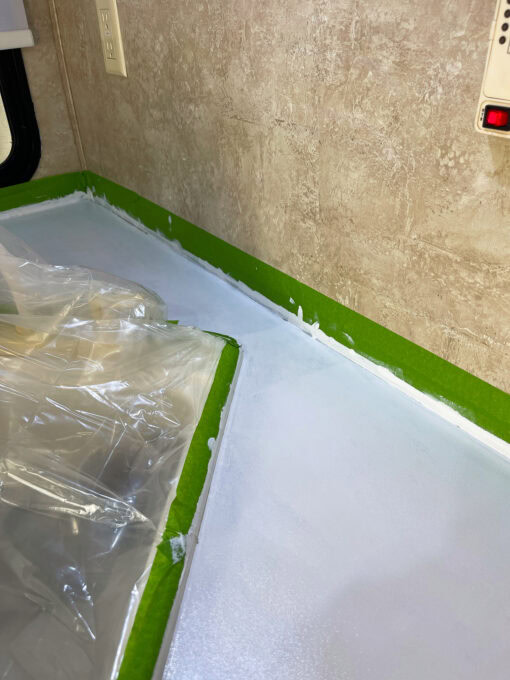
- Tape off the backsplash area, around your appliances/sink (Photos 6/7), and press down on the tape to be sure there are no areas for leaking (Photo 6). Then measure out the plastic sheeting (included in the kit), to cover your cabinets and floors (Photo 8). You probably want to cover your floors with butcher paper to protect the floors. However, I did not do this step because I plan on replacing the floors. The little bit of paint and resin that DID end up on the floor was easily wiped away with a cloth and some rubbing (isopropyl) alcohol.
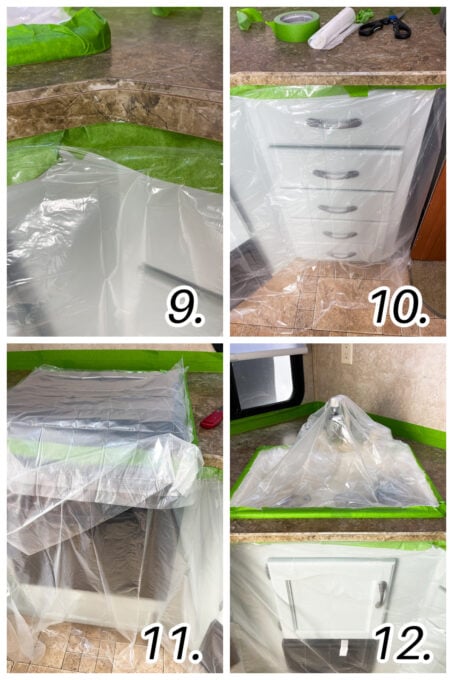
- Cover the cabinets/appliances with the plastic sheeting and more tape (Photos 9-12). Be sure that the underside edge of your counter is exposed in order to have complete coverage with the product (Photo 9).
Painting the Base Coat Using Giani Countertop Kit
The next step is to paint the base coat. This was the easiest part of the project.
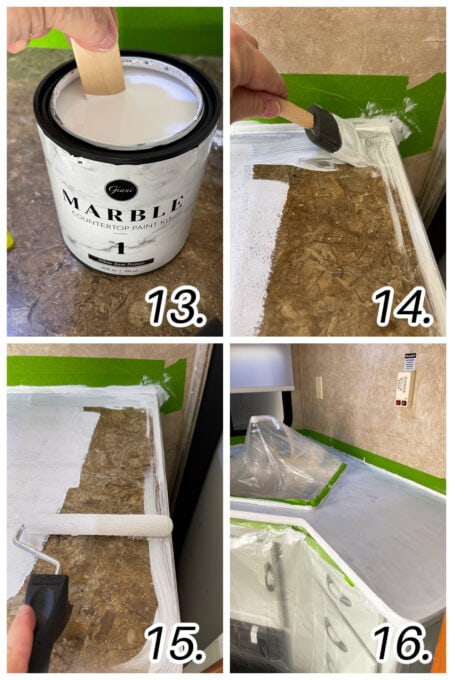
- Thoroughly mix the White Base Primer 1 (Photo 1). Pour the base into a paint tray.
- Using the provided sponge brush, paint the back edges and narrow areas (Photo 14).
- Next, using the provided sponge roller and handle, paint the larger areas of the counters (Photos 15 and 16). Depending on the color of your counters, this can take 2-3 coats.
- Let the paint dry to the touch before adding the veining. During this drying time, you can do research on what type of marble-look you want. Just Google ‘marble counter’ or even ‘Carrera marble’ for different ideas.
Adding the Veining for a Marble-look Countertop
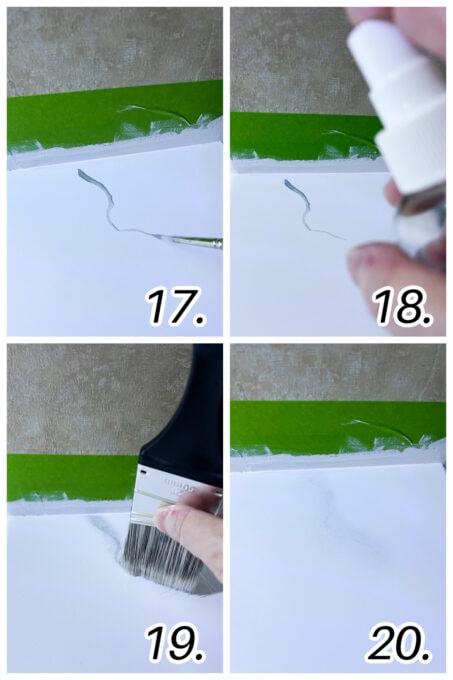
After doing your research regarding the different styles of veining you would like to add to your counter, open the Grey Veining 2a paint can and mix thoroughly.
One thing I would have done differently as this point… I would have used the White Highlight 2b step BEFORE adding the veining. I would have Added the White Highlight (described below) first, and repeated the process after, as well. This would have given the marble-look more depth.
- Before you add the veining to your actual counter, use the included white ’tile’ in the kit to practice with. This will not work the same as doing it on the counter (the counter is easier), but it will let you do some practicing on how to use the brush.
- Add your veining per the instructions, holding the brush loosely in your hand and twisting the brush as you go (Photo 17). If you make a mistake, drown the paint stroke with water from the spray bottle included, and wipe away with paper towel. You can also paint over your mistakes later with the original white primer.
- When you are satisfied with the paint stroke, lightly spray with water (Photo 18) and then take the 3-inch brush (included) and gently tap the stroke up-and-down, and bit outwards (Photo 19). Again, if you are not happy with the effect, you can drown with water, wipe away, and start over.
- Tap as much or as little as you want to achieve your desired look (Photo 20). Again, if the vein dries, or you decide later that you don’t like it, you can paint over it with the white primer paint, and start over.
- Let dry to touch.
Add the White Highlight
To give the ‘finished’ marble look, use the White Highlight 2b. Again, thoroughly mix the paint.
As I mentioned above, one thing I would have done differently here is added this step BEFORE and AFTER the veining step. It’s easy, and would have made the counters look even better.
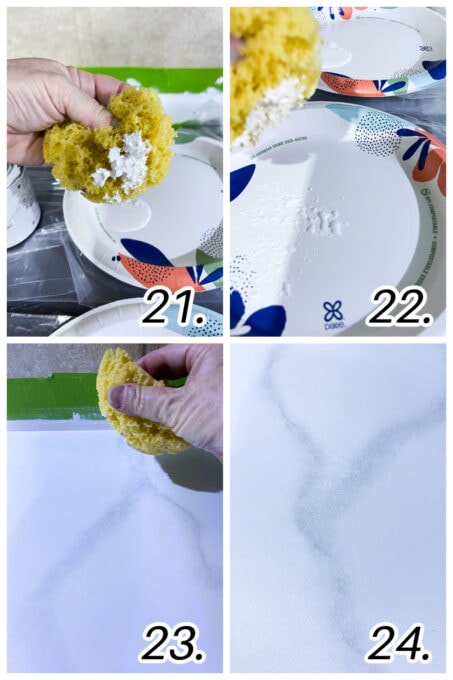
- Pour a small pool of White Highlight 2b onto a paper plate. Using the sponge provided (I cut mine in half to use on a second project… but the sponge washes well, so this wasn’t necessary), dab the sponge into the paint (Photo 21), and then dab it on a clean plate to take off the excess (Photo 22).
- Next, lightly ‘pounce’ the sponge over the veins you have created (Photo 23). Add as much as you want for your desired effect (Photo 24). Again, doing this BEFORE and AFTER the veining, would achieved a more marbled look.
- Let your counters dry overnight and re-read your instructions (or re-view the video) to prepare for the next day’s process of adding the epoxy.
Finishing the Marble-look Counters with Epoxy
Now, this was the part that was the trickiest. And, because it was the trickiest… I didn’t get any photos!!! (I was purely focused on the process. Ugh!)
However, I do have some tips for you.
Follow the written instructions and PLEASE watch the video. It will truly help you so much.
Don’t stress/fret about mixing the epoxy. If you mix it according to the instructions, it will be fine. You won’t get EVERY drop of the Epoxy Activator out of the can… you just do your best and it will work.
Wear clothes that you aren’t worried about ruining… because there is a good chance they will be… ruined, that is.
Follow the instructions on how to apply the epoxy. It’s not as scary as you think, it is self-leveling, and works out great!
Be sure to get the epoxy around the edges of your counters as thick as possible. This can be tricky, because it does drip down.
Take a mixing stick and scrape the drips every once-in-a-while from the bottom of the edges of your counter. These can also be buffed/filed away after.
When you remove the tape and plastic, don’t worry if it drops into the epoxy… it levels out with a very quick shot from the hair dryer. Guess how I know this!
Removing the tape and plastic is REALLY messy. I tried wearing gloves, to keep the epoxy from getting on my hands, but as I removed the tape, it stuck to the gloves. The epoxy was easy to remove with isopropyl alcohol. Both on my hands and the floor!
Don’t Fall into Temptation…
After a couple hours, you may be tempted to touch the epoxy to see if it’s dry. Don’t do it!!! Give it the full ‘overnight’ drying time, and the next morning you’ll be pleasantly surprised that it is dry to the touch and super smooth! (Give it a full week to cure before you place anything on the counters.)
FYI, not a drop of epoxy got onto my newly painted cabinets! Praise God! That was a miracle!
Here’s one more look at the counters, at least for now! 😉
Notice that the veining is all going one way for the most part. I learned that this is the natural look of marble.
And on the side of the stove:
Final Thoughts On Giani Marble Countertop Paint Kit
Overall, the end results of the countertops are lovely. The high gloss and customized veining make for a look that is exactly what I wanted.
The process is a bit tedious, but, if you take your time, read the instructions, and watch the video tutorial, you will get great results at a very affordable price.
If you have any questions, please leave them in the comments below. I read and answer every comment I receive!


You are awesome!!! GOD BLESS
Thank you so much, Josee! Hugs!
I love the way they turned out! So beautiful.
Thanks, Joy. It was a bear!
Good for you! Your counters look
beautiful!
Thank you SO much!
The countertops look amazing, Julie! I’m sure it was hard work, but it paid off. Your transformations are always so good.
Thanks, BB! Always encouraged by you! Hugs!
Congratulations! Your counter is lovely!!
Thanks, Barbara… I’m so glad it’s done!
Okay, that looks AMAZING, Julie! Kudos to you!
Thanks you, sweet friend!
Julie, you did a fabulous job with your countertops! They are so beautiful! What a difference this makes. All the renos you have done are lovely. I know it has been so much work for you but you have put your heart into all this and everything has turned out so beautifully!
Thank you, Mary-Ann! Always blessed by your comments and reading the blog!
Beautiful counters! I am so pleased that you share all your painting and redos with us as many, like me, need some guidance on what to do as I haven’t heard of most products you find that work so well. Thank You for all you do to make my life easier and prettier.
Thanks, Fernie. I’m so glad you enjoyed the post. I’m so thankful for longtime My Wee Abode members like you. It blesses me big time!
It looks incredible. I considered doing this in my own kitchen, then I realized it was just easier to put in a new countertop.
Yeah… I wish I could have afforded a new counter. This was a sponsored post, so it only cost me sweat and tears! 😉
Wow! I could never ever do this! You def got all the artsy-crafty genes from Mom!!! It looks so pretty, Sis!! 😍
It was NOT easy, sister. Thanks for the comment and love! 😍
I am amazed at your skills girlfriend! I wouldn’t even try to DIY that! It looks fantastic and makes such a huge difference! Pat yourself on the back and buy yourself a cake! You are awesome! pinned
Thank you, Cindy! I would love to buy a cake… but I’m trying to be a good girl… again!
Your counter top looks fantastic Julie! I would never know it was not the real deal. I bet it feels great to have this project finished, and you can start planning the next! Way to go!
You are so right about happy to have this finished! The backsplash is already started!
You amaze me, Julie! You make this transformation look so easy and I know it’s not. The counters look beautiful and the marbling effect looks so natural! Congrats on another great makeover!
Thanks, Laura. This was the hardest DIY I think I’ve done thus far.