
How to Dress-up a Charger with Wood Beads
Do you have a decorative plate or charger that needs a little update? Today, learn how to dress-up a charger with wood beads.

HOW TO DRESS-UP A CHARGER WITH WOOD BEADS
Have you ever seen something at the store and thought, “That would be perfect, if….”?
Yeah, me, too!
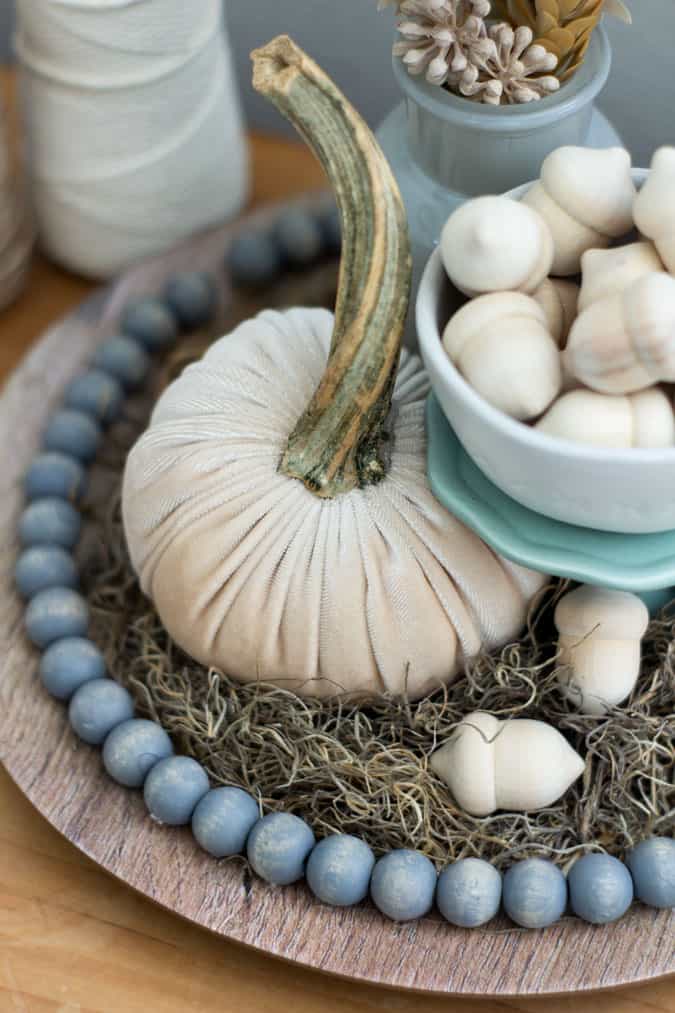
On a recent trip to Hobby Lobby, I found a lovely large dinner plate that had the look of wood. It was so pretty, but I didn’t have a use for it.
Until I found out the August Pinterest Challenge was a fall cloche. For the challenge, I had the bell jar, but I was missing a foundation piece for it…
Come to me, oh pretty ‘wood’ plate’!
However, when I got the plate home and placed the cloche on top of it, it just fell ‘flat’. Ya know what I mean? It needed a little sumpin’-sumpin’.
So, I decided to give the wood charger a quick and easy update. And, y’all know how I love wood beads.
There’s the coastal farmhouse wood bead garland, the wood bead garland with stars, and even the velvet heart garland with wood beads. And, I’m thinkin’ I may be missin’ one or two here.
(And get this… I have at least one more fall decor item with wood beads coming to a blog near you… and me!)
Now, let’s learn how to dress-up a charger with wood beads.
This post may contain affiliate links, at no additional cost to you. For more information, see my complete disclosure HERE.
Quickly Update a Charger With Wood Beads
What You’ll Need
This wood charger update is so easy and only takes a few items to create it:
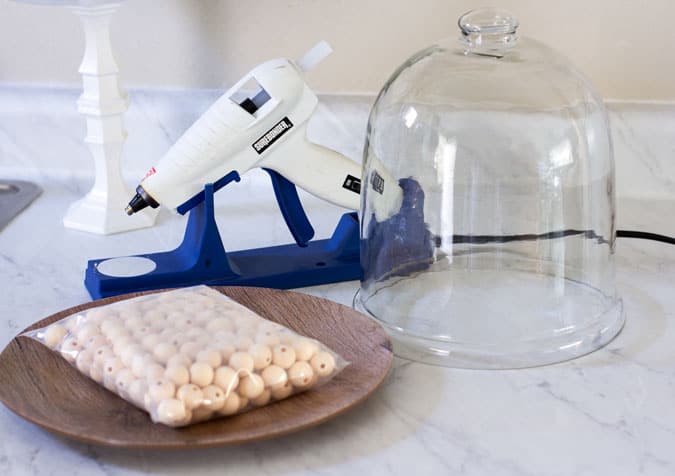
- 16 mm wood beads
- Varathane Fast Drying Stain in Weathered Gray (not shown)
- Cloths for staining
- Waxed paper or butcher paper
- Large real or faux wood plate or charger
- Glue gun and glue sticks
- Bell Jar (you can find these at Goodwill or Salvation Army for a little bit of nothing)
Steps to Updating a Plate with Wood Beads
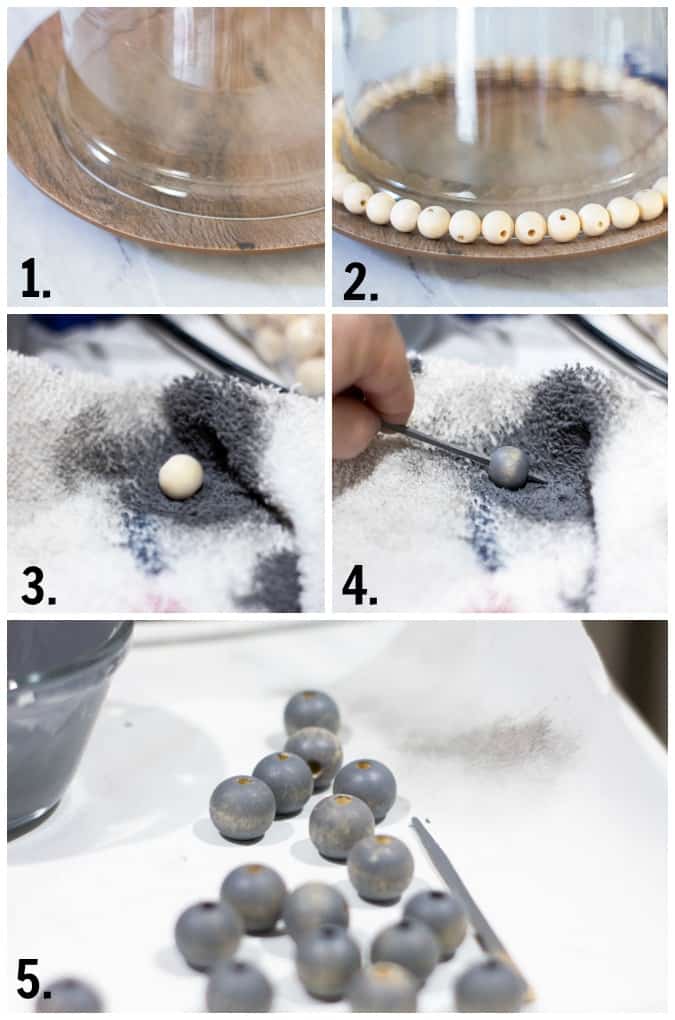
Center the bell jar on the plate and then place the beads around it to see home many you’ll need to stain. Add about 5 extra, just in case (Photos 1 and 2).
Stain your wood beads with Varathane Quick Drying Stain in Weathered Gray. You can place the bead on a stick and wipe the stain on it with a cloth, or simple drop the bead in a stain-soaked cloth and roll the bead around in the cloth. Let the beads dry for 1-2 hours on waxed paper (see photos 3, 4, 5)

Place the stained beads around the edge again, and then place glue on a bead and place on plate… hold until glue sets. For best results, be sure to place the beads just a smidge away from the cloche glass (Photo 6, 7, 8). Also, be sure to hide the bead holes! 😉
Place two beads in four places, each set a quarter of the way around the cloche glass. This will hold the glass in place (Photo 9). “Pro” tip: leave the other beads in place while you do this… this way you will not have gaps. Finish off the plate by glueing down the rest of the beads (Photo 9).
And that’s it!
The Finished Product
It’s so interesting… the pictures above show the truer color of the beads… they are quite gray and match the plate well, which is what I was going for.
But, as you can see, the finished wood bead charger a in my cloche photos looks like the beads are more on the blue side.
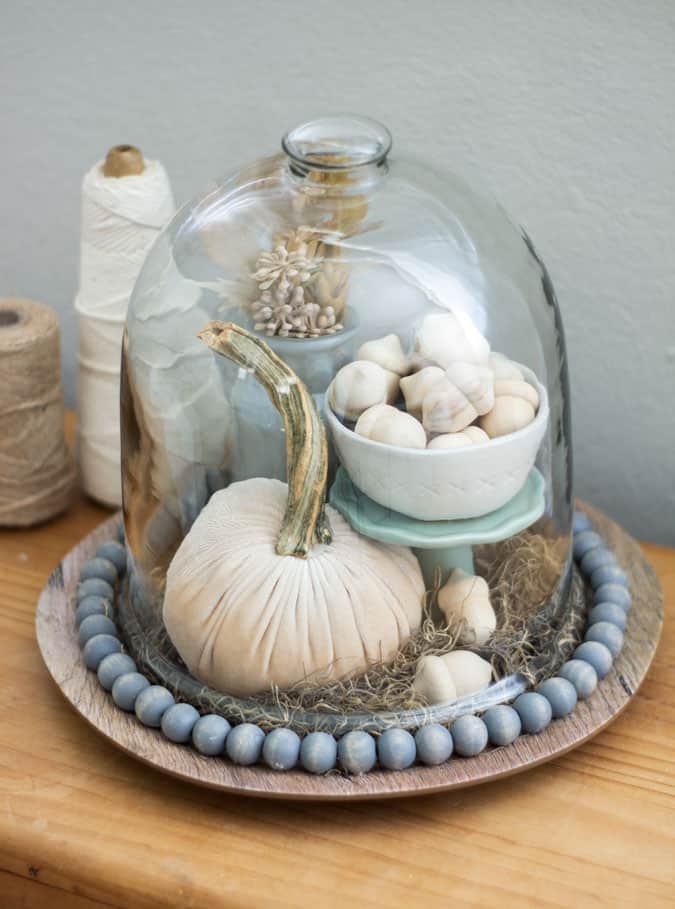
Whatever the case, I really like the result of adding some wood beads to the faux wood plate.
This cloche needed that plate, and the wood beads added so much to the charger, don’t you think?
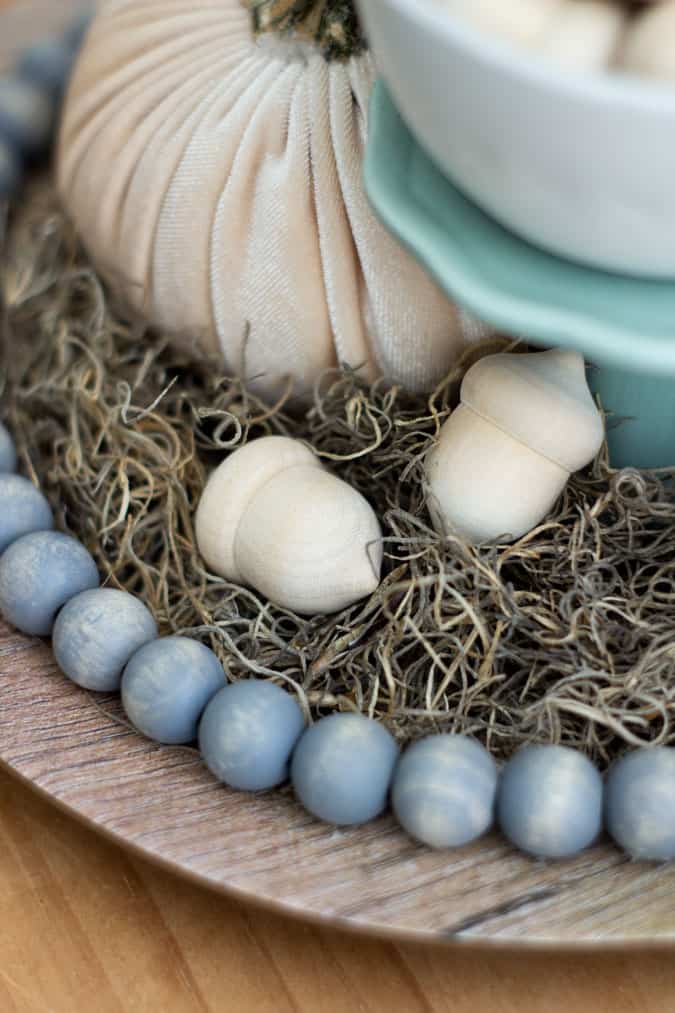
And, don’t you LOVE those wood acorns?
Let me know if you have any questions, and if you plan on dressing-up a decor item with wood beads!


This was an easy thrifty fix for a plain plate.
Cindy
Thanks, Cindy! It was super easy, and I love how it came out!
The beads were exactly what this plate needed to give it some pizazz. Now that you have a beautiful base for your cloche, you can use it for decorating in any season.
Yes, I want to use a cloche in MWA more often! Thanks, sweet friend! Just about two weeks!!!
What a fun way to dress up a charger, my friend! I love that subtle blue color, too. Pinned!
Thanks, Crissy… it was SO easy!
Love it! So pretty. What the perfect diy!
Aw, thanks, Cynthia! I need to go take a look at what’s up with you!
This is so cute and easy! I love all of the things you can do with wood beads!
I agree, Kera… wood beads are great for decor and crafts! 😉
Love this project, Julie. I don’t think I’ve seen anything like it! There are so many crafting possibilities with wood beads. They really jazzed up your charger! Pinned 🙂
Thanks, Rebecca! Well, there’s nothing new under the sun, but some of us may not have seen it… yet! 😉
It is so beautiful, Julie! What a clever idea. It looks like a completely brand new, custom piece!
Oh, thanks, Jen! It was so easy to do!
I love how easy it was for you to add some pizazz to this charger. Great idea Julie!
Thanks, Kim! Very easy, and versatile, too! 😉
Hi there! Thank you so much for linking up with us at Embracing Home and Family. The color of the beads is just beautiful!
Thanks for hosting!
This is such a cute idea Julie and I love the color of the beads
Thanks, Sonya… and it’s so easy!
Julie,
What a wonderful upcycle of the charger. Adding the beads made it so special. Congratulations, you are being featured at Thursday Favorite Things. I hope you stop by. https://www.eclecticredbarn.com/2020/09/thursday-favorite-things_16.html
Take care my friend.
Hugs,
Bev
Thank you so much, Bev! I’m making my rounds now! 🙂
Great idea Julie, and I love the colors you chose for your fall display. I am happy to feature you at TFT this week. Thanks for sharing!
https://followtheyellowbrickhome.com/soft-and-serene-september-vibes-at-thursday-favorite-things/
Oh, thank you so much, Amber! I totally forgot! I need to go link-up… work was extra busy today!
Great idea! Love it when a simple DIY makes something look completely different!
Thanks, Donna… I agree with you! 😉
Brilliant, fix, Julie! And those little acorns are super adorable!
Love those acorns, for sure!