
How To Prep Cabinets for an Amazing Paint Finish
Today we’re going to learn how to prep cabinets for an AMAZING paint finish! Before starting a bathroom or kitchen cupboard makeover, you really need to prepare cabinets for paint.

HOW TO PREP CABINETS FOR AN AMAZING PAINT FINISH
Are you thinking about updating your bathroom cabinets?
Or painting your kitchen cupboards?
Well, before you start painting those ugly ducklings (that will soon be swans… just you wait and see!), you need to be sure to prep them for their lovely new coats… of paint, that is. (See what I did there?)
Today I’m sharing the second post in a 3-part series on how to paint cabinets the easy way!
Part I in the series is DIY Cabinet Repairs, the quick and easy way! Even before prepping your cabinets, the first thing to do is make any quick repairs!
My next post will be on how to actually paint your cupboards in one day! Be patient, it’s coming! 😉
So, let’s get right to the tutorial, in case you want to prep your cabinets today!
This post may contain affiliate links, at no additional cost to you. For more information, see my complete disclosure HERE.
How to Prepare Cabinets for Paint
What You’ll Need
To get the CLEANEST cupboards around, here’s what you’ll need, and also what was suggested by the paint kit I used. (Yep, I’ll let you know what kit I used in the next post!)

Almost all of these items can be ordered online and picked up curbside at your local Home Depot!
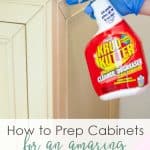
- Krud Kutter (or some type of cleaner/degreaser… this great!)
- 320 grit sandpaper
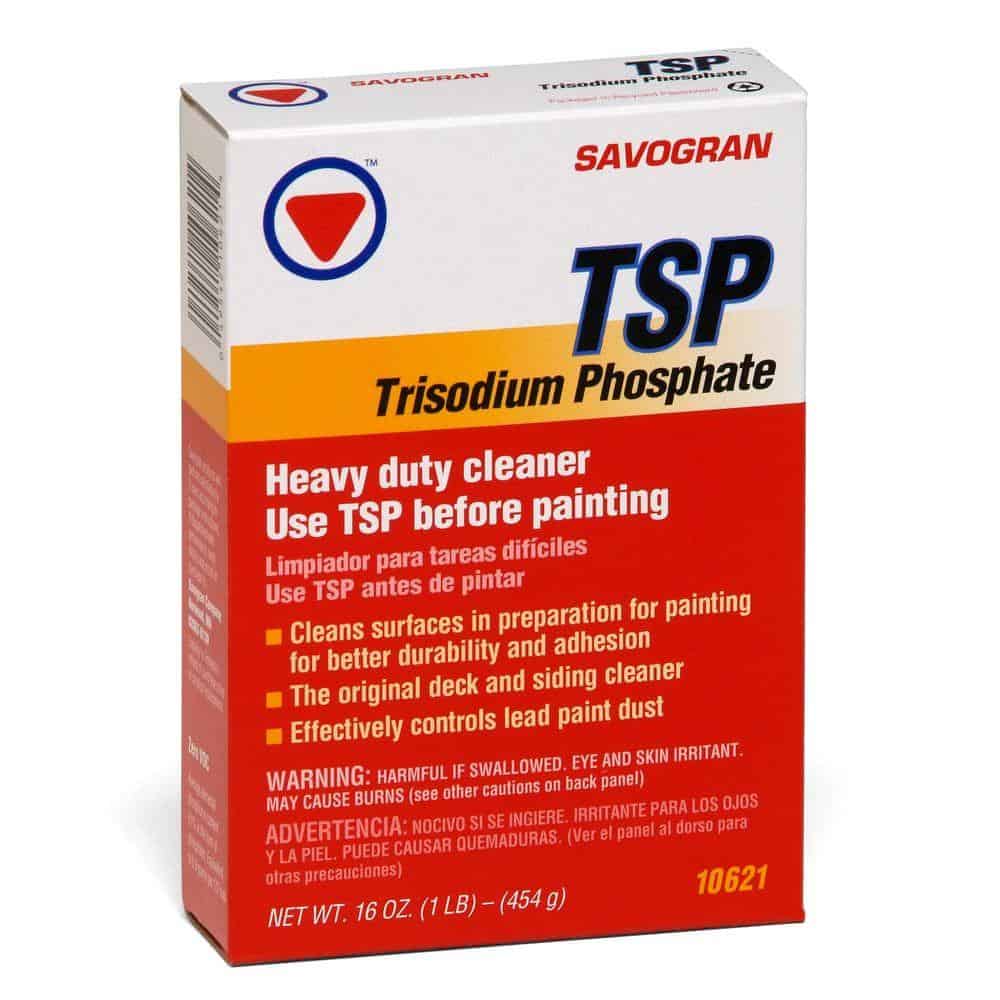
- TSP
- Window Cleaner (for the ammonia factor)
- Frog Tape (the 1″ is versatile, but you’ll need two strips of it)
- Latex-free Gloves (these are not disposable, so you can use them on future projects, too!) or disposable latex gloves
- Plenty of wiping cloths or microfiber cloths
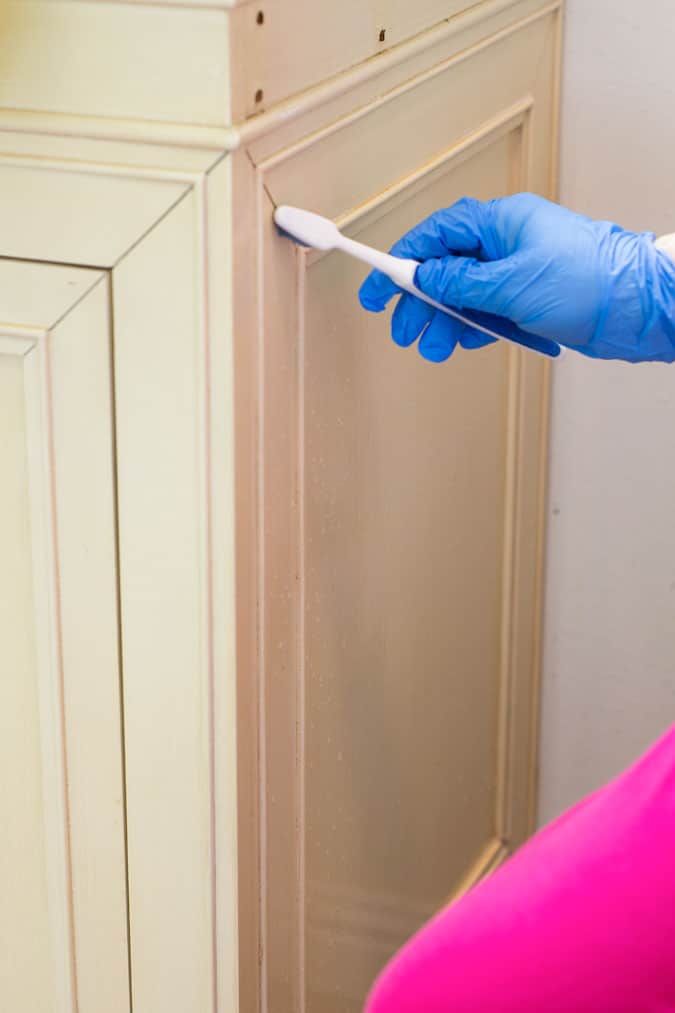
- Old clean toothbrush (optional, but works great for cabinets with trim)
- Screwdriver (usually a phillips head)
- Credit card or something rigid and flat
- Bucket or plastic container
What Do I Clean Cabinets with Before Painting?
Well, if you haven’t guessed, the first thing to do is to clean any dirt, grime, or residues that may be on your cabinets.
For the bathroom, that can include hair product build-up on edges and trims of your cabinets. For kitchens that means food, grease, and dust that accumulates in places you can’t see (sometimes 😉 ).
So what I found to the be best product for cutting through the crud is, well, Krud Kutter.
(Oh, btw, remove the cabinet hardware at this point (pulls and knobs)).
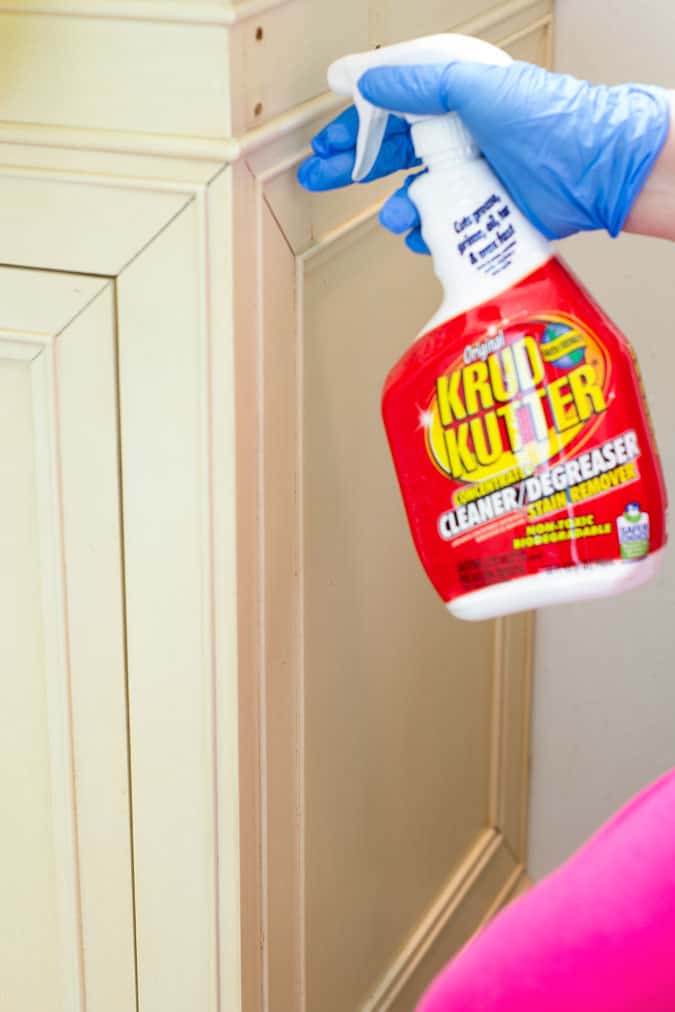
Just spray, let set for 30-60 seconds, and then scrub the trim and corners with a toothbrush to loosen up any residues. And wipe clean with a damp cloth (even a couple times).
Do You Have to Sand Cabinets Before Painting?
This is a question heard round the world. Okay, well maybe just on DIY blogs, but I digress.
It really depends on what type of paint you are using on your cabinets. (How do you like that answer?)
Many DIYers that I know have used chalk paint on their cupboards for a uber-matte finish. It’s my understanding that you don’t NEED to sand if you are using chalk paint (and when I chalkpaint furniture/wood items, I don’t sand them either).
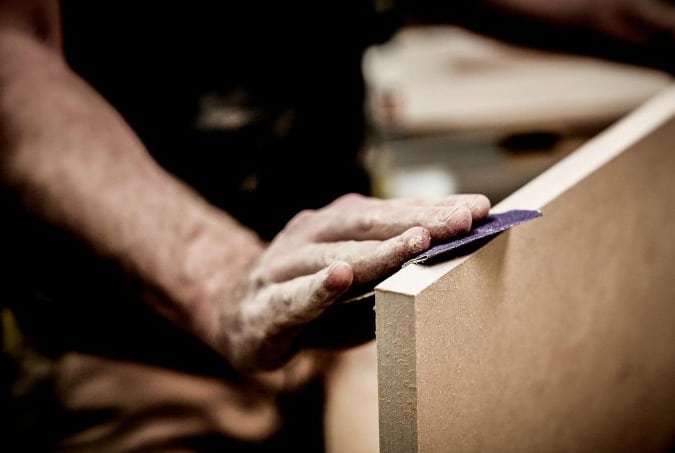
However, with the paint kit I used, they recommend sanding your cabinets. Sanding helps prep your cabinets for an amazing paint finish by removing any gloss your cabinets may still have, along with removing anything you may have missed with the Krud Kutter.
Sanding Is More Fun Than I Thought!
I recommend removing your cabinet doors at this point, in order to avoid any unnecessary tugging and pulling on the hinges while sanding. Don’t be afraid, I found this part to be easy, and strangely fun!
First unscrew the hinges inside where the door is attached to the cabinet wall. Then unscrew from the door and remove. (Remember to keep those screws and hinges in a zip lock bag.)
Then simply take your 320 grit sandpaper and lightly sand your cabinets. “Pro” tip: fold the sandpaper and use the fold to sand the trim areas.
Final Cleaning Steps to Prepare Cabinet for Paint
The last two things you need to do is clean, again… and again.
After the sanding is done, follow the directions on the TSP, and wipe down your cabinets with your wiping cloths or microfiber cloths (I prefer the microfiber for this). This will clean off the dust and remove more of the gloss on your cabinets, preparing them for great adhesion of your paint!
After the cupboards are dry from the last cleaning, take your window cleaner and do a final wipe down, making sure to pay close attention to the areas where your hardware is placed (we want to remove any oils that may be left behind by our hands).
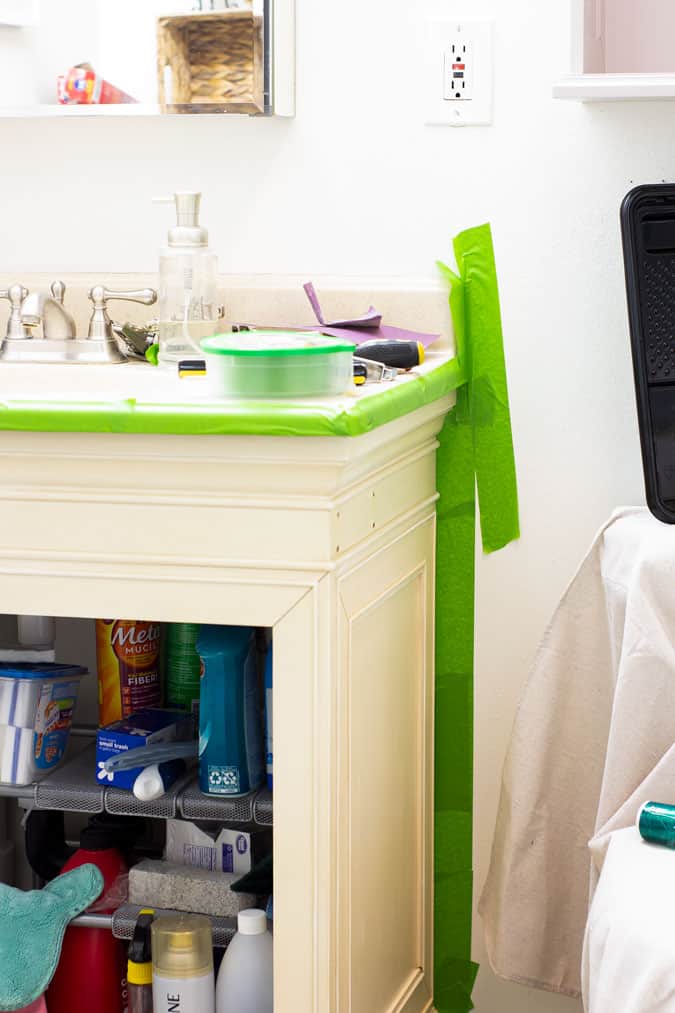
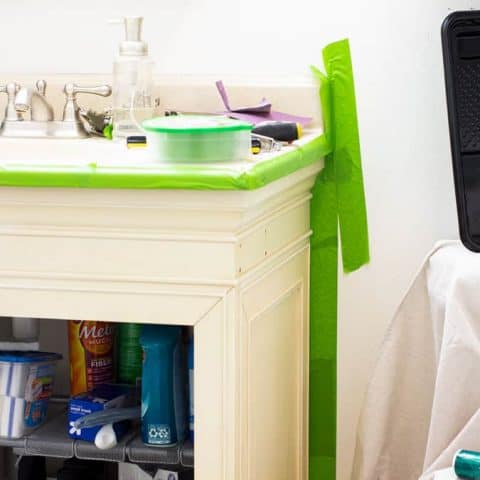
Taping Off Cabinets for Painting
The last step to prepping bathroom cabinets for a paint finish that looks like the pros is taping off areas that you want protected from the paint.
Pro tip: Just use Frog Tape… don’t mess with any other brand or color!
Frog Tape is easy to use, adheres like magic, and removes leaving behind crisp, clear lines! Just tear off from the roll, place two side-by-side rows along the areas you want to protect (think walls and counters), and ‘run-over’ the edges of the tape with a credit card. This will make those lines even cleaner!
That’s it! You’re ready to paint!
Mind you, the prepping was the hardest part of this whole bathroom cabinet update. And, I took lots of breaks to hydrate and cool down! But, the end product was sure worth all the prep work that went into it!
Update: This 3-part series is now available to you!
- How to Repair Cabinets the Fast and Easy Way
- How to Prep Cabinets for an Amazing Paint Finish (you are here)
- DIY Perfectly Painted Bathroom Cabinets in a Day!
Now It’s Your Turn!
Have you ever painted your cabinets? What was your experience like? Any tips for prepping that worked great for you? Let us know in the comments!

How To Prepare Cabinets for an Amazing Paint Finish
Before starting a paint update on bathroom or kitchen cupboards, you really need to prepare cabinets for paint.
Materials
- Krud Kutter
- 320 Grit Sandpaper
- TSP cleaner
- Window Cleaner
- Frog tape (1")
- Latex-free or latex disposable gloves
- Wiping or microfiber cloths
- Old clean toothbrush (optional)
- Phillips head screwdriver
- Credit card or rigid, flat item
- Bucket or plastic container
Instructions
- Remove cabinet hardware and spray Krud Kutter on the surface. Let set for 30-60 seconds. Scrub the trim and corners with a toothbrush to loosen up any residue. Wipe clean with a damp cloth (even a couple times).
- Remove cabinet doors from frames using a screwdriver. Unscrew from the frame first, then unscrew from the doors and remove. Place hinges and screws in zip lock bag.
- Lightly sand doors and frames with 320 grit sandpaper, making sure to sand trim and corners. (Pro tip: Fold the sandpaper and use the fold to sand hard-to-reach areas.)
- Following the directions on the box, wipe down the cabinets with TSP using the microfiber cloths.
- Using the window cleaner, do a final wipe down of the doors and frames paying close attention to hardware areas.
- Finally, use Frog Tape to protect walls and counters from paint swipes. Use two side-by-side rows on walls, and go over tape with a credit card to ensure crisp, clean lines*.
Notes
*A credit card can come in handy to push the tape behind the cabinet frame that sits against the wall.

Can’t wait to see how they turned out tomorrow.
You can see them now! 😉
I agree that prepping is the worst part of a painting job and it takes so long, but its so worth it to get a great end result. It is wonderful that your landlord is allowing you to make improvements to your home that you can enjoy while living there.
It really is worth it. I accidentally bumped the bottom of the cupboard with a ladder the other day… didn’t harm the paint at all (or the cabinet)!
Great tip and product suggestions. Prepping is definitely worth all the effort put into a painting project. Yes, FROG TAPE ~ can’t say it loudly enough ~ the best tape ever!
I hear you! Go Frog Tape!!!
Awesome tips! I’ve never heard of TSP, so I will have to check it out! I’d love for you to share this post over at our Creative Crafts Linky Party https://creativelybeth.com/creative-crafts-linky-party-1-join-in-the-fun/
Have a great weekend!
Creatively, Beth
Done, and thanks for the invite, Beth… I have you on my party page now!
Yup, prep i the most important and least glamorous part of painting! Looking forward to the big finish, Julie 🙂
Yes, Janet… and the cabinets are done and posted!
Great tips Julie! I always just want to jump right in and do it! My husband always has to slow me down and remind me to prep. I laugh and say, why do you have to complicate this? Ha! He’s right though, it’s always best to do it right! Thank you for linking up at Embracing Home and Family!
So glad to be part of your party each week! It’s a lovely get-together. And, I’m SUPER glad I did the prep. I have actually hit the cupboard with a hammer (TP holder installation gone bad)… and the paint TOTALLY held-up… looks perfect still!
Thank you so much for sharing these awesome cabinet prep tips! I’m planning to paint the cabinets in my mud room soon and these tips will come in handy! Thanks so much for sharing this at Farmhouse Friday!
Of course, Michelle! Hope the post helps! 🙂