
How to Make Stretch Velvet Acorns the Easy Way
‘Tis the season for all things velvet! Today, let’s learn how to make stretch velvet acorns the easy way! These easy diy stretch velvet acorns are made with a secret ‘ingredient’ that makes them easy to style, as well!
HOW TO MAKE STRETCH VELVET ACORNS THE EASY WAY
Are you loving the fall weather in your area?
We are FINALLY getting consistent ‘cooler’ temps here in So Cal. It always seems to take so LONG to get to the 60s and 70s in our area? I noticed there is actually SNOW in some of my friends’ neighborhoods!
Well, I’m not QUITE ready to start my Christmas posts, so I thought I would share another fun and easy velvet decor project!

Because you know I’m ALL about creating seasonal velvet decor on the cheap!
So far, here at My Wee Abode, velvet has made a luxurious appearance in:
- DIY Velvet Pumpkins, Just Like the Pros
- Easy DIY Velvet Mushrooms Three Ways
- How to Make a Frosty Velvet Winter Wreath
- Make a Valentine Garland with Velvet Hearts
- Velvet Easter Eggs the Easy Way
Today we are going to add to this variety-of-velvety-ventures and create the last MWA velvet project… for this season! (You didn’t think I was done, did you?!) 😉
Cozy Personal Care
And, if you are looking to add some cozy fall colors to your personal ‘look’, take a look at these burnt orange nails designs!
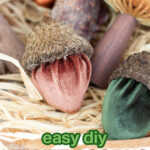
Easy DIY Stretch Velvet Acorns
If you are wanting to add another touch of autumn to your home, whether it’s for the fall season or for a Thanksgiving centerpiece, these easy DIY stretch velvet acorns might be just the ticket!

And, with my ‘secret ingredient’, these acorns are easy to style and place in any centerpiece or vignette!
Plus, they can be created in different acorn shapes! Because, you know, not all acorns are created alike! (That’s right! We have an AWESOME Creator that decided we need LOTS of different types of acorns!)
What’s the secret? Read on!
The Anatomy of an Acorn
But first, let’s have a little botany lesson, shall we?
Because, truth be told, for the purpose of this tutorial, I didn’t know *what* to call the parts of the acorn. (Nope, we never covered the subject of acorns when I homeschooled my children. 🙂 )
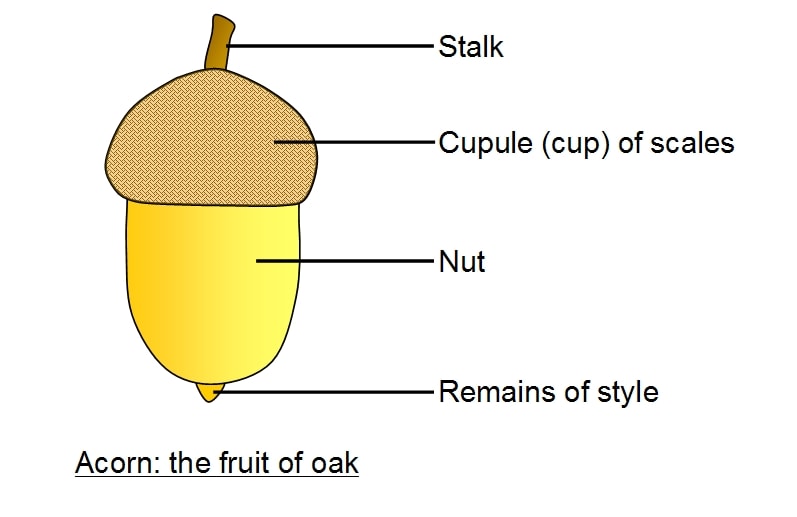
Simple lesson, right?
I’ve always thought the stalk was called a “stem”; the cupule (cup) of scales was a “cap” (and what the heck?! Scales… really? I thought those were only on fish… maybe mermaids!); never thought about what to call the nut (a “kernel” or the “pod” maybe?); and who knew the pointy end of the acorn was called “the remains of the style”?! Tell me in the comments if you knew this! What have you called the ‘parts’?
This post may contain affiliate links, at no additional cost to you. For more information, see my complete disclosure HERE.
What You Will Need to Make Easy DIY Stretch Velvet Acorns
The items you will need to make your own velvety acorns aren’t much different than from any of the other velvet projects we’ve done.
The BIGGEST difference is, or course, the acorn caps cups.
But something I’ve NEVER used before, that I’m using THIS time, is AIR DRY CLAY!

- Stretch velvet fabric; you can get this at your local fabric store, but there are a lot more colors to choose from on Amazon (seller 1 and seller 2) and Etsy.
- Acorn cups… The best place to get these, IMHO, is Etsy. They have all kinds of shapes and sizes. I wanted large velvet acorns, so I went with Bur Oak acorn cups.
- CraftFom eggs
- Air Dry Clay (The ‘secret ingredient’)
- Wooden skewers
- Extra Strong Upholstery Thread
- Large sewing needed with large eye
- Tacky Glue (Set) (I like this set because I’ve used all of them at some point.)
- Rhinestones (optional)
- Jewel Picker
The Best Filler for Easy DIY Velvet Acorns
Now, ya’ll… I’ve used a lot of foundations/fillers for my DIY velvet projects.
Velvet pumpkins were made with foam and stuffing (and rice!). Eggs were made with foam alone. We even made hearts with paper mache!
And, I tried all of the above for these large DIY velvet acorns. However, every time I put them down to style them, they landed on their heads!
It just doesn’t do these soft adorable pods nuts any justice to have them sitting on their cups!
So, I thunk and I thunk… and decided to see if air dry clay would be heavy enough to weigh-down the large Bur acorn cups.
First, I tried creating the acorn nut completely out of air dry clay. Two problems with this. The nut was WAY too heavy, and it took three days to completely dry! No one wants to wait that long for a velvet acorn!
That’s where the CraftFom egg comes in!
How to Make Stretch Velvet Acorns the Easy Way
Let’s get to the tutorial, shall we?
There are a lot of step-by-step instruction photos, but I wanted to be sure that you could see exactly what to do. Don’t let it scare you… it really is easy!
Trimming the ‘Half Egg’
- Take your foam egg and mark it above the narrow end of the egg. The narrow end of the egg will be your base for the acorn nut. (Photo 1) Mark it at whatever length you want the acorn nut (you can even make it a little shorter). Then cut it with a sharp knife. (Photo 2)
- Take the knife and trim the edges from the sides of the egg half (Photo 3), leaving the sides at a slight angle (Photo 4).

Prepping the Acorn Nut with Air Dry Clay
- Take the foam and roll it on a flat surface into a modified acorn nut shape. (Photo 5) Make sure the diameter fits in the acorn cup, with plenty of room for the clay and velvet. Photo 6 shows the first ‘fitting’. I continued to roll the foam until the foam fit easily into the cup with ‘extra’ room.
- Now, take a small amount of air dry clay (about the size of a walnut) and roll it in your hands. This will smooth out edges and creases, and will make the clay pliable. (Photo 7)
- Start shaping the clay around the foam form to the shape you want for your acorn nut. (Photo 8) Continue shaping until the clay is covering the foam base. The thinner the clay is around the foam, the better. Use the majority of the clay to form the nut area that will be exposed.

Finishing the Air Dry Clay Acorn Nut
- Push the ‘nut’ into the cup, and form the rest of the nut to your liking. (Photo 9) The air dry clay will shrink a bit as it dries, allowing room for the velvet.
- Cut a wooden skewer down to about 1-inch long (toothpicks are too thin).(Photo 10)
- Push the skewer into the end of the clay. This will create the ‘remains of the style’. (Photo 11) You can also create the ‘tip’ of the acorn by forming the end with your fingers.
- Place your acorns nuts on skewers and stick them in a foam form or a cup that is tall enough to hold them. These should dry over-night. (Photo 12)

Adding the Stretch Velvet to Your Acorn Nut
- Cut circles of velvet. I used a large glass custard cup as my template (the same as in photo 12). (Photo 13)
- Slip stitch your stretch velvet as pictured (Photo 14), and then pull until the opening is about half closed. (Photo 15)

- Cover your acorn nut with the velvet and tightly close and tie off. (Photos 16 and 17)
- Make sure your acorn nut fits into the acorn cup after the velvet has been added. If it doesn’t fit, try another cup. I didn’t have issues with them fitting. Place Tacky Glue inside the edge of the acorn cup and slide the acorn nut inside. (Photo 18 and 19)

Optional Elements for Stretch Velvet Acorns
Just like with the DIY velvet mushrooms, you can add rhinestones, beads, or even sparkles to your velvet acorns. To see how to easily add rhinestones to your velvet acorns, check out the velvet mushroom post.
DIY Stretch Velvet Acorns – The Finished Product
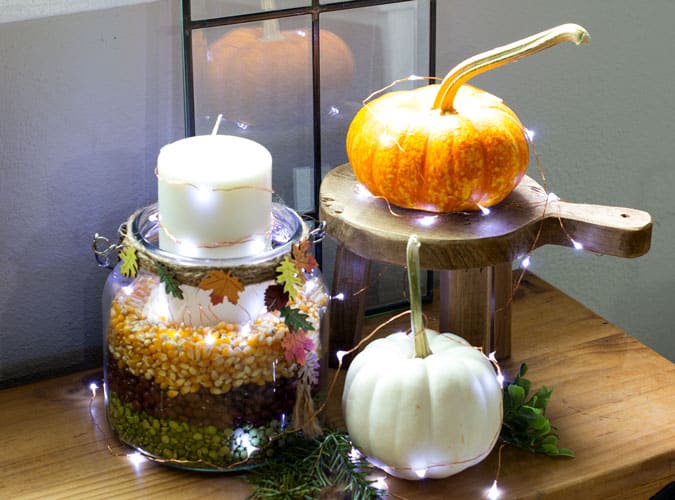
Now you can add your velvet acorns to your favorite fall vignette, autumn wreath, or even your Thanksgiving centerpiece!

These acorns look so pretty with amber bottles!

And, I decided to add some rhinestones to the deep red velvet acorn…

Do you like them better with the rhinestones, or without?

Let me know if you have any questions about how to create these sweet velvet acorns! They might just be my favorite velvet DIY so far… next to my pumpkins, and my mushrooms, and my…. 😉


Those velvet a thorns are so cute, Julie!! And thank you for doing all the testing to figure out what makes them sit right, too! (And, also, those velvet mushrooms are darling!)
Thank YOU for dropping in! They were both really fun to create!
I thought of you yesterday when seeing acorns laying in my yard. These are too cute.
Oh… that is so sweet! I always think of you when I smell or see lilacs! 😉
These are adorable. I would add ornament hangers or a gold cord to make them Christmas ornaments–perfect for a woodland themed tree! I’d use rhinestones for the ornament ones, leave the others plain!
That sounds great, Kathy! I heard at least one other person that is doing that, too! Are you doing a themed tree, or just think acorns are cute to add to your tree?
Gah! I LOVE these!! They are SO stinkin’ cute and can be used in so many ways!!!
Thanks, Rachel… I really love them, too!
These are so cute, Julie! Thanks for figuring out the hard stuff for us. Love the larger size of them!
Cute as a button Julie! You always have the best tutorials my friend. Pinning of course!
Oh, thank you so much, Michelle! Right back at ya!
Julie,
I love these cute acorns. I’ve pinned it for next year. Plus, I’m sharing on my Sunday, Dirt road Adventures.
Thank you SO much, Rachel! Can’t wait to visit the roundup this weekend!
Hi, this is my first time here. Found you on Shabby Art Boutique’s Create, Bake, Grow & Gather Linky Party.
I thought the acorns were adorable, then I saw your velvet mushrooms and fell out of my seat! Quite possibly the most beautiful fall element ever made, simple and stunning and I can’t wait to try making my own. Thank you for sharing the lovely tutorial and look forward to browsing some more.
Oh, thank you so much, Lorena! You truly made my day! Be sure to email me pictures when you’ve made your own! Be on the lookout for a couple new velvet Christmas projects, too!
Hi Julie- I love this idea and your velvet mushrooms so much that they will be featured on our Home Imagined Link party tomorrow. Thank you for joining our party.
Thank you so much, Anna! Double shout-out/feature??? What a blessing!
My pleasure Julie!
So lovely and elegant, Julie! We will be featuring you starting Wednesday at the Creative Crafts Linky Party!
Creatively, Beth
Thank you so much, Beth! Hugs!
Hi Julie! You know I love your velvet pumpkins, mushrooms, and now acorns! They are so darn cute! Great job figuring out how to make them and thanks for sharing with all of us! Happy day! Donna
Thanks, Donna… I have several more projects coming! So fun!
Julie,
I am really loving all these cute velvet DIY you have been making lately! You are the velvet queen. These acorns are adorable and perfect for any centerpiece or vignette. Thank you for stopping by the Home Imagined party and sharing. Pinned!-Meagan
Oh… you are so kind, Meagan… I have several more velvet projects coming! Hope I can get them all done!
These are great!!
Thanks! I love ’em, too!
Julie,
I love these velvet acorns. Congratulations, you are being featured on Thursday Favorite Things. https://www.eclecticredbarn.com/2022/11/first-thursday-favorites-party-in.html
Hugs,
Bev
Aw… thank you so much, Bev! So kind of you!
These velvet acorns are SO sweet! Never would’ve thought to use styrofoam eggs and air dry clay! I love that the cups are real, and the rhinestones add such a pretty touch. Pinned and sharing on FB!
Thank you, Crissy… they are a new fave of mine!
These are so creative, Julie! And adding the clay to weigh them down is genius!
Thanks, Janet… the clay works GREAT! 🙂
These are the cutest thing Julie! The perfect compliment to your velvet mushrooms. SO fun and great decorating pieces. Loved seeing them at the Home Imagined link party. Thanks friend. XO- MaryJo
I’m so happy to be joining the party! Thank you!
SO stinkin’ cute! Hope I can find some down time to make some for myself. Love these! Thank you for linking up on Farmhouse Friday. Featuring them tomorrow. Blessings! pinned again!
These acorns couldn’t be any cuter Julie… I love them!
Thank you for sharing your DIY velvet acorns at Create, Bake Grow and Gather this week. I’m delighted to be featuring this project at tonight’s party and pinning too.
Hugs,
Kerryanne
Super cute and well done. Thanks for your time in working through all the processes to share the final product with us.
Thank you for sharing your links with us at #282 SSPS Linky. See you again next week.
Thanks, Esme!
Hi Julie – First, I have to say, I always love this acorn post and your mushroom post. I think it’s genius to use clay around the foam. Thank you for sharing this post with the Home Imagined Link Party. Also, I hope you and your Mom had a better week.
Thanks, Anna! Appreciate the well wishes, too!
These little acorns really are the sweetest decor item, Julie. Thanks for sharing the DIY… I’m featuring them at the party tonight and pinning too. ♥
Thank you, again, for the feature, Kerryanne! Would love for you to share your posts at TTA, if you have the time!